
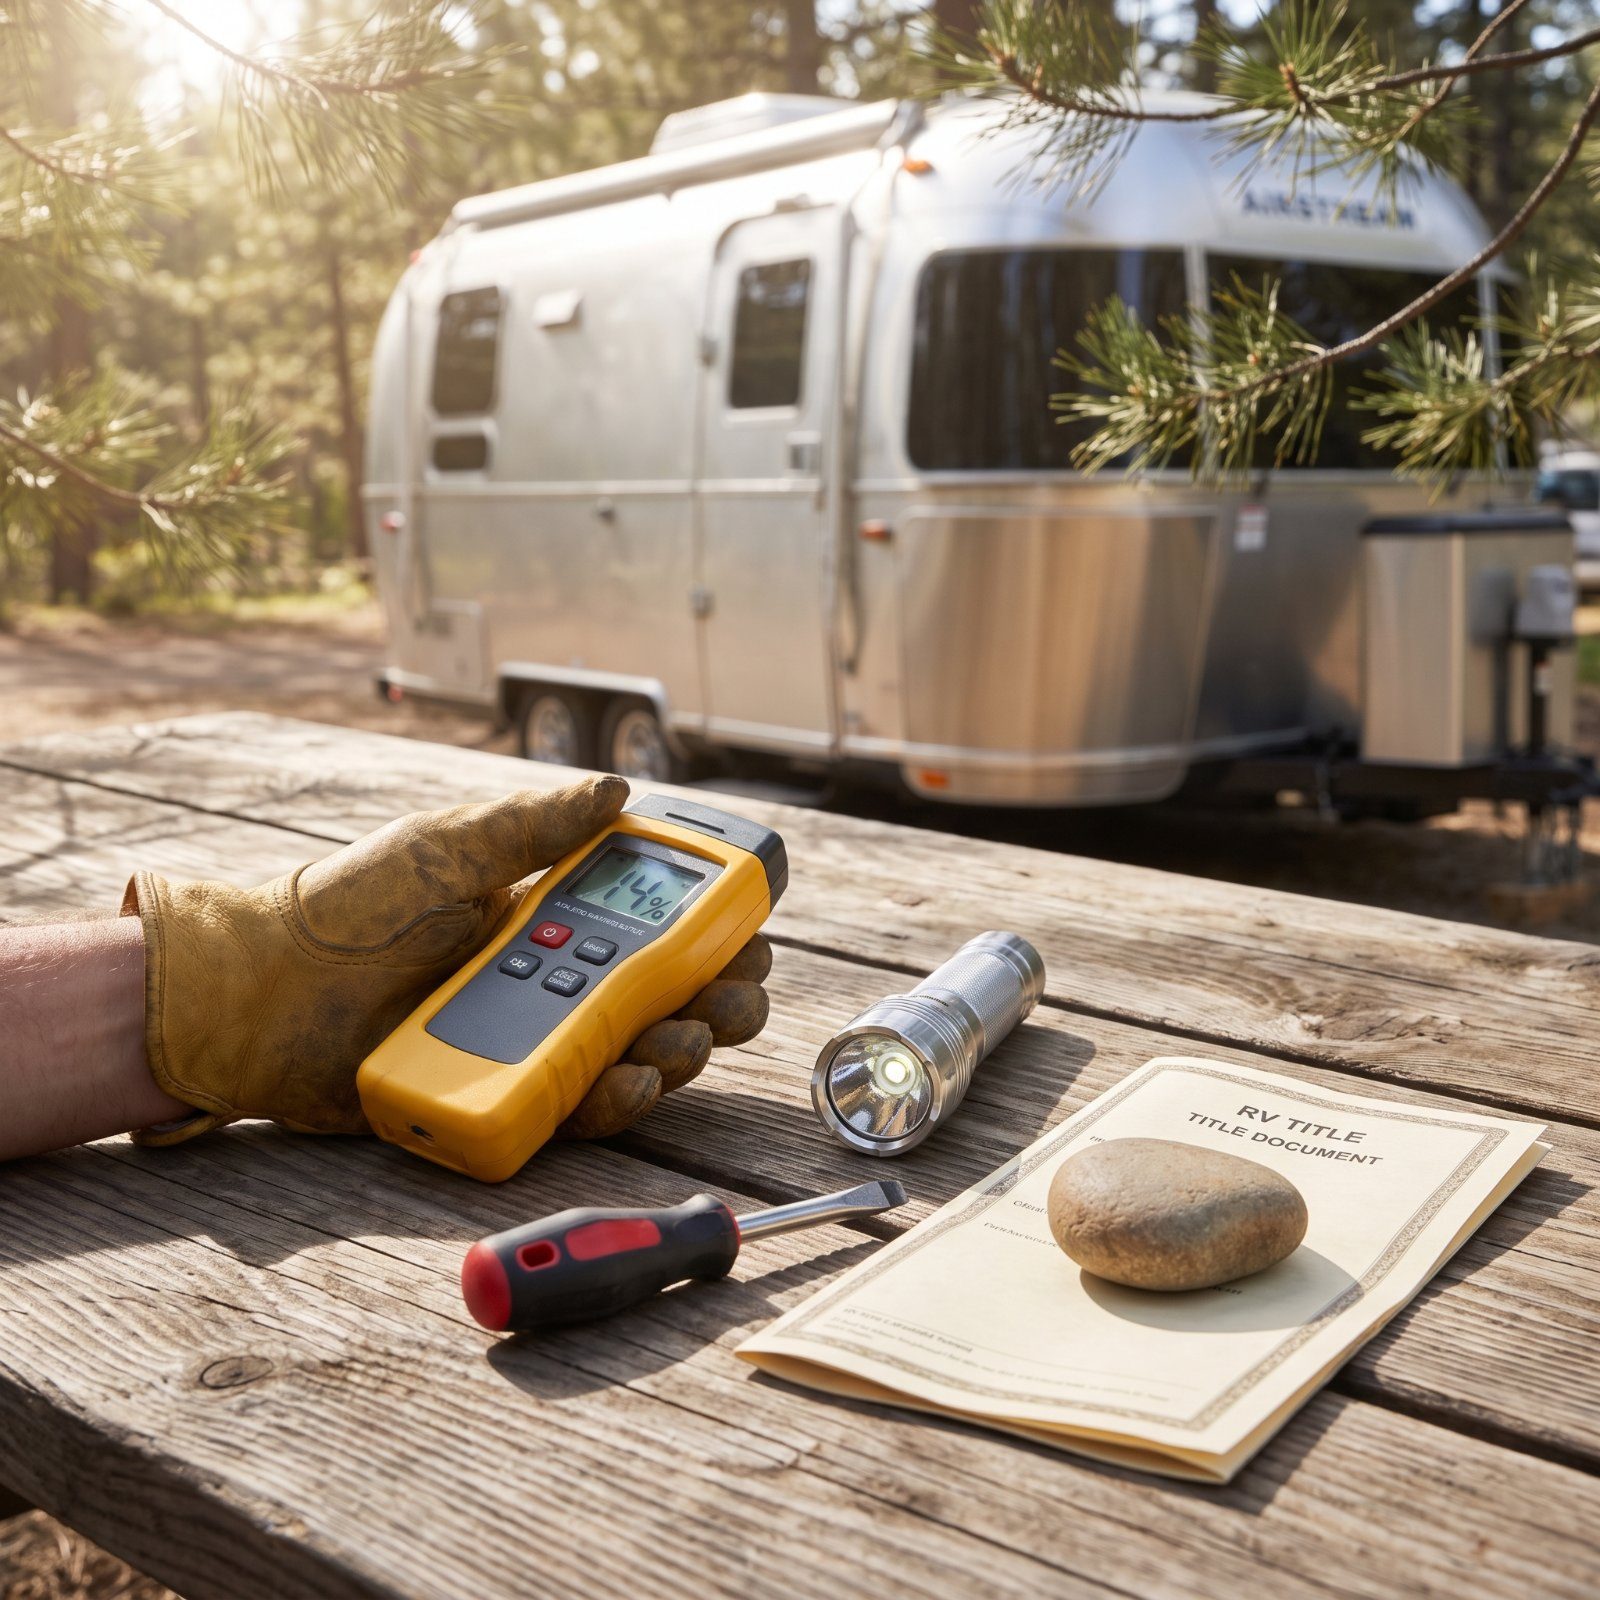
Water is what kills RVs. Not mileage, not age, not a tired engine. Water. It sneaks in behind a seam you can’t see and quietly eats the frame while the carpet still smells fine. Good news, though: most of the expensive problems leave fingerprints, and once you know where to press, poke, and sniff, you can catch them before the money leaves your hands. Here’s what to look for, and when to walk.
39. A Moisture Meter That Spikes Behind a Clean-Looking Wall
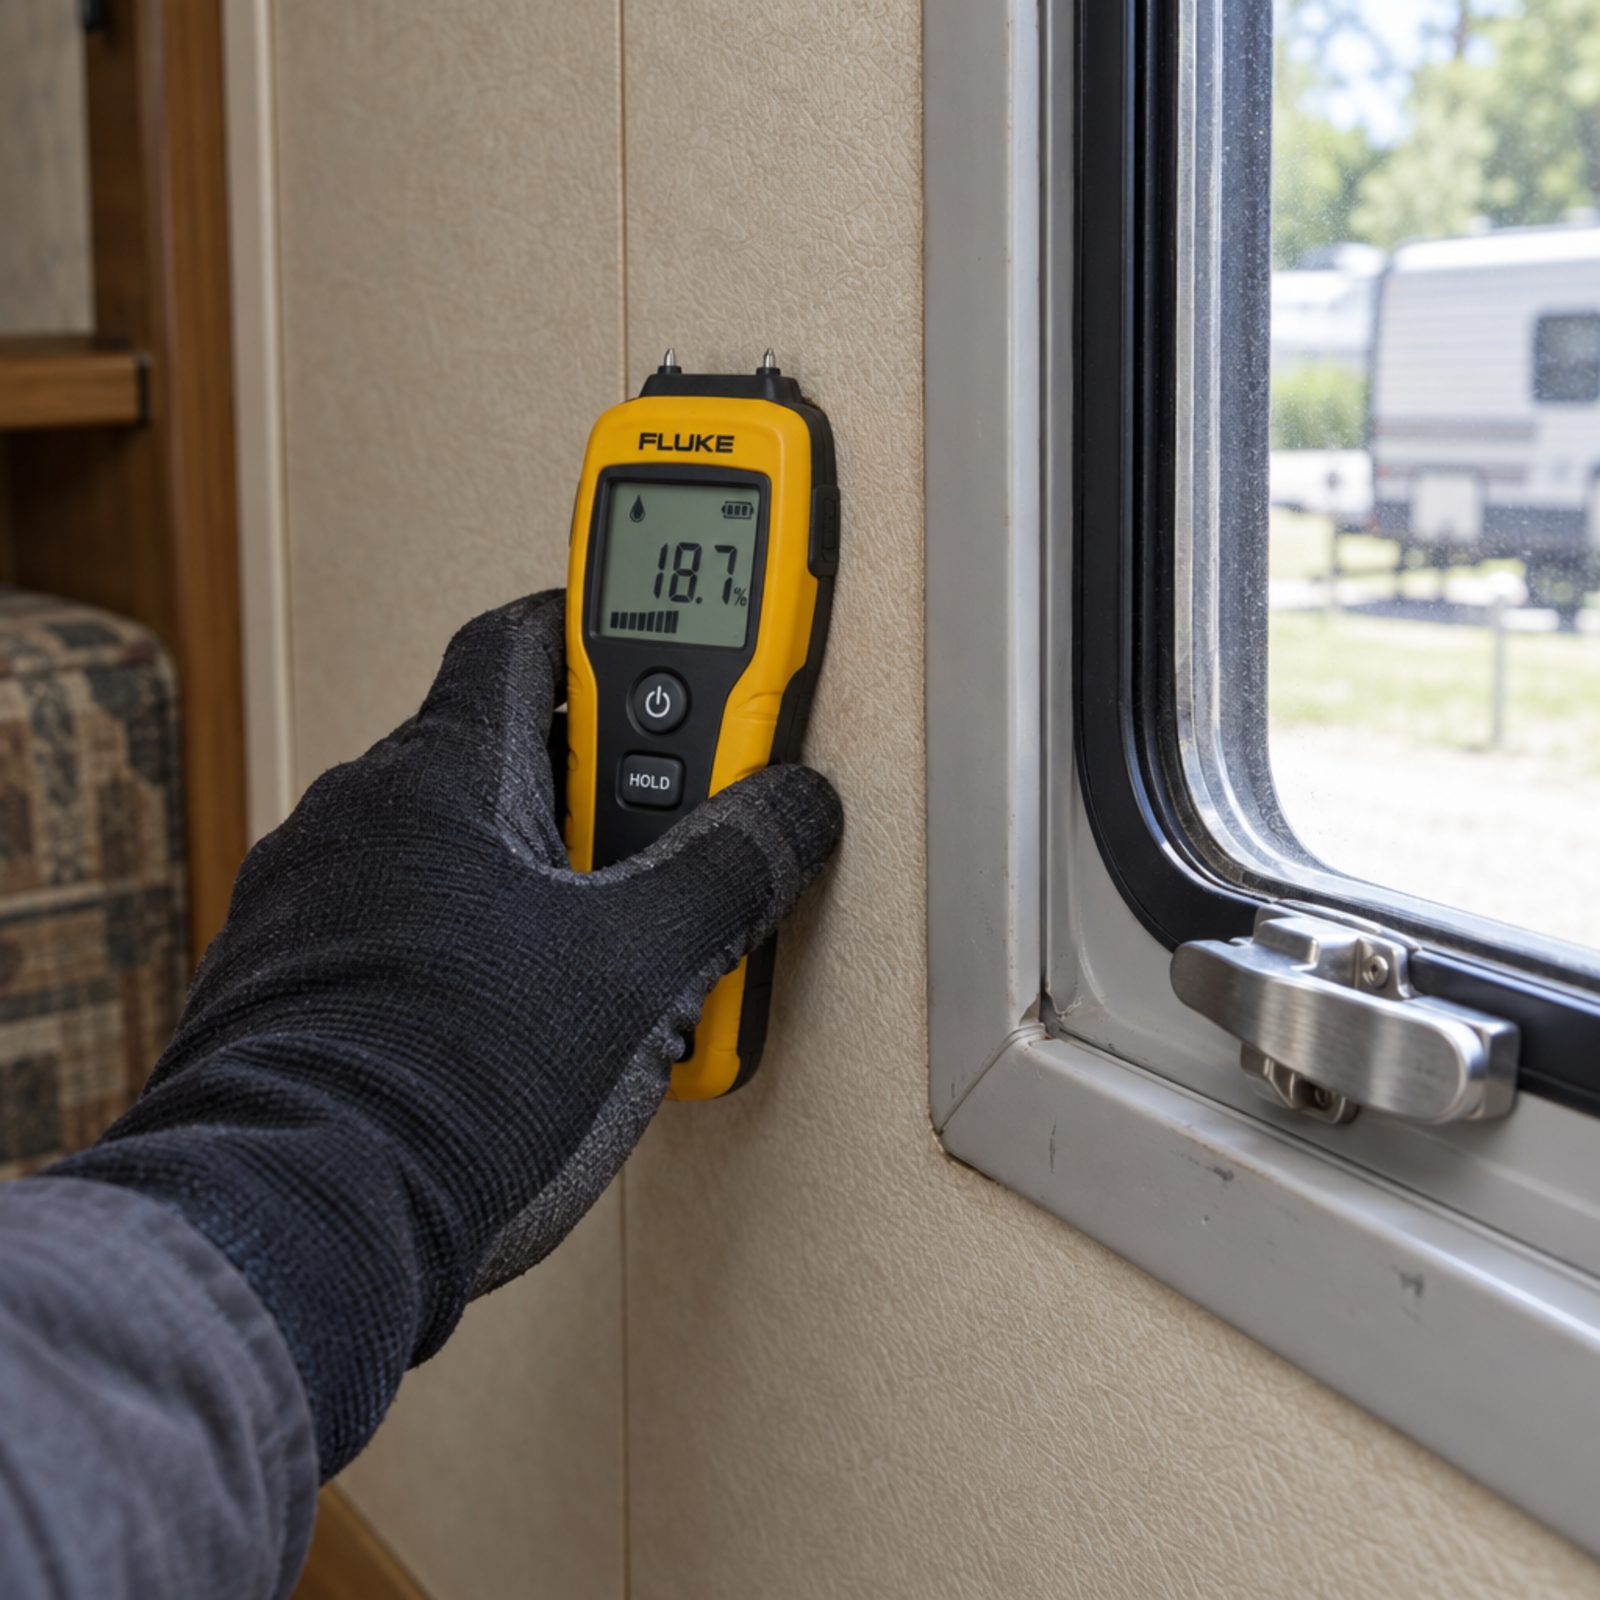
The wall looks perfect. That’s exactly why you bring the meter. A pin-type moisture meter runs around forty bucks and takes its readings through two small metal pins on top of the unit, and the walls around windows, slide-outs, and the roofline are where it earns its keep. Hold the meter against the wall, watch the number, then move it six inches and watch again.
A spike behind a wall that looks bone dry means water is already living in the structure. Painted paneling hides stains beautifully, which is the whole problem, because by the time you see a brown ring the wood behind it has been soft for a season.
Walk the whole interior perimeter, pausing at every window corner and the base of every wall. One isolated reading near a known leak is a conversation. Spikes in three unrelated spots is your cue to close the door and go.
38. Roof Decking That Feels Spongy Underfoot

Climb up if the ladder will hold you, or send someone who can. Walk the roof slowly and feel for the give. Solid decking feels like a floor; rotted decking feels like stepping on a wet sponge wrapped in rubber, that soft downward sag your foot knows is wrong before your brain catches up.
Spongy roof decking means water got under the membrane and the plywood has been quietly composting ever since. Replacing a roof deck is one of the biggest bills in RV ownership once you count the membrane, the labor, and whatever the shop finds when they peel it back.
Press around every roof penetration and seam: the roof vents, the sealed center seam, the vent flanges, the edges along the sides. Those are your leak points. If the area around a vent or the seam sinks under your weight, you’ve found exactly where the next owner’s savings account goes.
37. Globs of Fresh Sealant Hiding Older Roof Repairs
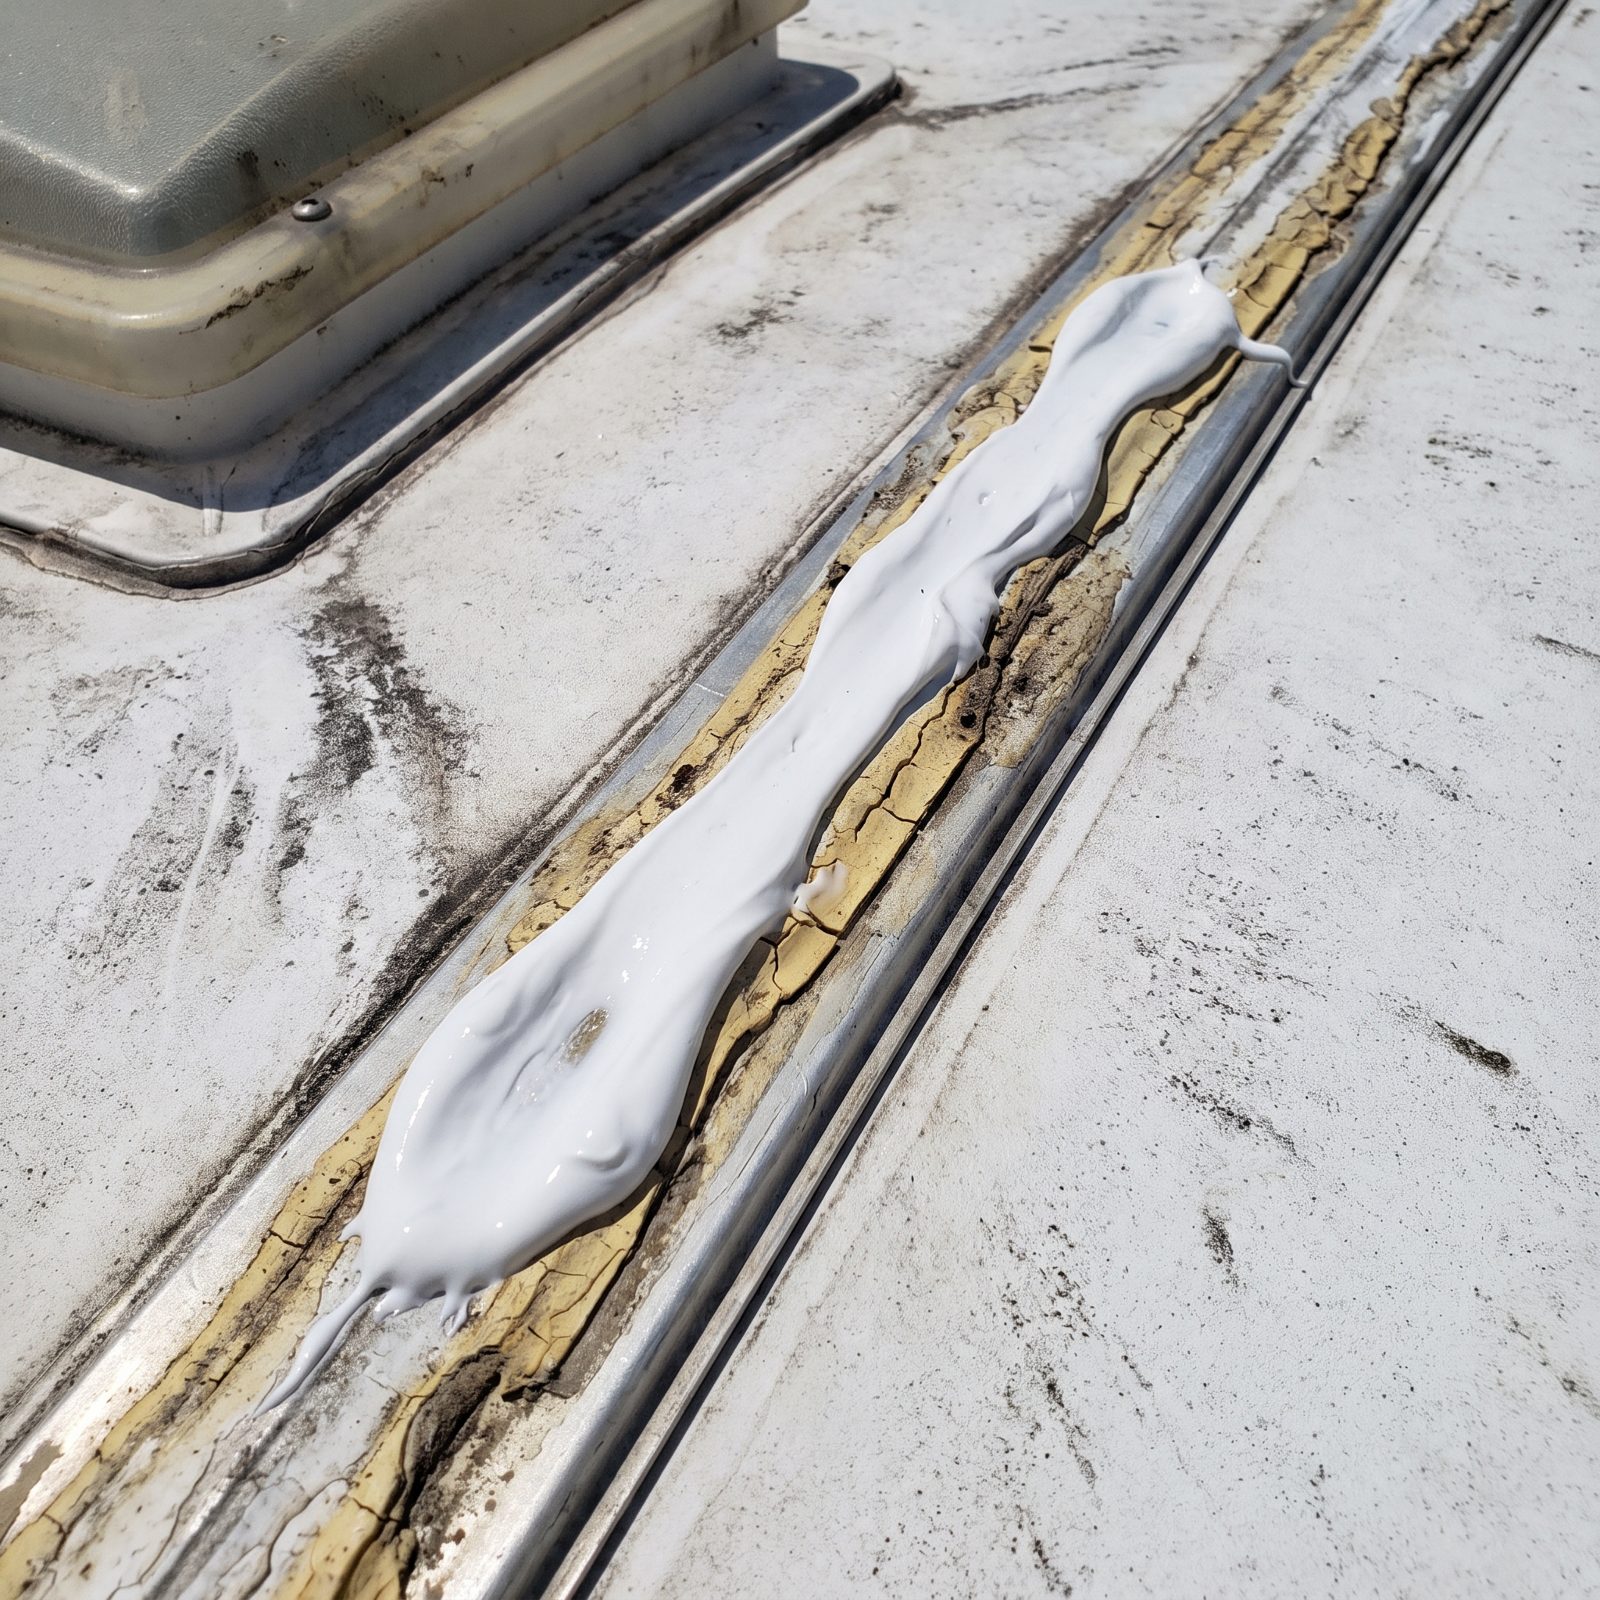
Fresh sealant is not a sign of care. It’s a sign of a recent problem someone hoped you wouldn’t ask about. You’ll spot it right away: bright white beads slathered over brittle yellow caulk, a thumb-smear finish, a glob where a neat line should be.
And here’s the trap. Caulk piled over caulk piled over more caulk doesn’t fix a leak, it just delays the day you find the rot, because somebody kept smearing the symptom instead of pulling the trim and solving the cause.
Ask when the roof was last resealed and who did it. A real reseal means old sealant removed, clean surface, fresh bead, documented. A mystery pile of caulk from last week, right before the listing went up, tells you where to point the moisture meter next.
36. Bubbles or Ripples in the Exterior Sidewalls
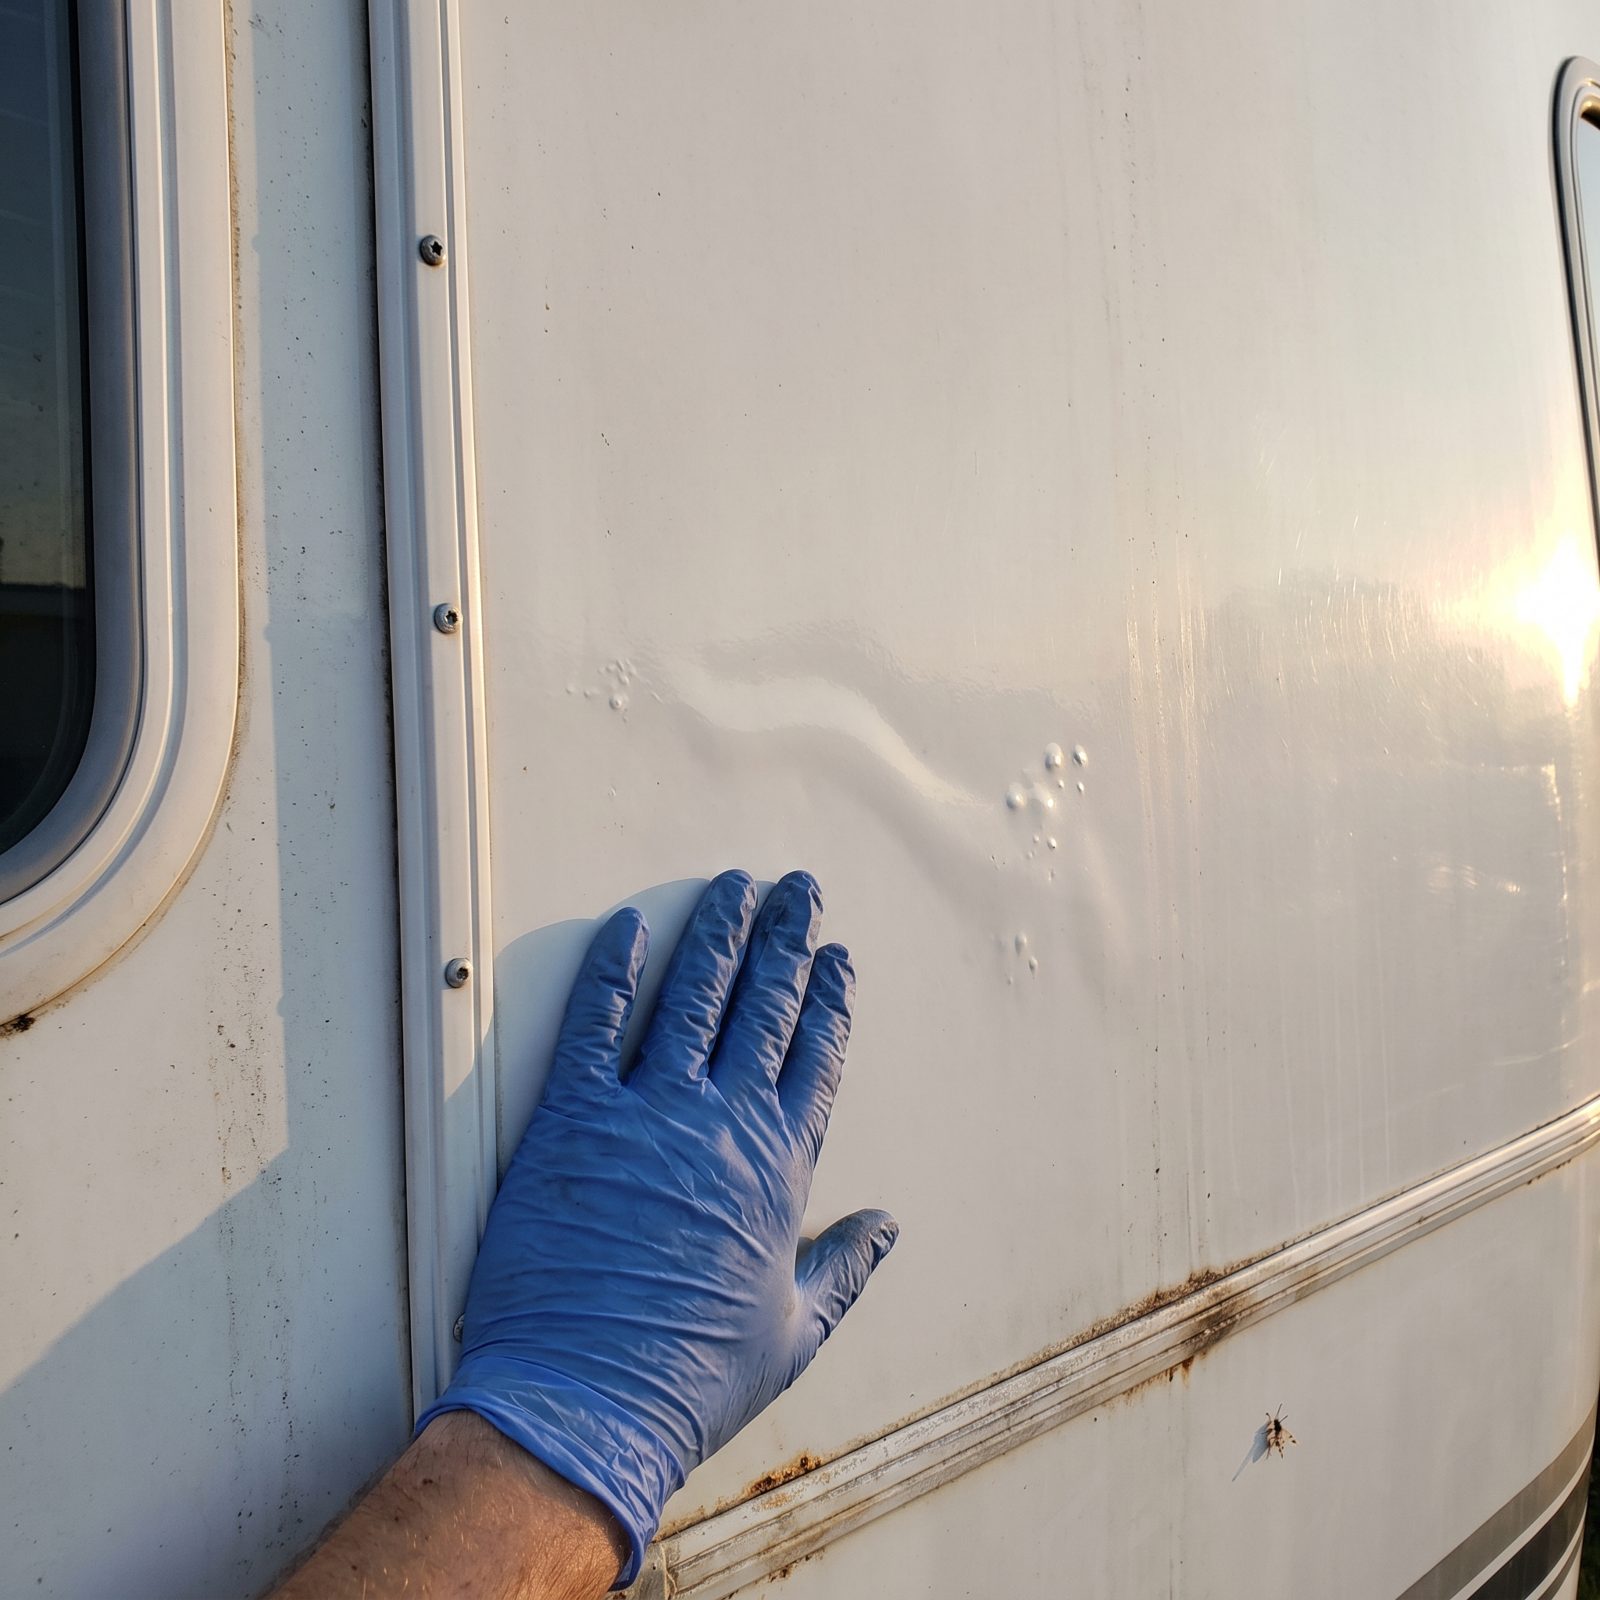
Stand at one end of the RV and sight down the sidewall the way you’d check a board for a warp. Low morning or evening light is your friend, because it rakes across the surface and throws any ripple into shadow. A flat wall stays flat. A troubled one shows waves, blisters, or soft bubbles where the fiberglass has pulled away from the backing.
Those bubbles are delamination. Moisture or heat has broken the bond between the fiberglass and the luan and foam behind it, and it only spreads from there. Fixing it right means replacing wall sections. Big money, and almost nobody does it on a trade-in.
Press gently on any suspect spot. If it flexes or crackles under your palm like a bag of chips, the bond is gone. One small bubble near a seam you might live with and negotiate. Rippling across a whole panel is a structural goodbye.
35. Rot Along the Underside of a Slide-Out Floor
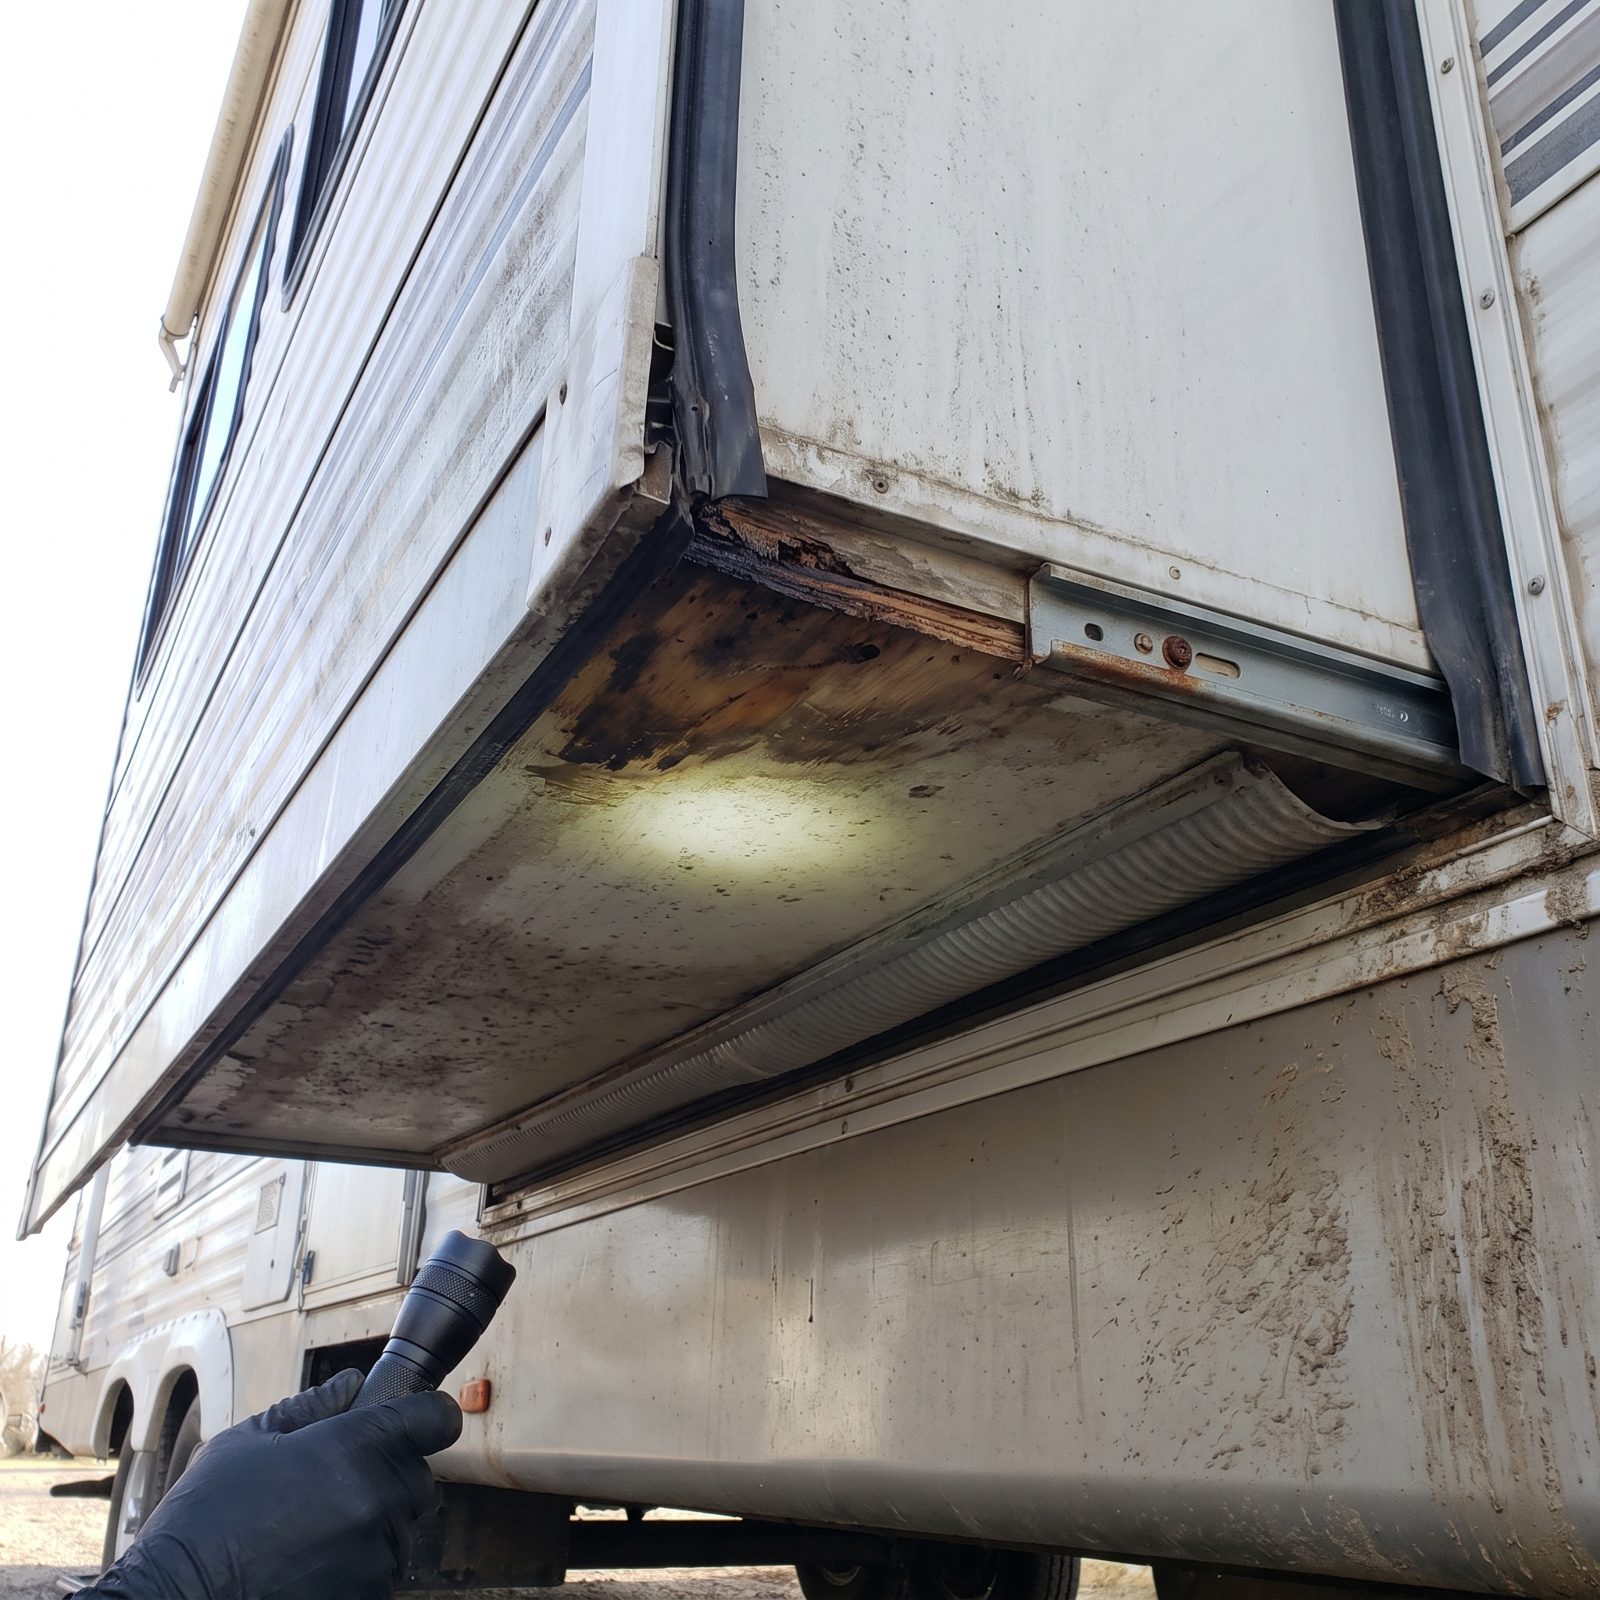
Slide-outs are among the most common sources of trouble on used campers, and the underside is where any damage hides. Run the slide all the way out, then get a flashlight on the underside of the slide floor and the corners. You’re looking for dark staining, soft wood along the outer edge, or anywhere the plywood has gone the color of a used tea bag.
These floors fail from the corners and edges in, because that’s where water gets past worn seals and collects. Once it’s soft, the whole slide can sag, the seals stop sealing, and the mechanism eventually binds, which leaves you with a slide-out stuck halfway open.
Poke the suspect edge with a screwdriver, gently. Firm wood says no problem. Wood that gives like damp cardboard says keep looking at other campers.
34. A Slide-Out That Sits Crooked in Its Opening
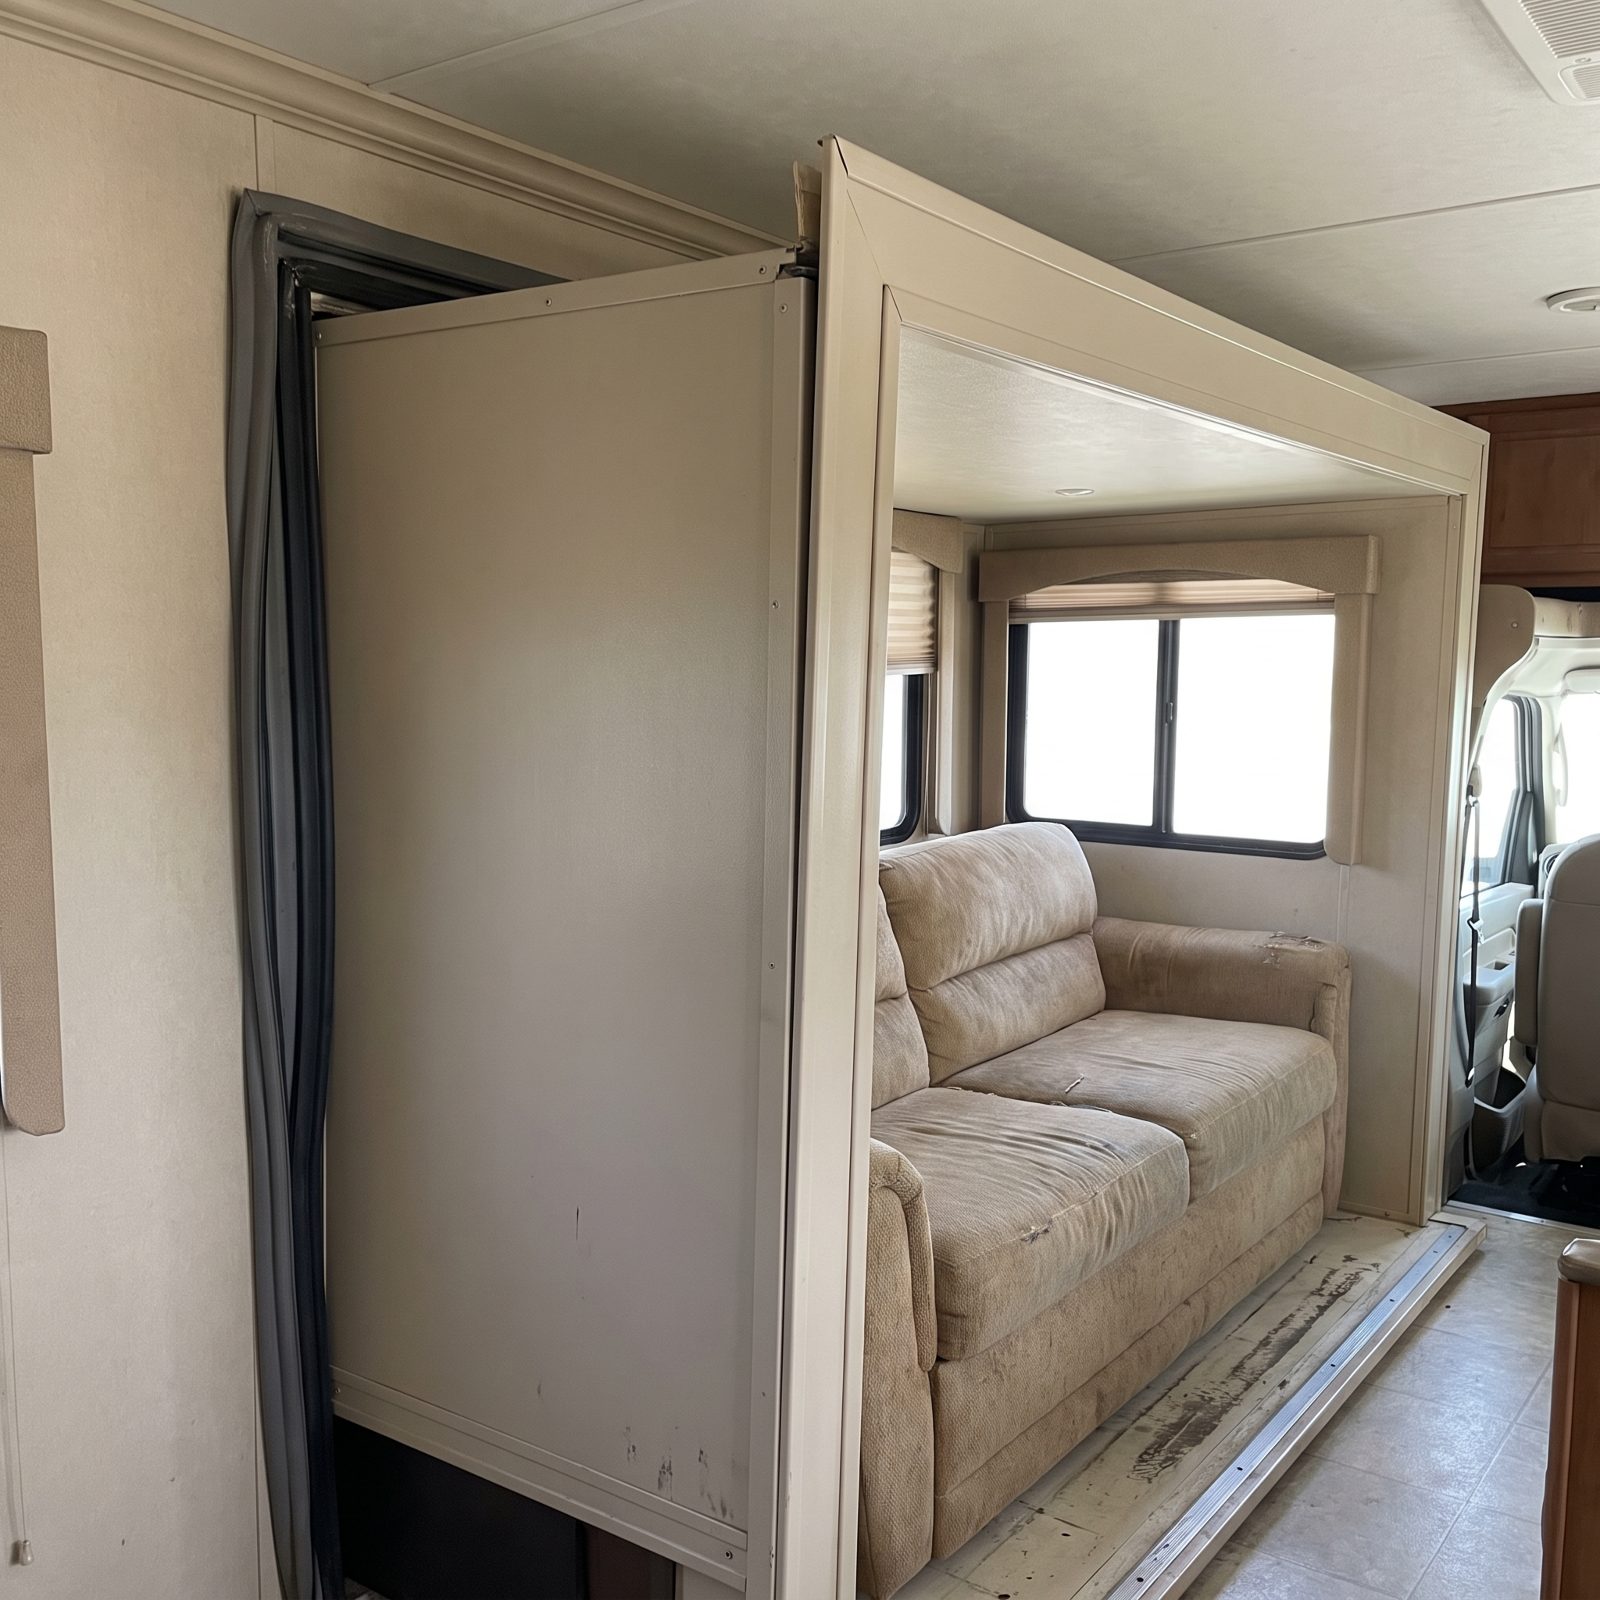
Extend the slide and look at the gaps all the way around it, top and sides. They should be even, like a well-hung door. When one top corner shows daylight and the other is crushed tight, the slide is sitting crooked, and crooked is never just cosmetic.
It points to a worn mechanism, a damaged rail, or a floor that has already begun to sag under the weight. It also means the seal can’t seat evenly, so it leaks, which rots the floor, which makes it sag further. A nasty little loop that feeds itself.
Run it in and out two or three times. Listen for grinding, watch for hesitation, check whether it seals flat against the gasket when closed. Smooth and even is the goal. Jerky, tilted, or straining is a repair bill waiting in the dark.
33. A Soft or Swollen Entry-Door Threshold
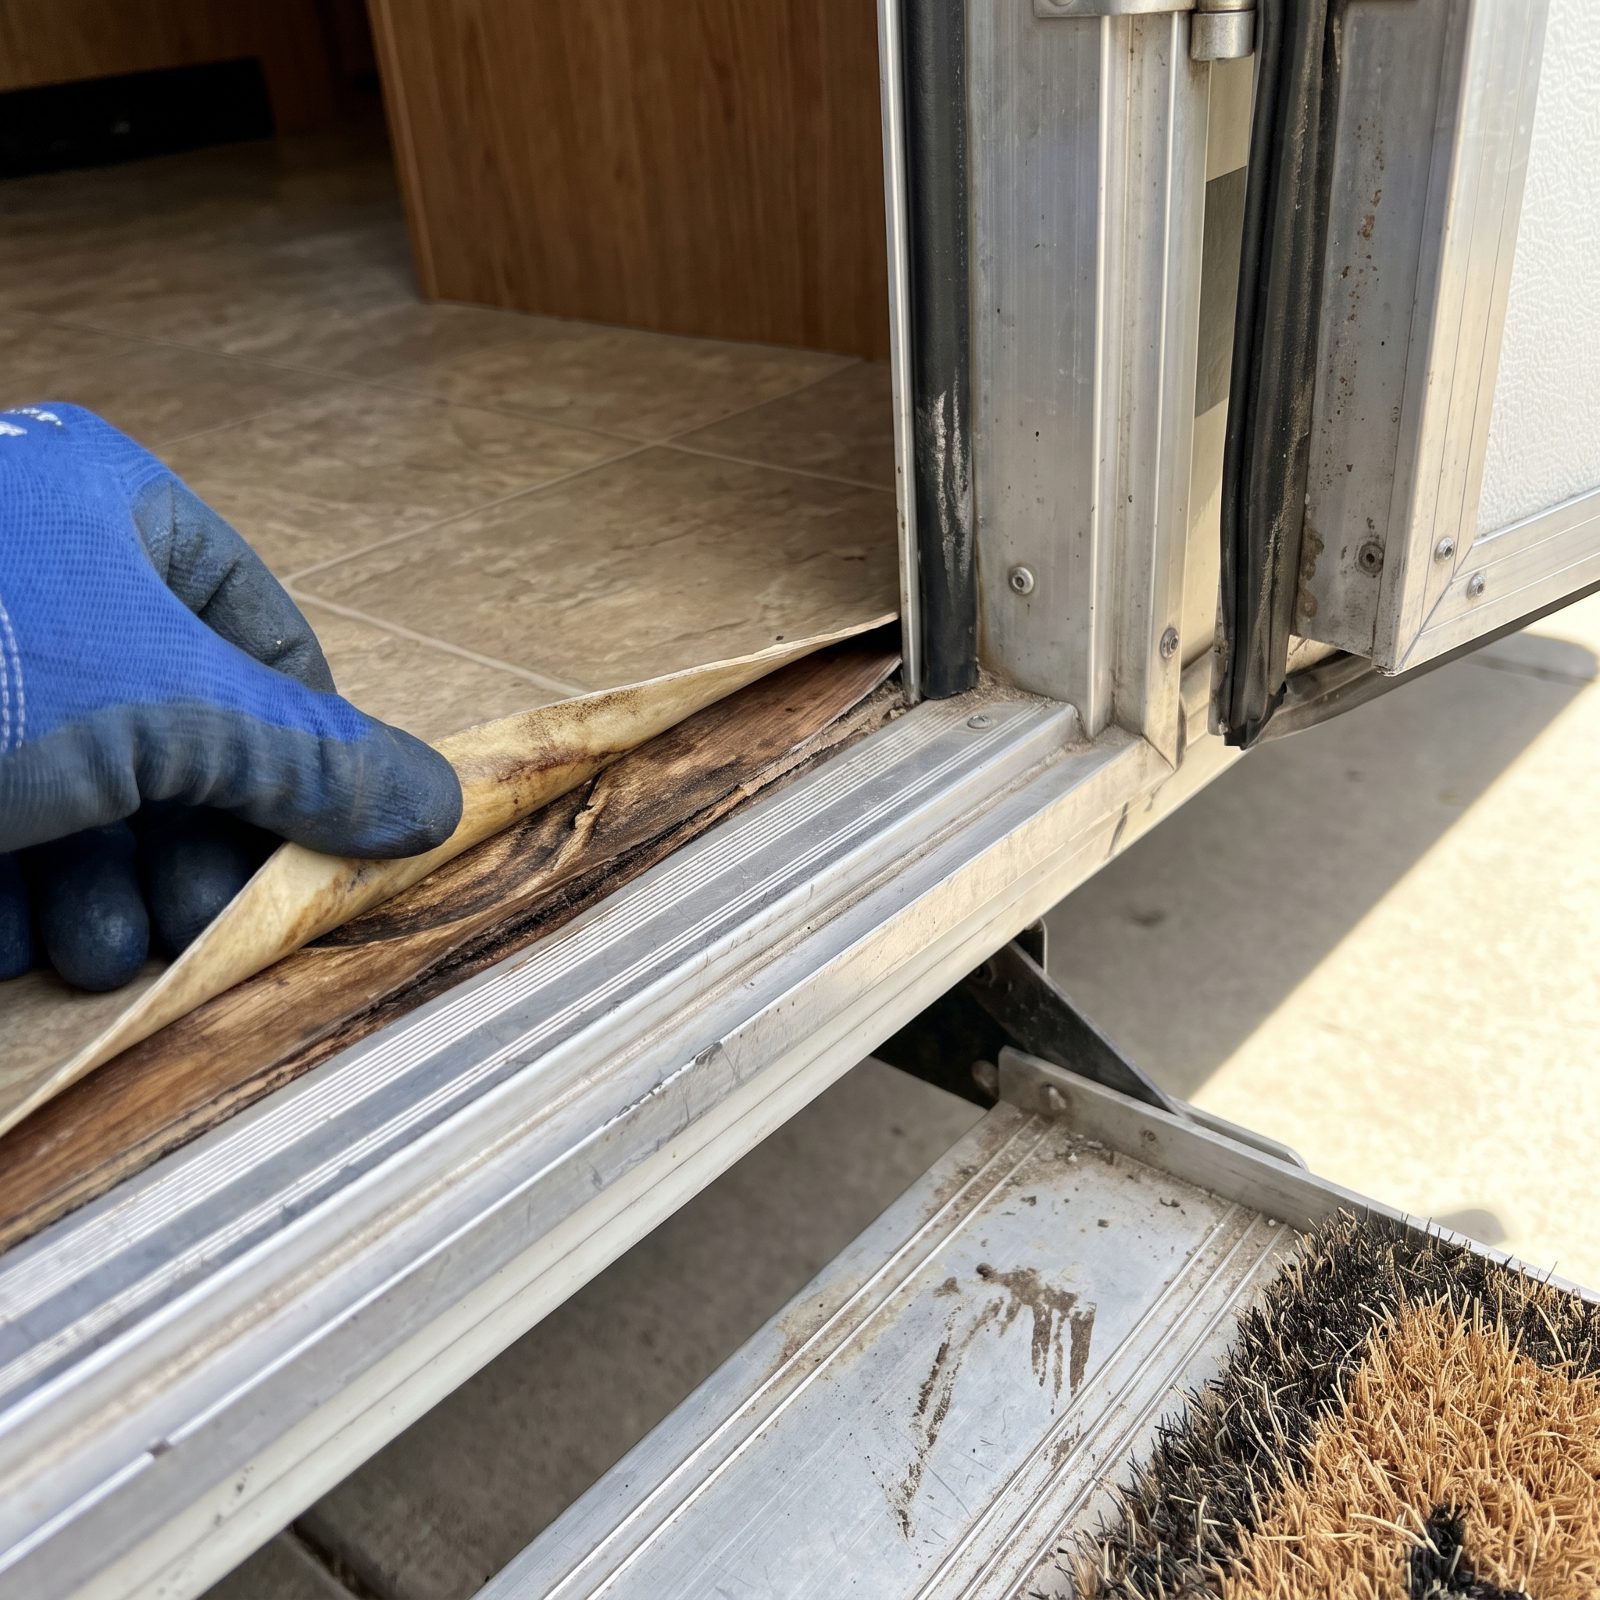
Everyone steps on it a thousand times and nobody inspects it. The entry-door threshold takes rain off your shoes, water running down the door, and every muddy boot for years, which makes it the first floor section to fail in a lot of rigs.
Step on it with your full weight and feel for softness or a spongy give. Look for flooring lifting or curling at the edge, and for wood that’s swelled up past flush. That swelling is the plywood subfloor drinking water and expanding.
A soft threshold rarely stays local. The water that ruined it has usually traveled under the flooring toward the center of the rig, so treat it as a clue, not a standalone problem. Pull up the nearest floor vent and feel the subfloor edge underneath while you’re down there.
32. Flooring That Flexes Around the Toilet
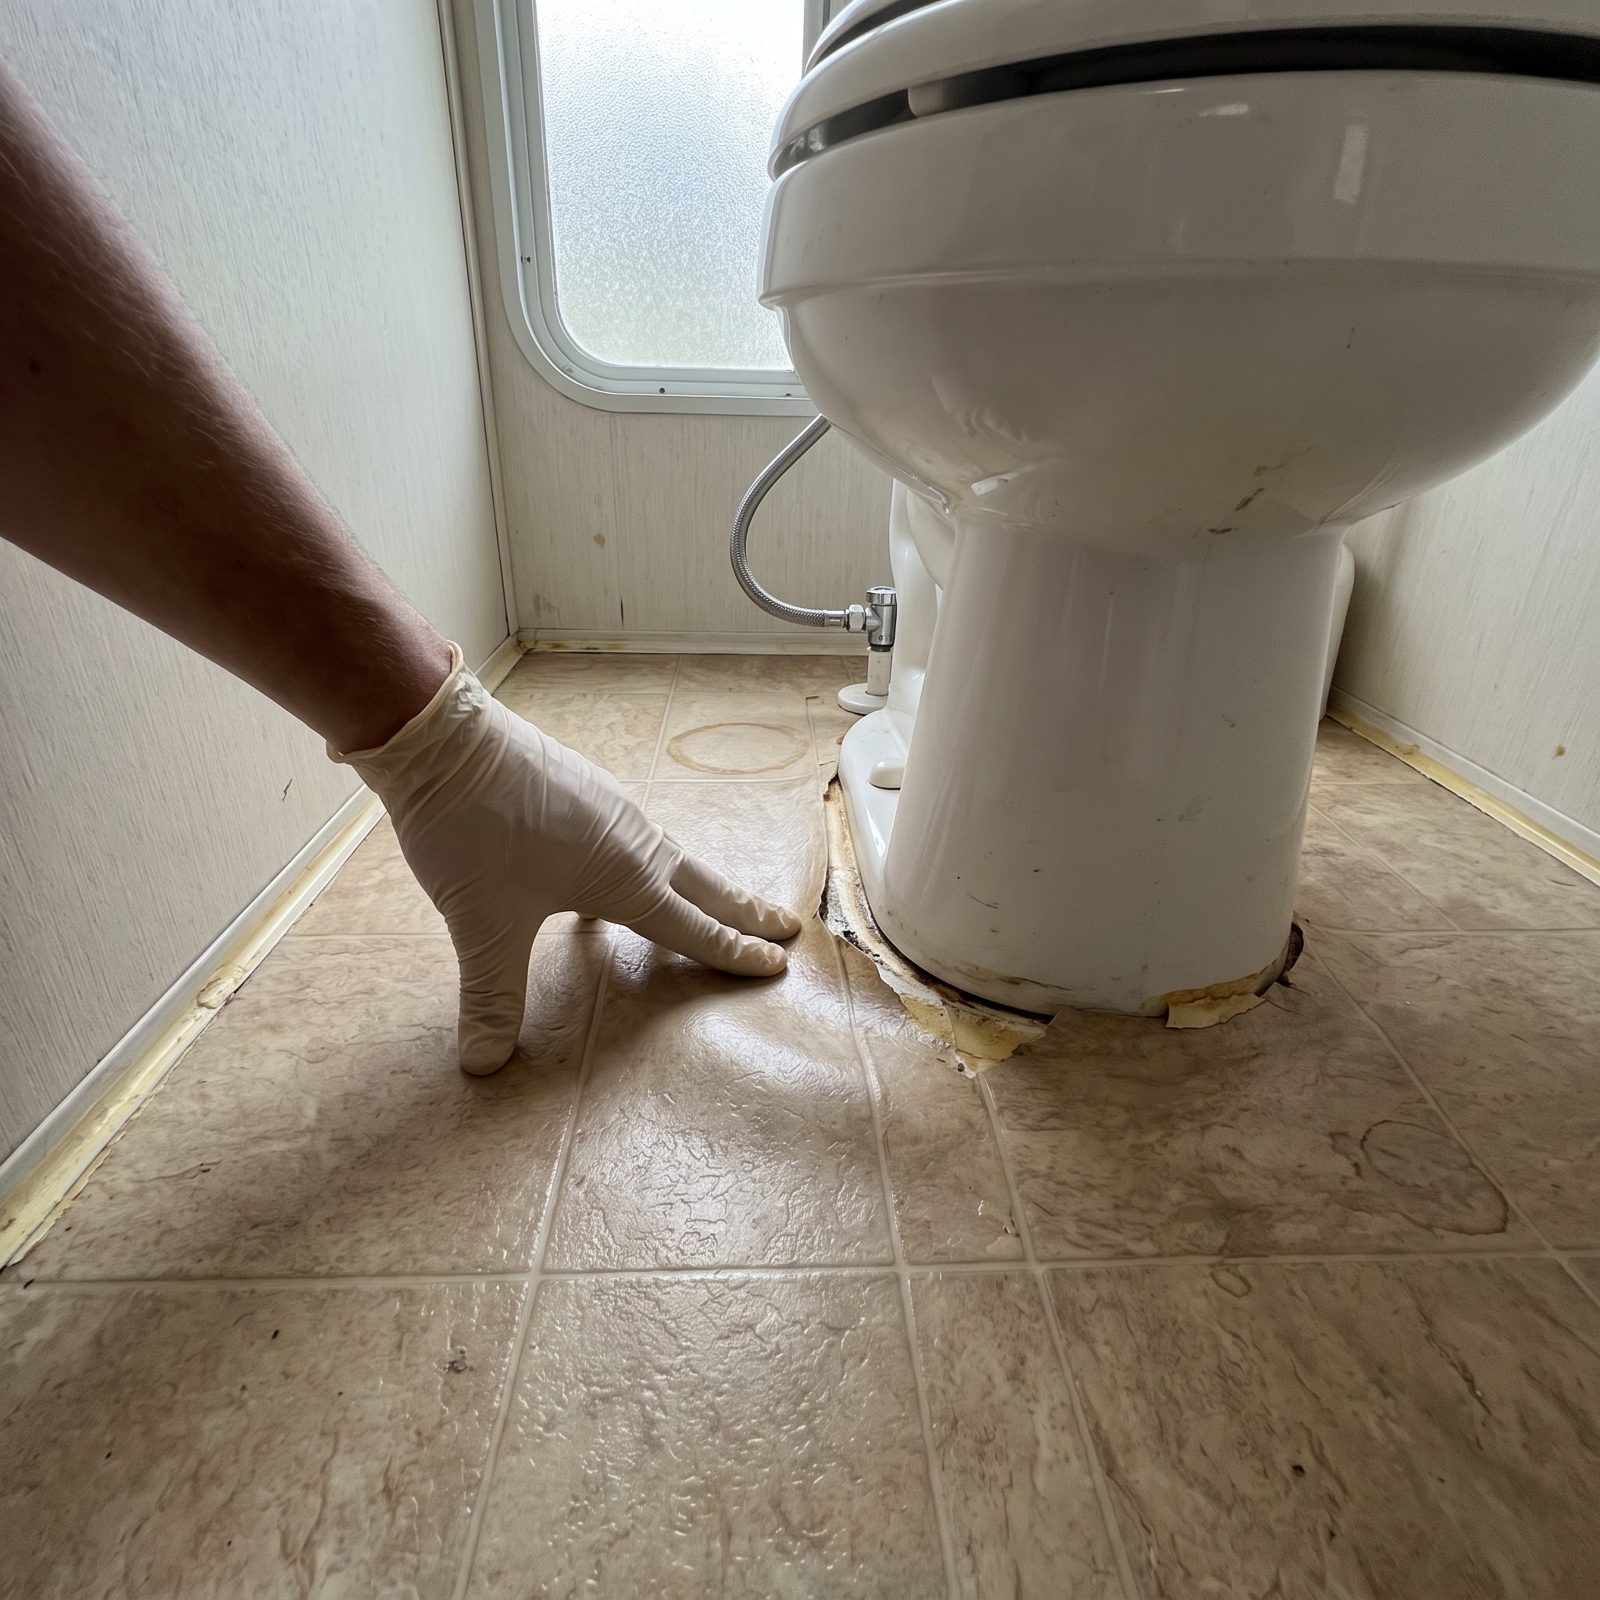
Put a hand flat on the floor right beside the toilet and press, then rock the toilet gently side to side. Both should feel solid. A floor that flexes, or a toilet that wobbles on its flange, is telling you the subfloor under it has gone soft.
Usually the culprit is a slow seal leak at the flange, the kind that wicks water into the plywood a teaspoon at a time for years. By the time the floor flexes, the damage is well underway, and a toilet reseat plus a subfloor patch in a cramped RV bathroom is fiddly, smelly work nobody enjoys.
While you’re down there, sniff. A persistent sewer smell near a flexing floor isn’t a tank issue. It’s a seal that’s been failing long enough to rot something.
31. Mold or Dark Staining Beneath the Mattress Platform
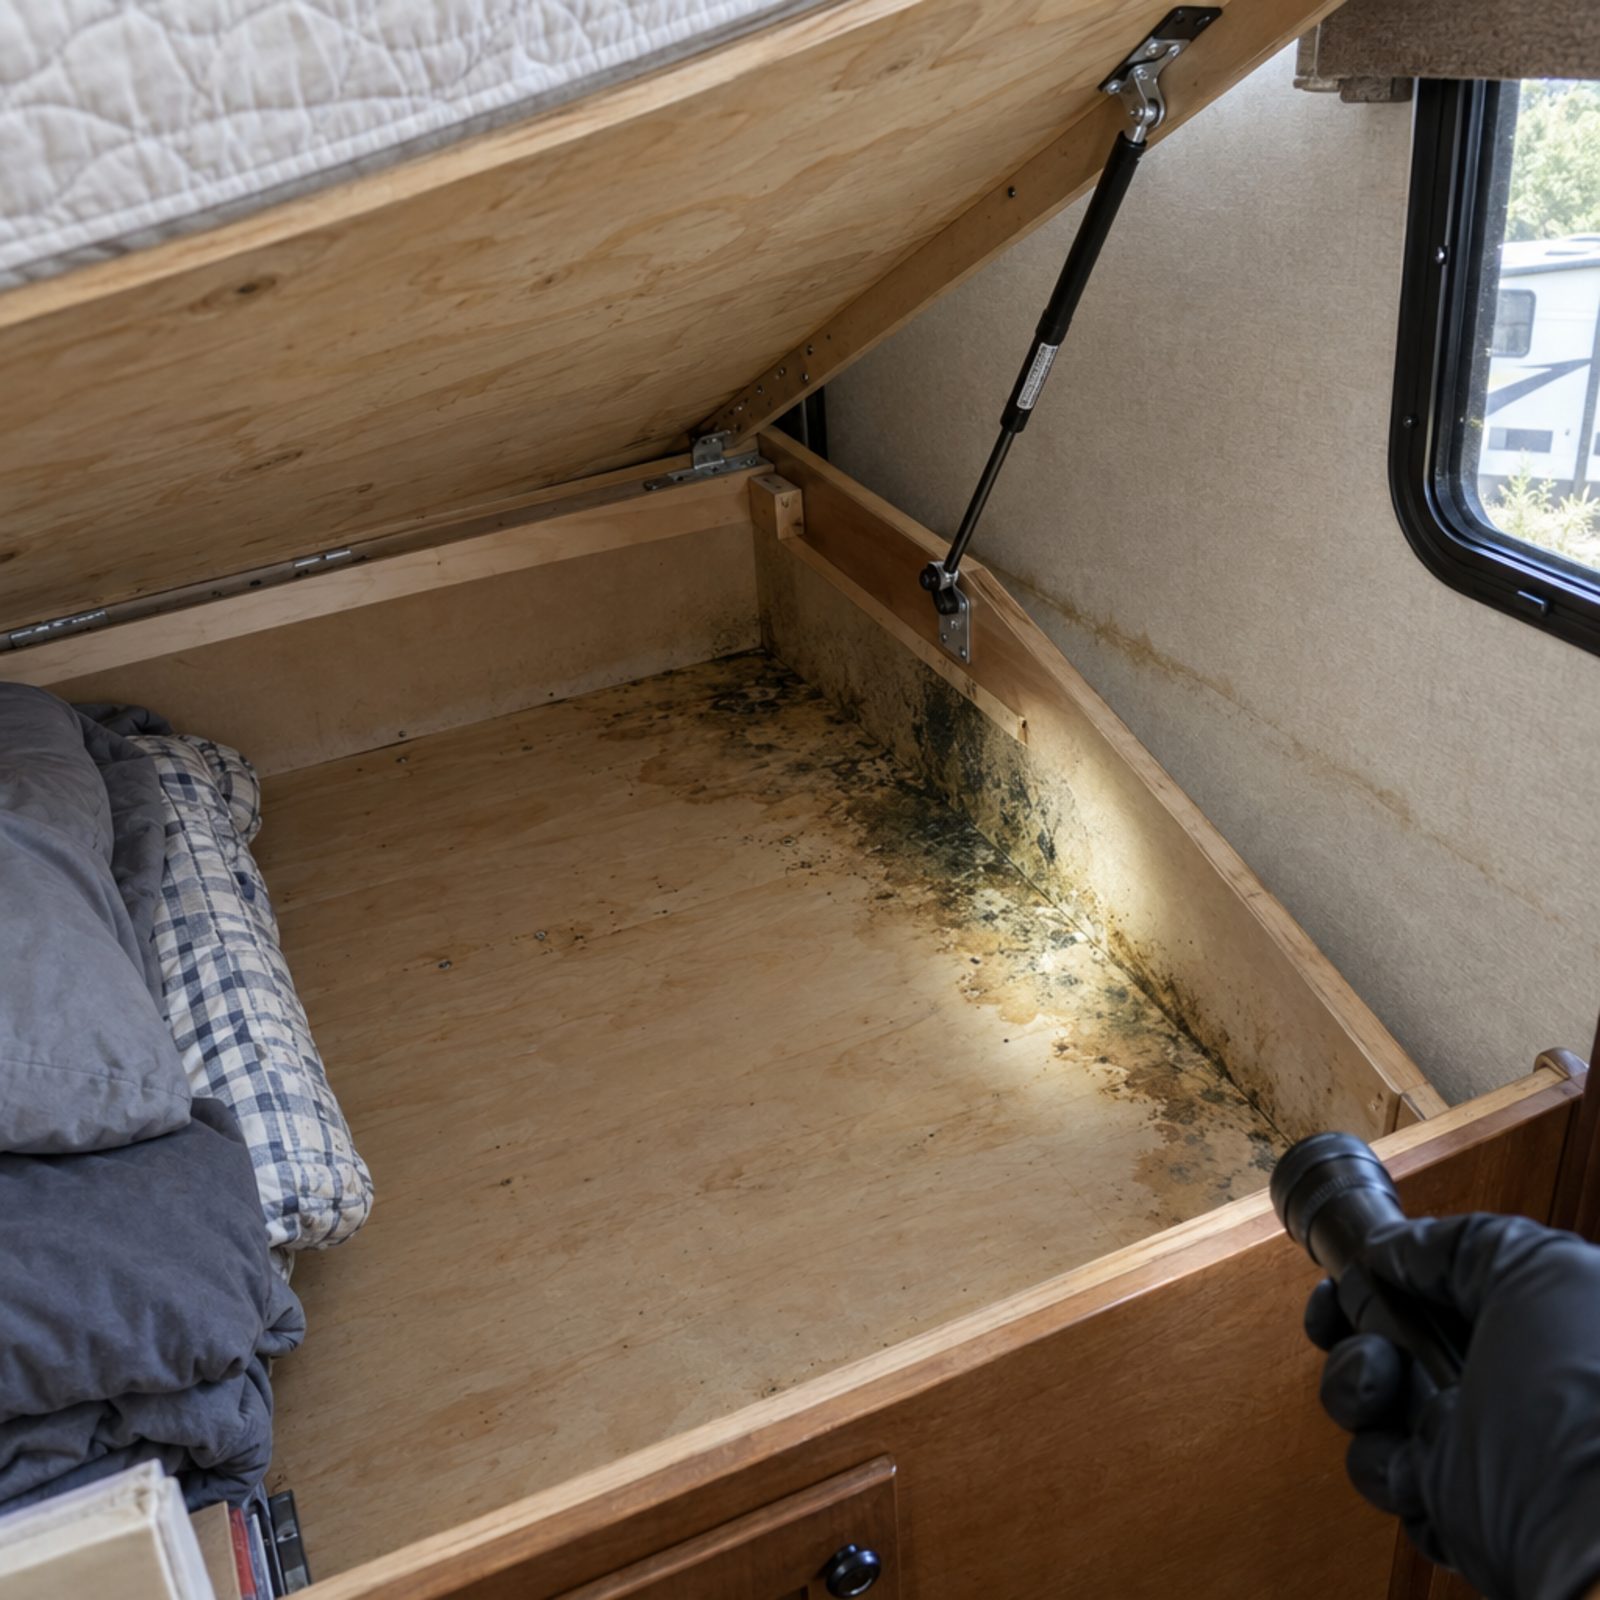
Lift the mattress. Every single time. The bed platform sits against an exterior wall at the back of the rig, usually right under a window and often near the roofline, which makes it a quiet collector of leaks nobody notices because it’s buried under a mattress and a quilt.
Dark staining or fuzzy mold on the platform or the wall behind it means water has been sitting there long enough to grow things. And beyond the repair cost, mold in a sealed space you sleep six inches above is a health problem, not just a structural one.
Get your nose in there. A musty, damp-basement smell under the mattress often shows up before the stain does. Trust it.
If the bedroom smells faintly of a wet towel that never dried, the RV is telling you something the seller hoped the air freshener would cover.
30. Rodent Droppings Inside Drawers and Utility Bays
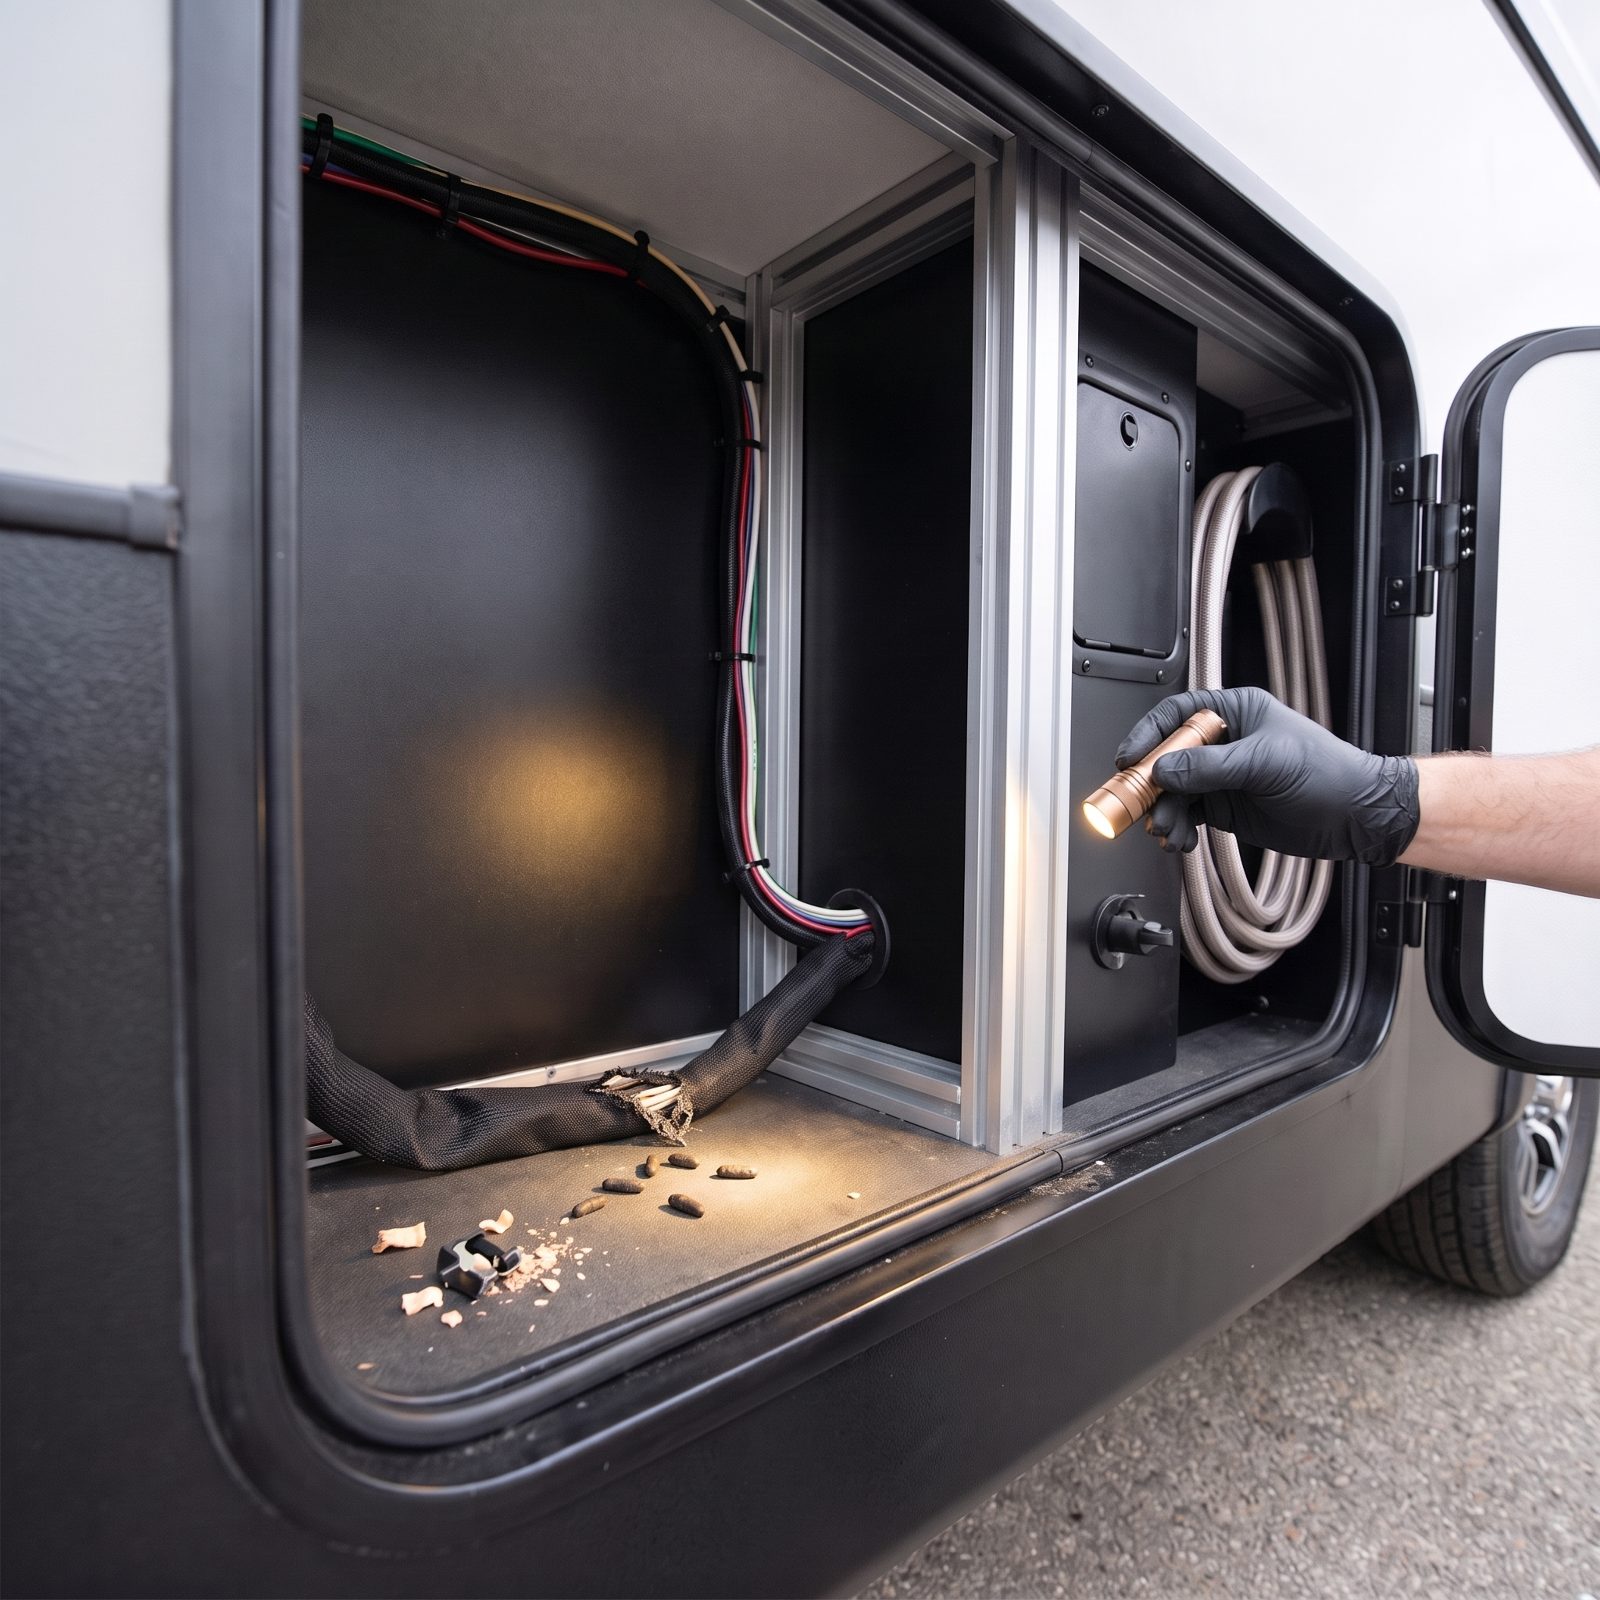
Open every drawer, cabinet, and exterior bay with a flashlight. You’re hunting for droppings of any size, including larger greenish-brown pellets from bigger rodents, shredded insulation pulled into nests, and chewed edges on anything soft. Behind the water heater, in the pass-through storage, under the dinette, those are the five-star suites for rodents.
Droppings aren’t just gross. They’re a warning about everything you can’t see. Rodents chew wiring insulation, and a nibbled 12-volt wire is a dead circuit or a short that can smolder. They also mean the rig sat parked and unused somewhere a rodent could get comfortable, which tells you plenty about how it was stored.
Follow the evidence to the wiring. Any gnawed sheathing in a bay is a fire and failure risk, and tracking down chewed wire runs buried in the walls is the kind of hunt that turns a weekend into a month. Fresh droppings mean they may still be living there, rent free.
29. A Sagging or Waterlogged Underbelly Cover
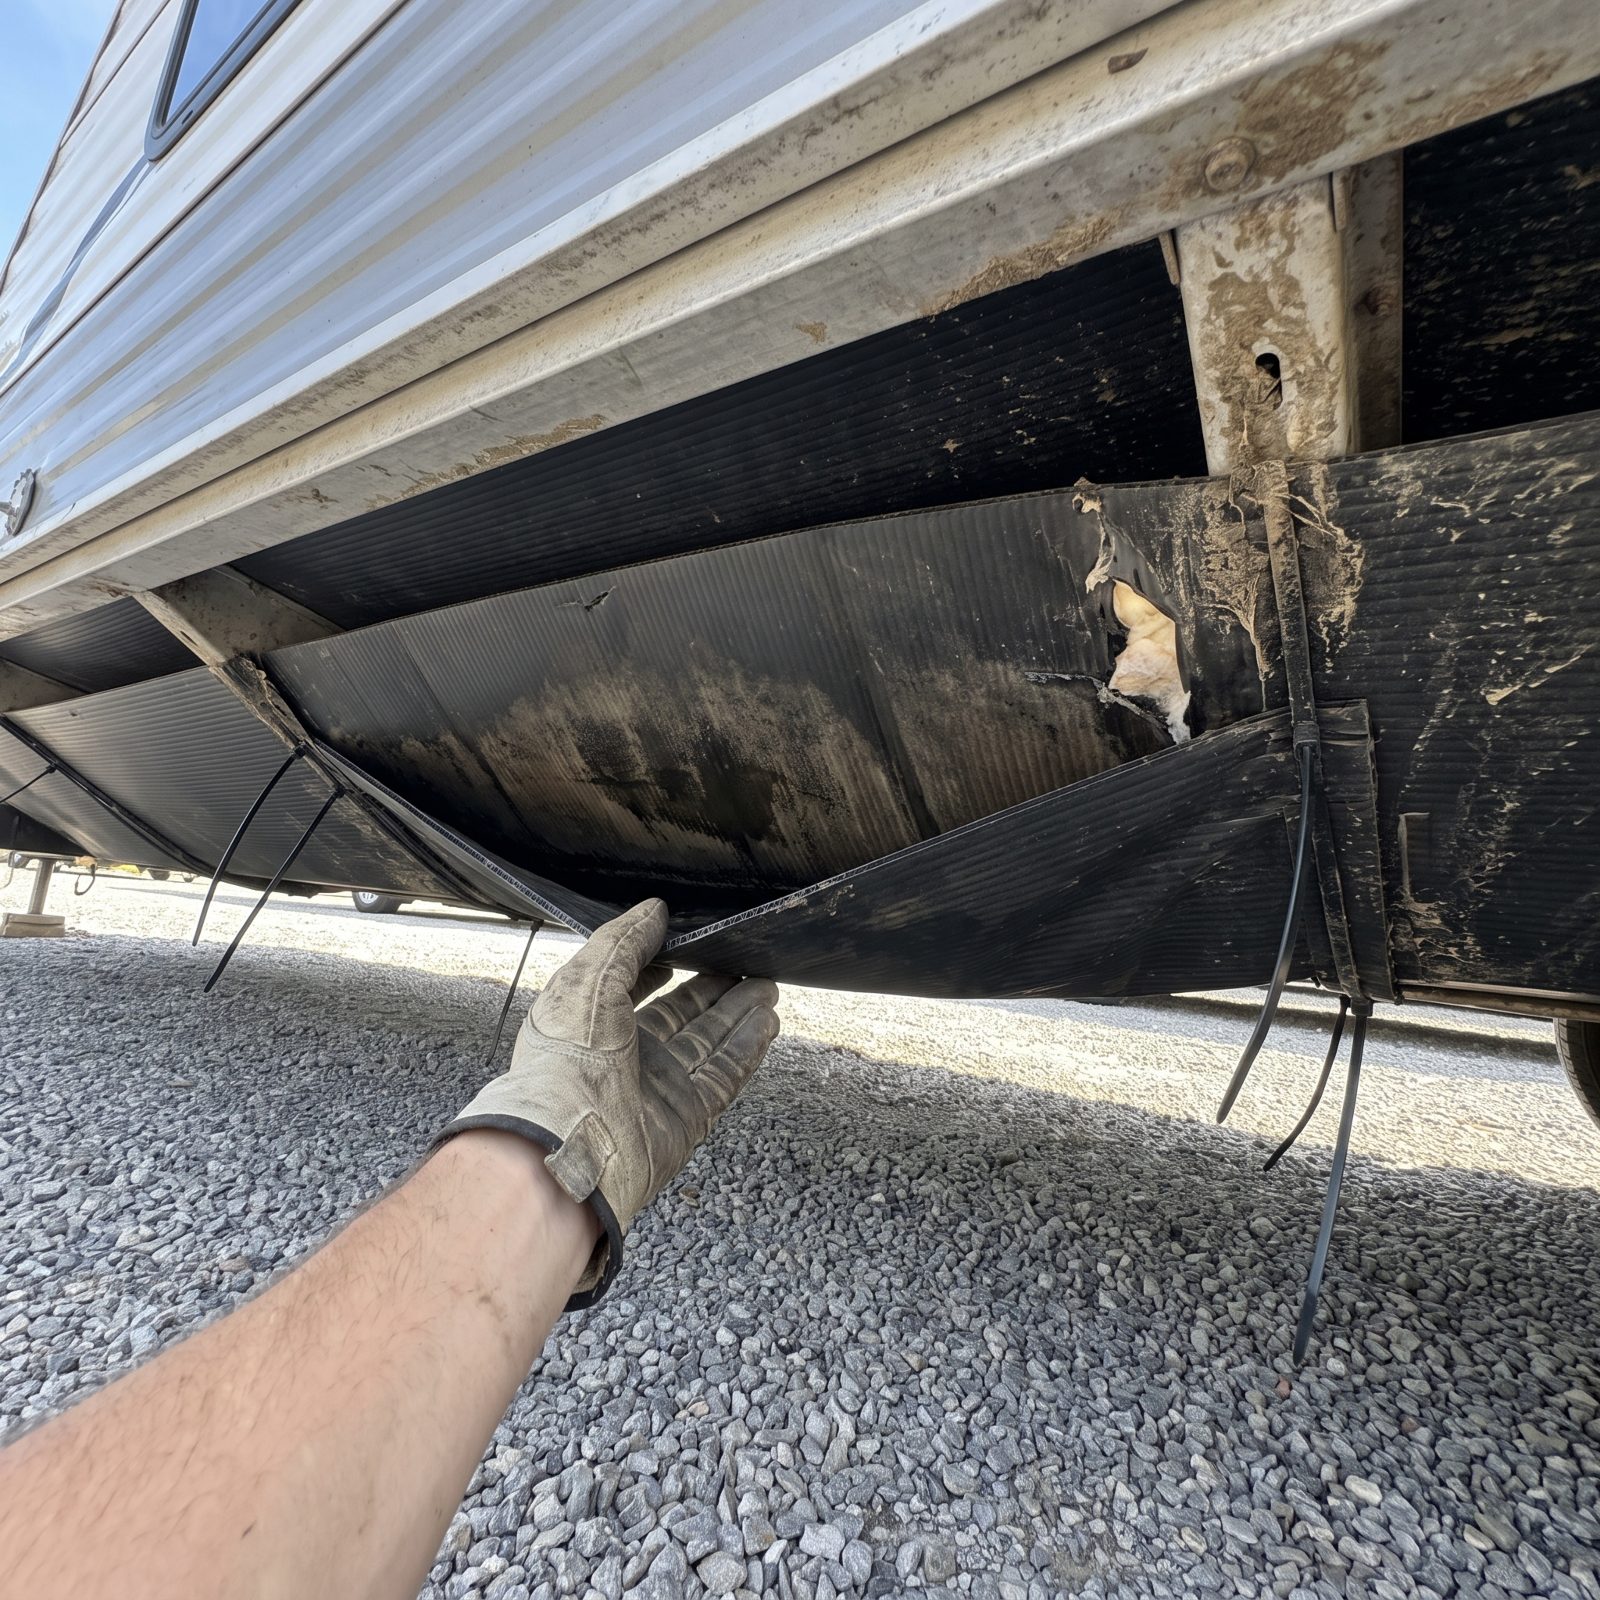
That gentle droop in the black plastic belly pan is not a design feature. A waterlogged underbelly means water got in and stayed, and it’s been sitting on your floor framing, wiring runs, and tank lines for who knows how long.
Press it with your hand. Heavy, spongy, or a slosh when you push? Walk around and hunt for the source: a cracked tank, a split water line, a roof leak that found its way all the way down. The cover itself costs almost nothing. What it’s been hiding does not.
28. Heavy Flaking Rust on the Main Frame
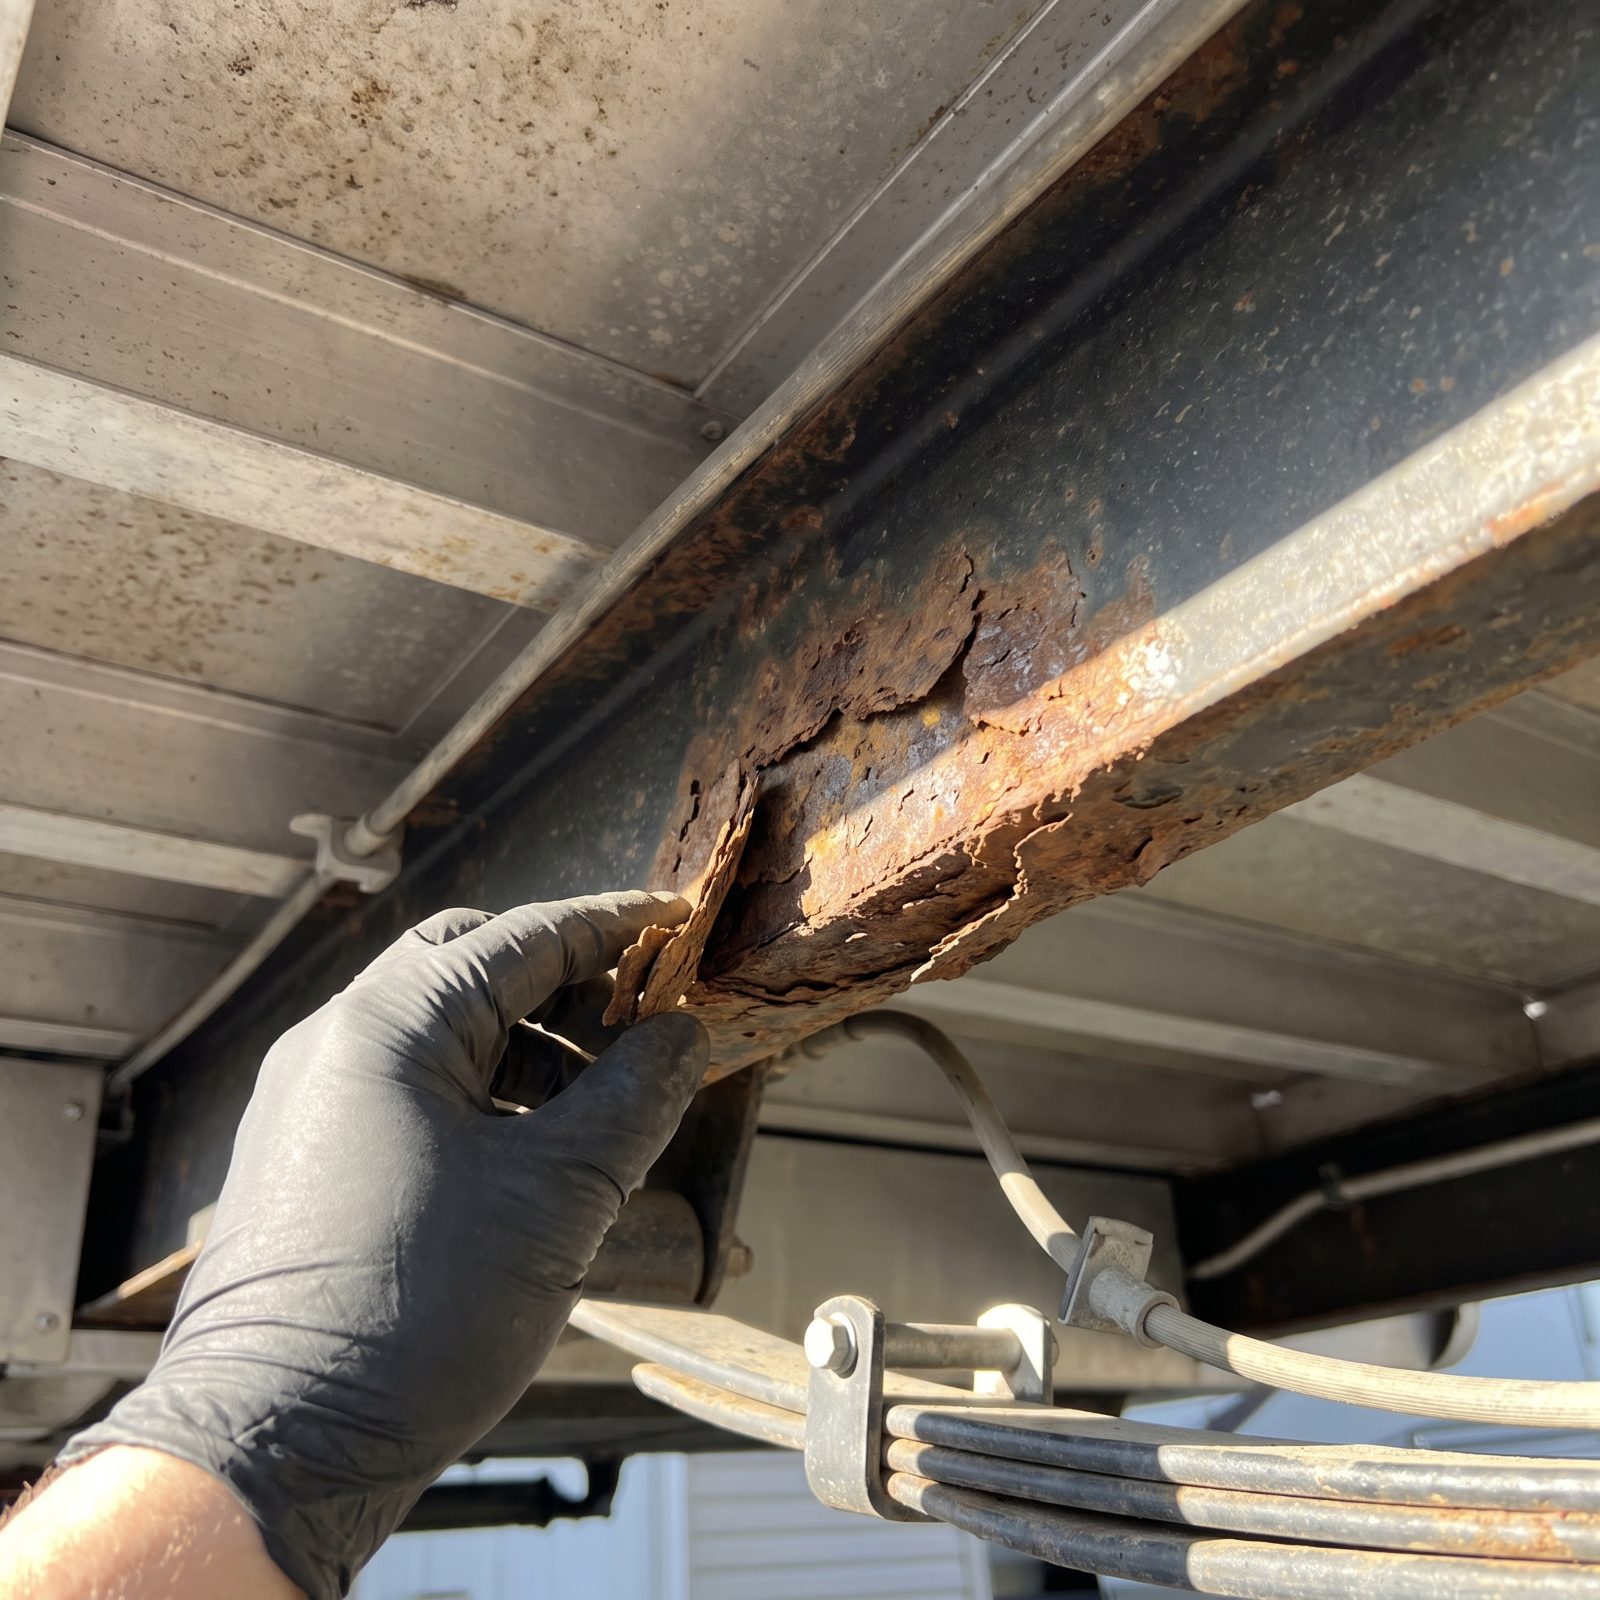
Surface rust on a trailer frame is normal. The whole underside of any RV that’s seen a winter looks a little orange, and that’s fine. What you’re watching for is different: rust that flakes, scales, and crumbles when you pick at it.
Bring a screwdriver. Press firmly along the frame rails and crossmembers, especially near the suspension hangers and anywhere road salt likes to pile up. Solid steel stops the tip cold. Compromised steel gives, flakes away, or sounds dull and hollow. Scaling rust means the cross-section is thinning, and a thinning frame under a loaded trailer is not a repair you want to inherit.
27. Crude Welds or Reinforcement Plates on the Frame
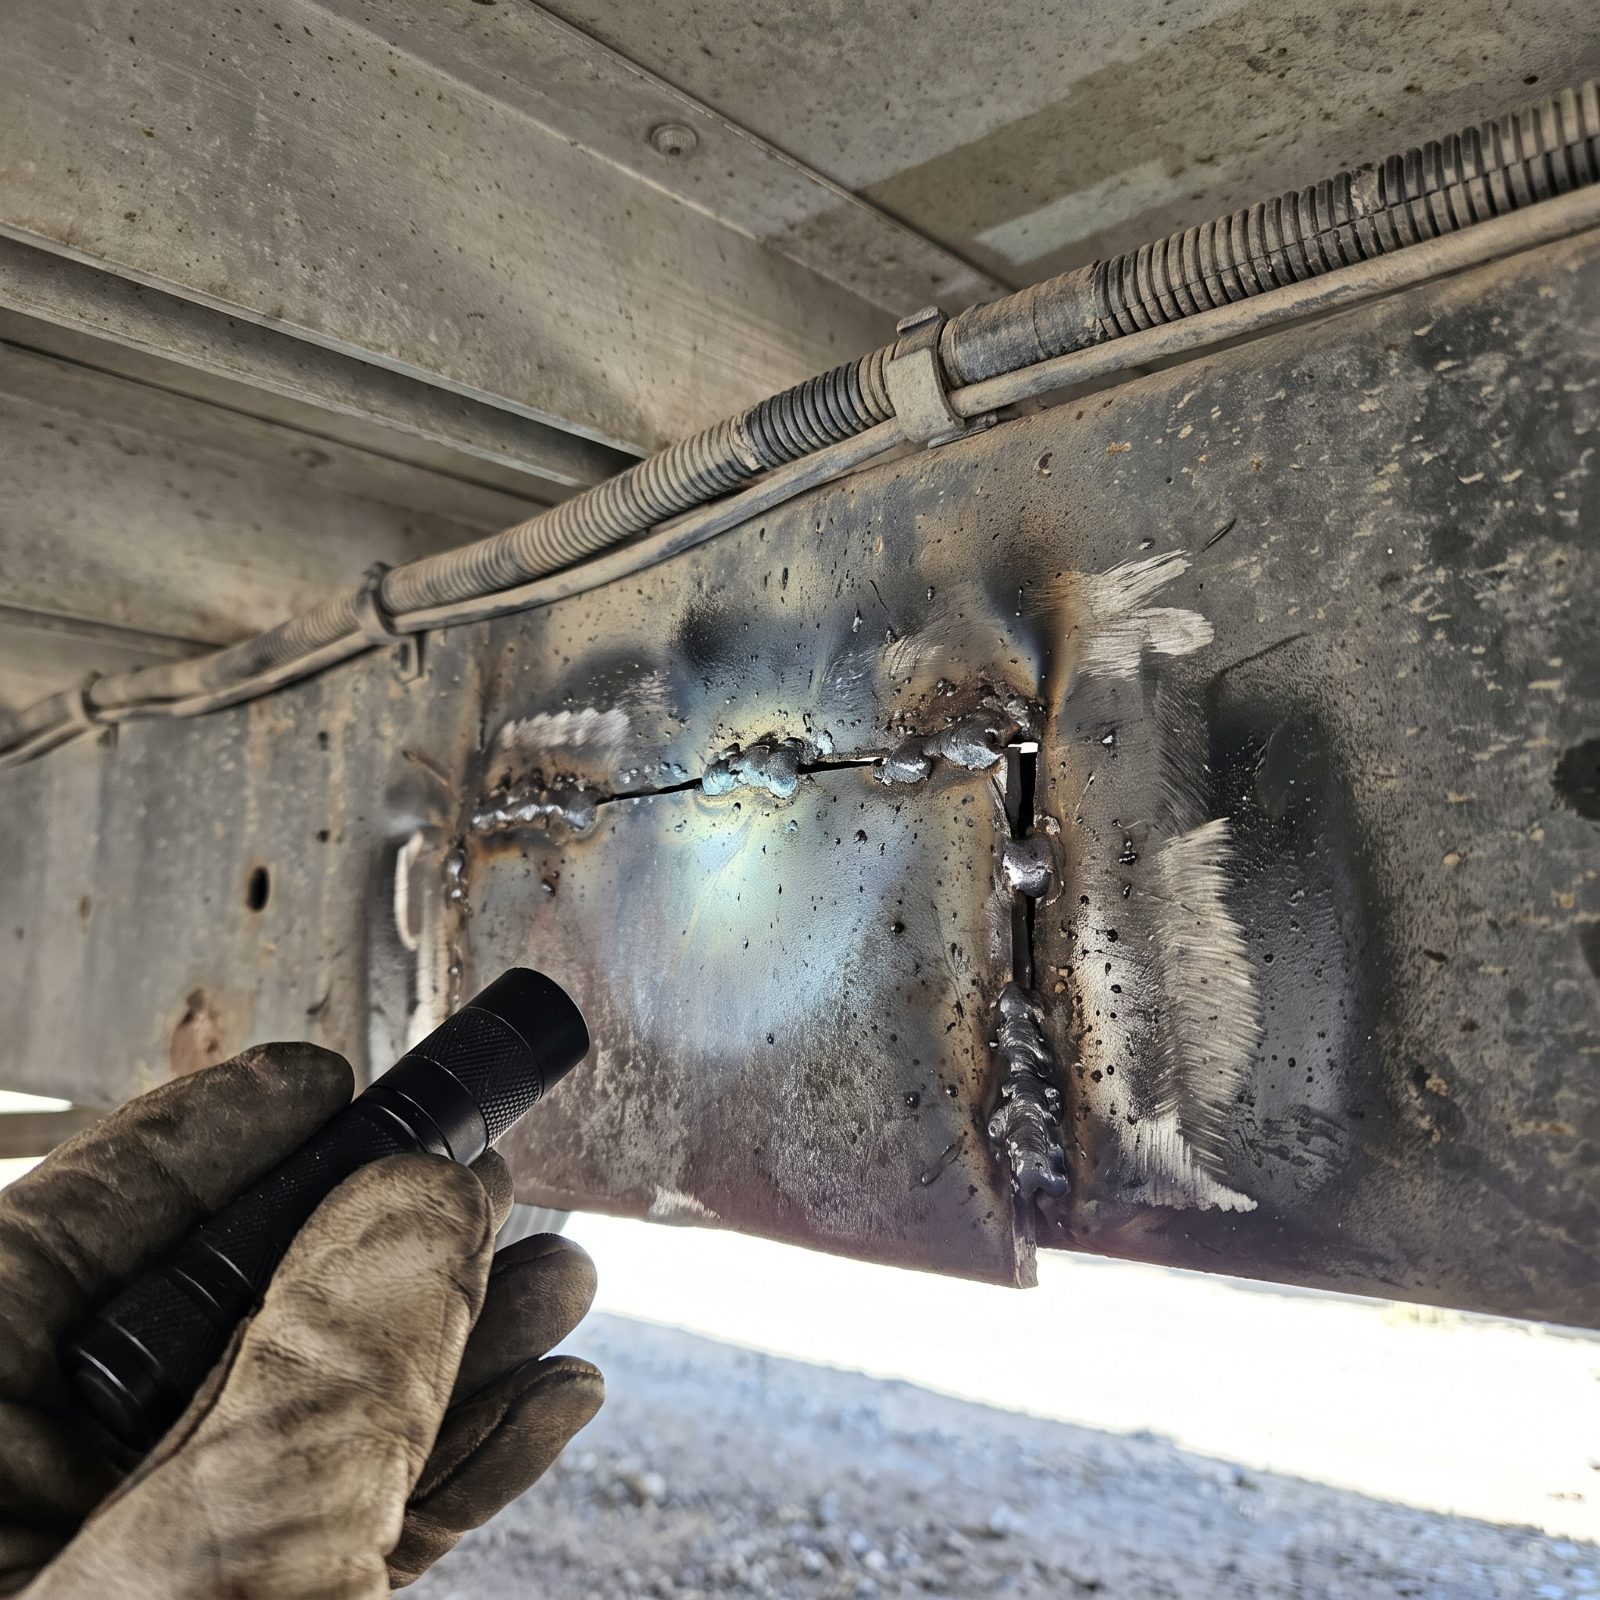
Factory frame welds are clean, consistent, and sit exactly where an engineer put them. Lumpy beads, mismatched steel plates, grind marks tucked up near the suspension or the hitch? That frame cracked or bent, and someone patched it.
Sometimes the repair is legitimate and well done. Often it isn’t. Either way, start asking hard questions. What failed? Was it overloaded? Was it in a collision? Fresh overspray feathered over a repair to make it disappear is a quiet confession, and you should file it away as you decide how far to dig.
26. Tires With Expired DOT Date Codes
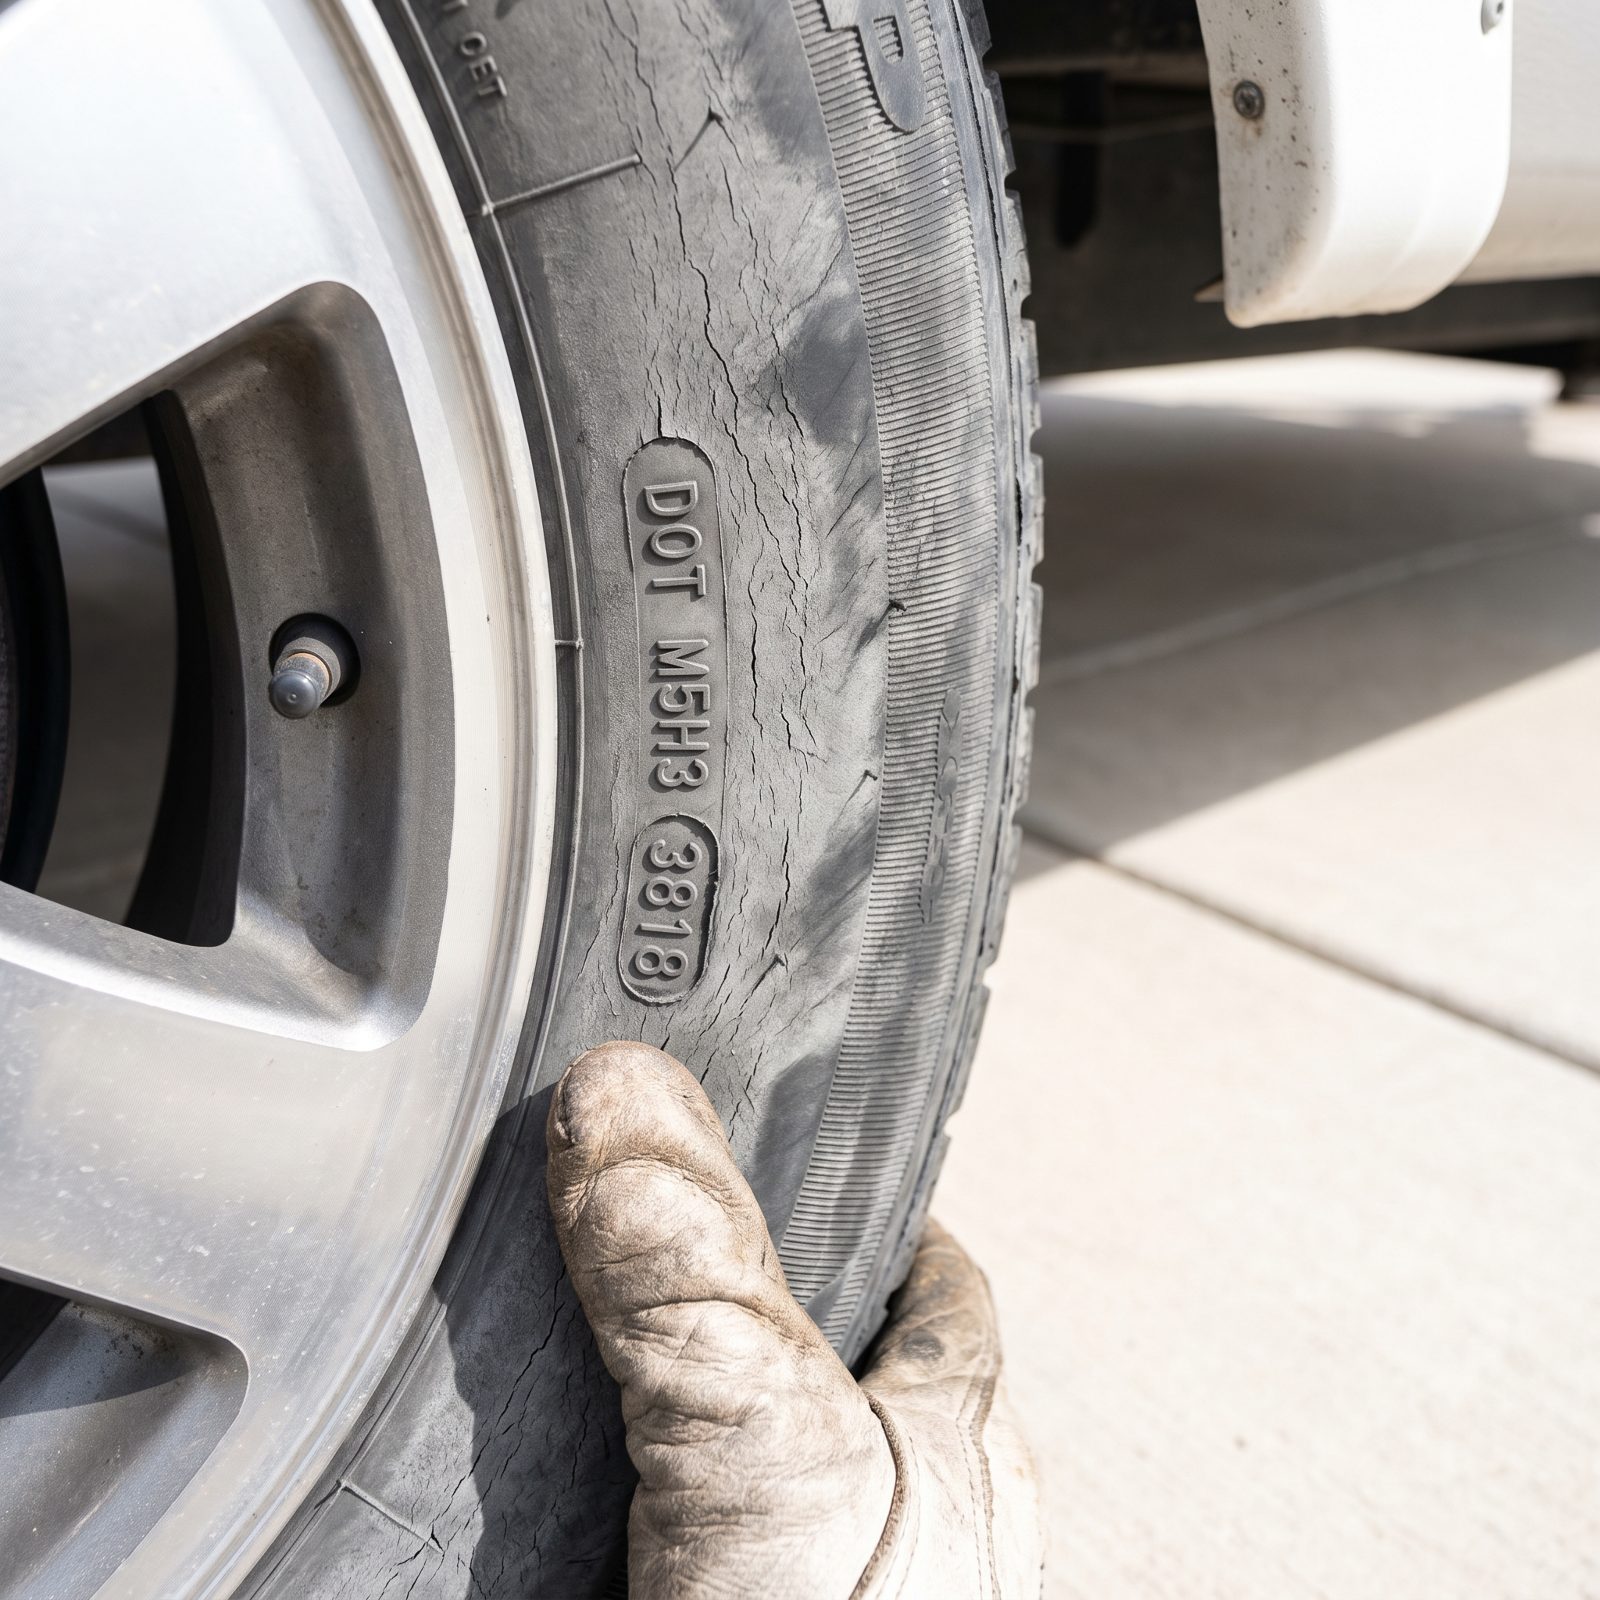
Tread depth lies. An RV tire can look barely used and still be a liability, because RV tires rot from age long before they wear out from miles. The truth is molded right into the sidewall. Find the DOT stamp and read the last four digits, which give you the week and year it was made.
Anything past six years is living on borrowed time. Past ten is a hard no, no matter how deep the tread looks. These tires bake in the sun, haul heavy loads, and age by the calendar whether they roll or not.
25. Feathered or Uneven Tire Wear
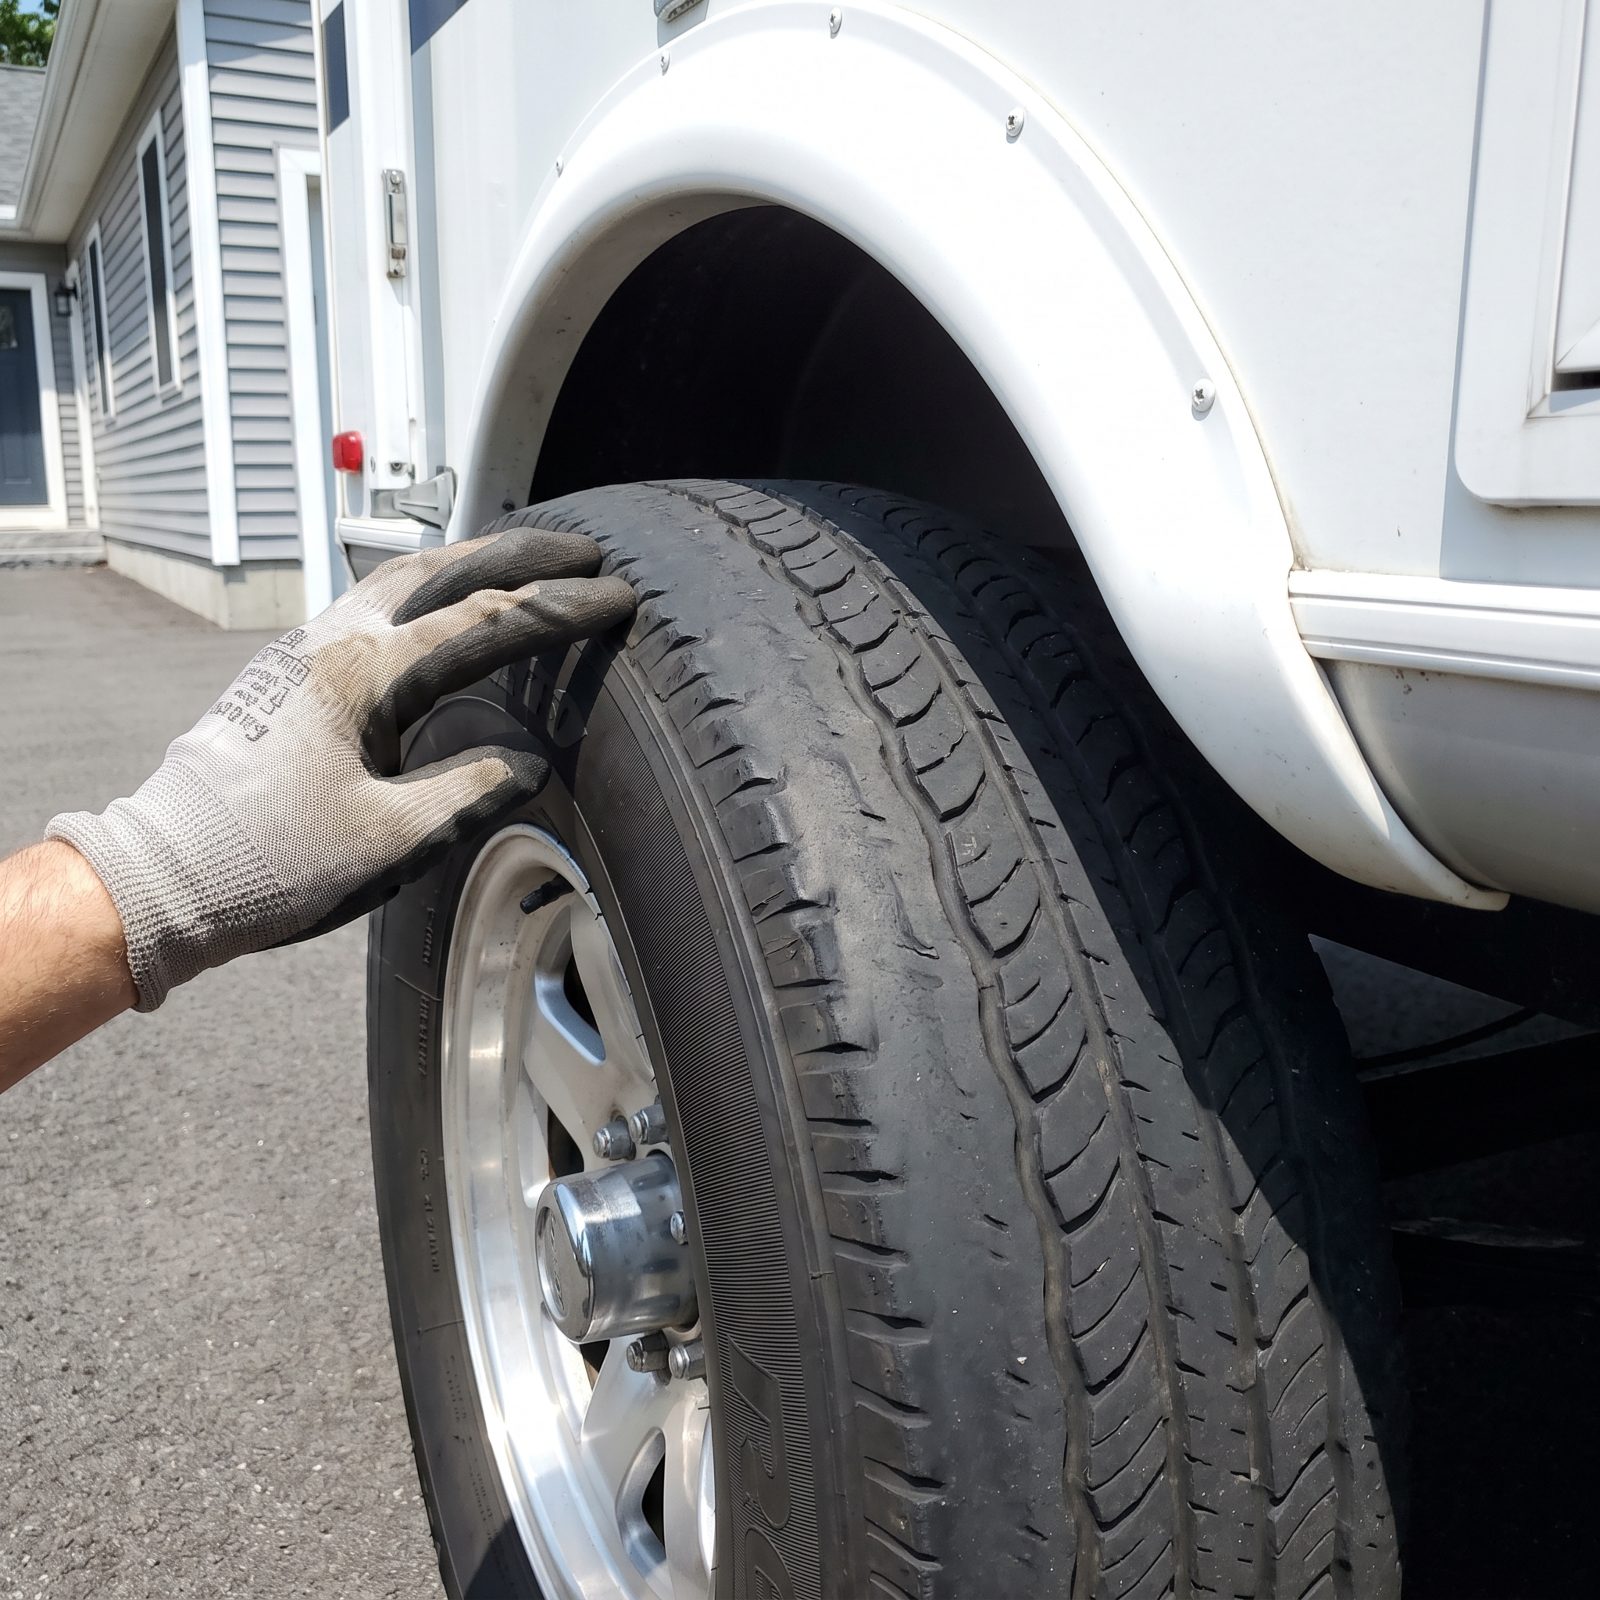
Run your palm across the tread, not just your eyes. Feathering, where one edge of each tread block is sharp and the other is worn smooth, catches your hand like the grain of rough-sawn wood. Cupping and scalloping show up as a wavy, dipped pattern that rolls around the tire.
New tires won’t fix what caused this. Uneven wear points straight at a bent axle, worn suspension bushings, or a trailer running out of alignment. You’ll buy the tires, then buy them again next year once the real problem chews through the fresh rubber. Figure out why the old tires wore wrong before you agree to anything.
24. Grease Sprayed Across the Inside of a Wheel
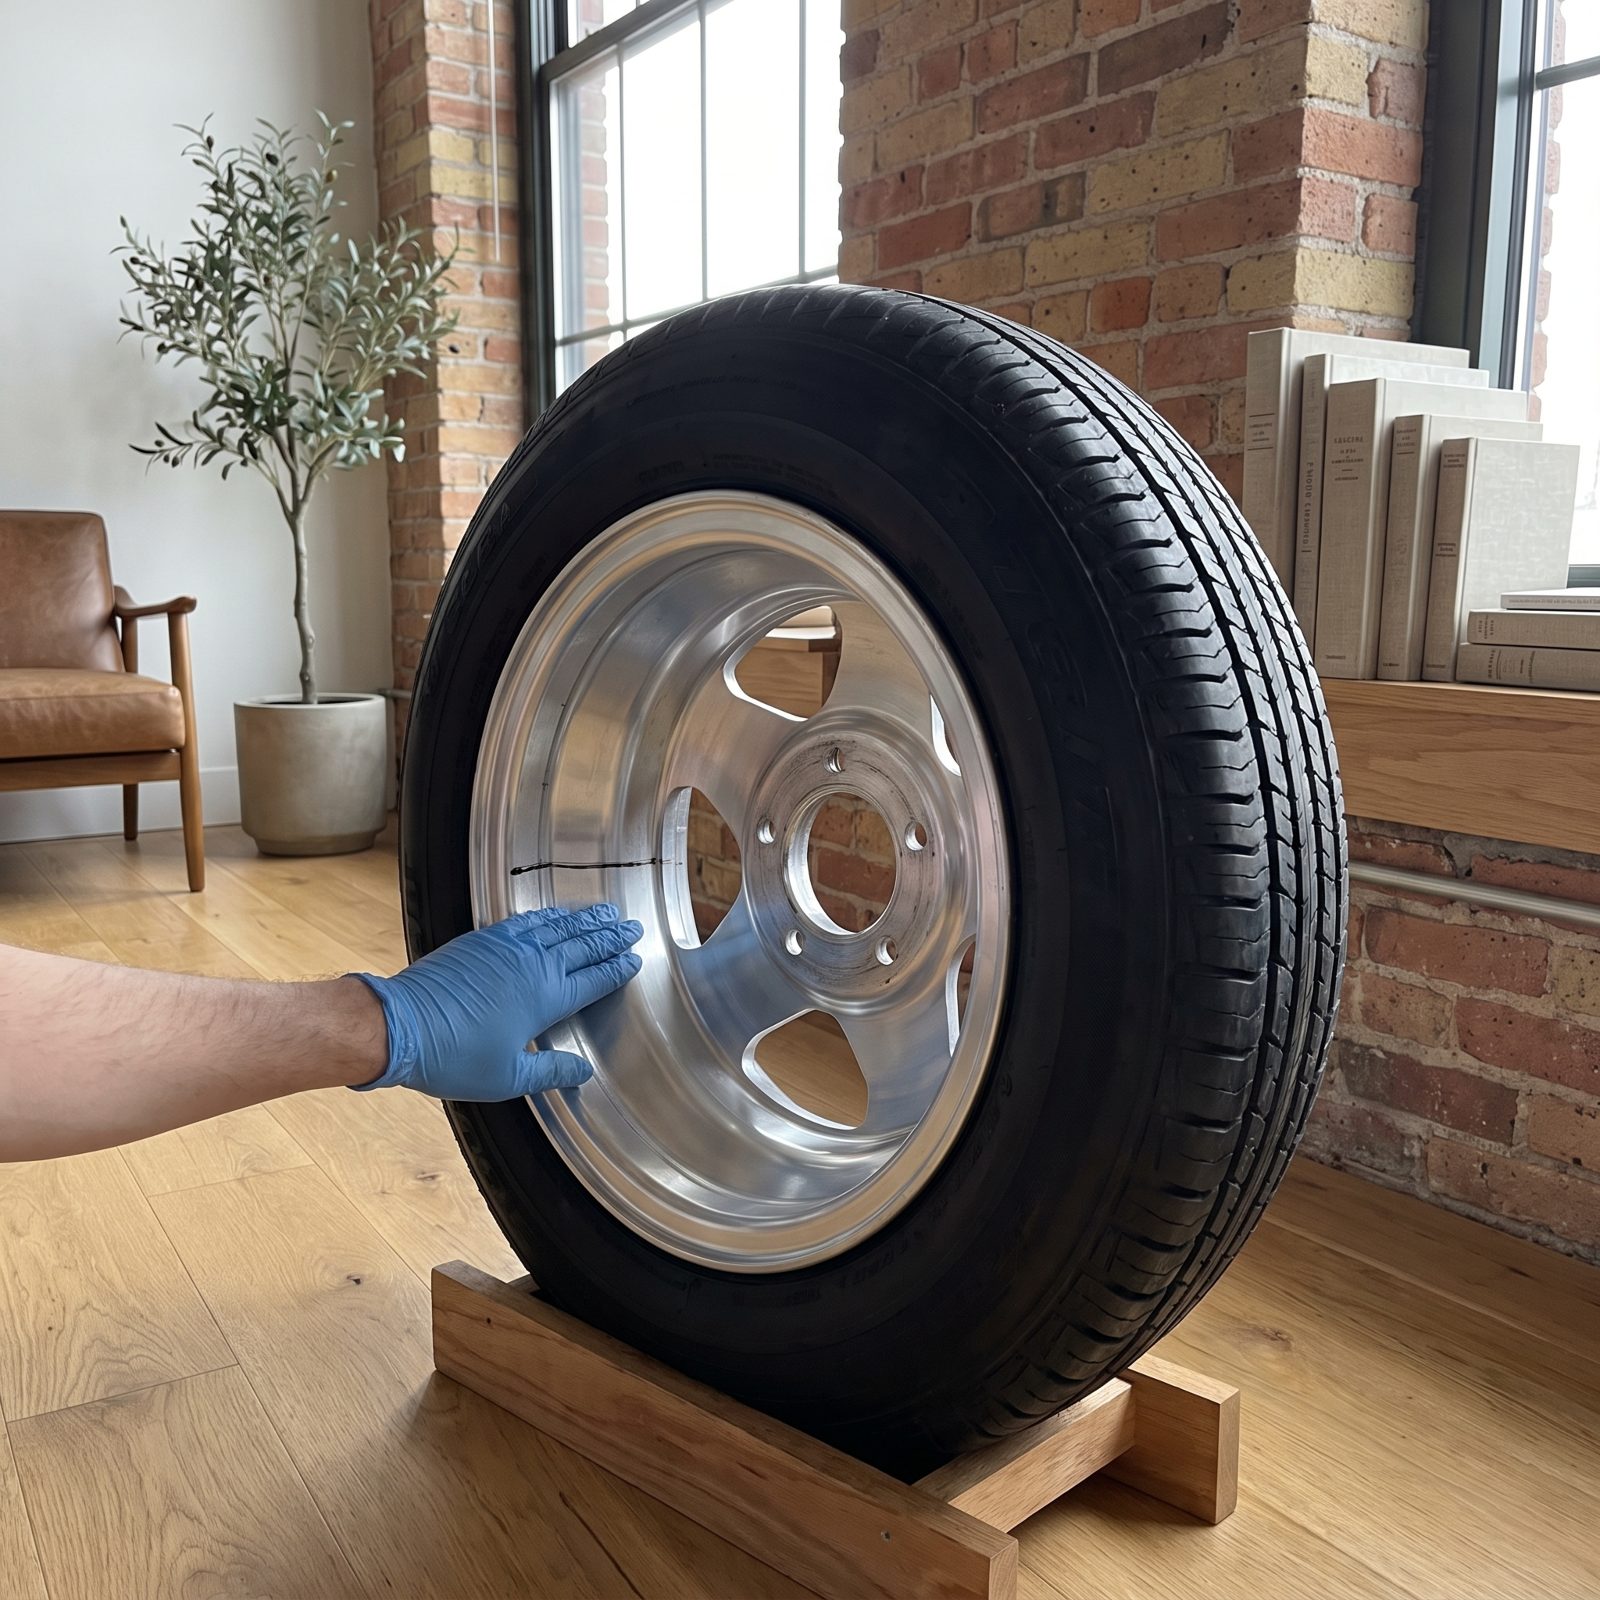
Run a gloved hand around the inner rim of the wheel. A fan of dark grease flung outward across the rim means the wheel seal is leaking.
That’s worth checking, because leaked grease isn’t just a mess. It slings onto the brake shoes, and greasy brakes don’t stop. A failed seal also means the bearing has been running dry, so it may be on its way out too. One leak, two problems, both of them involving the parts that keep the trailer from running you over on a downgrade.
23. Noticeable Play in a Wheel Bearing
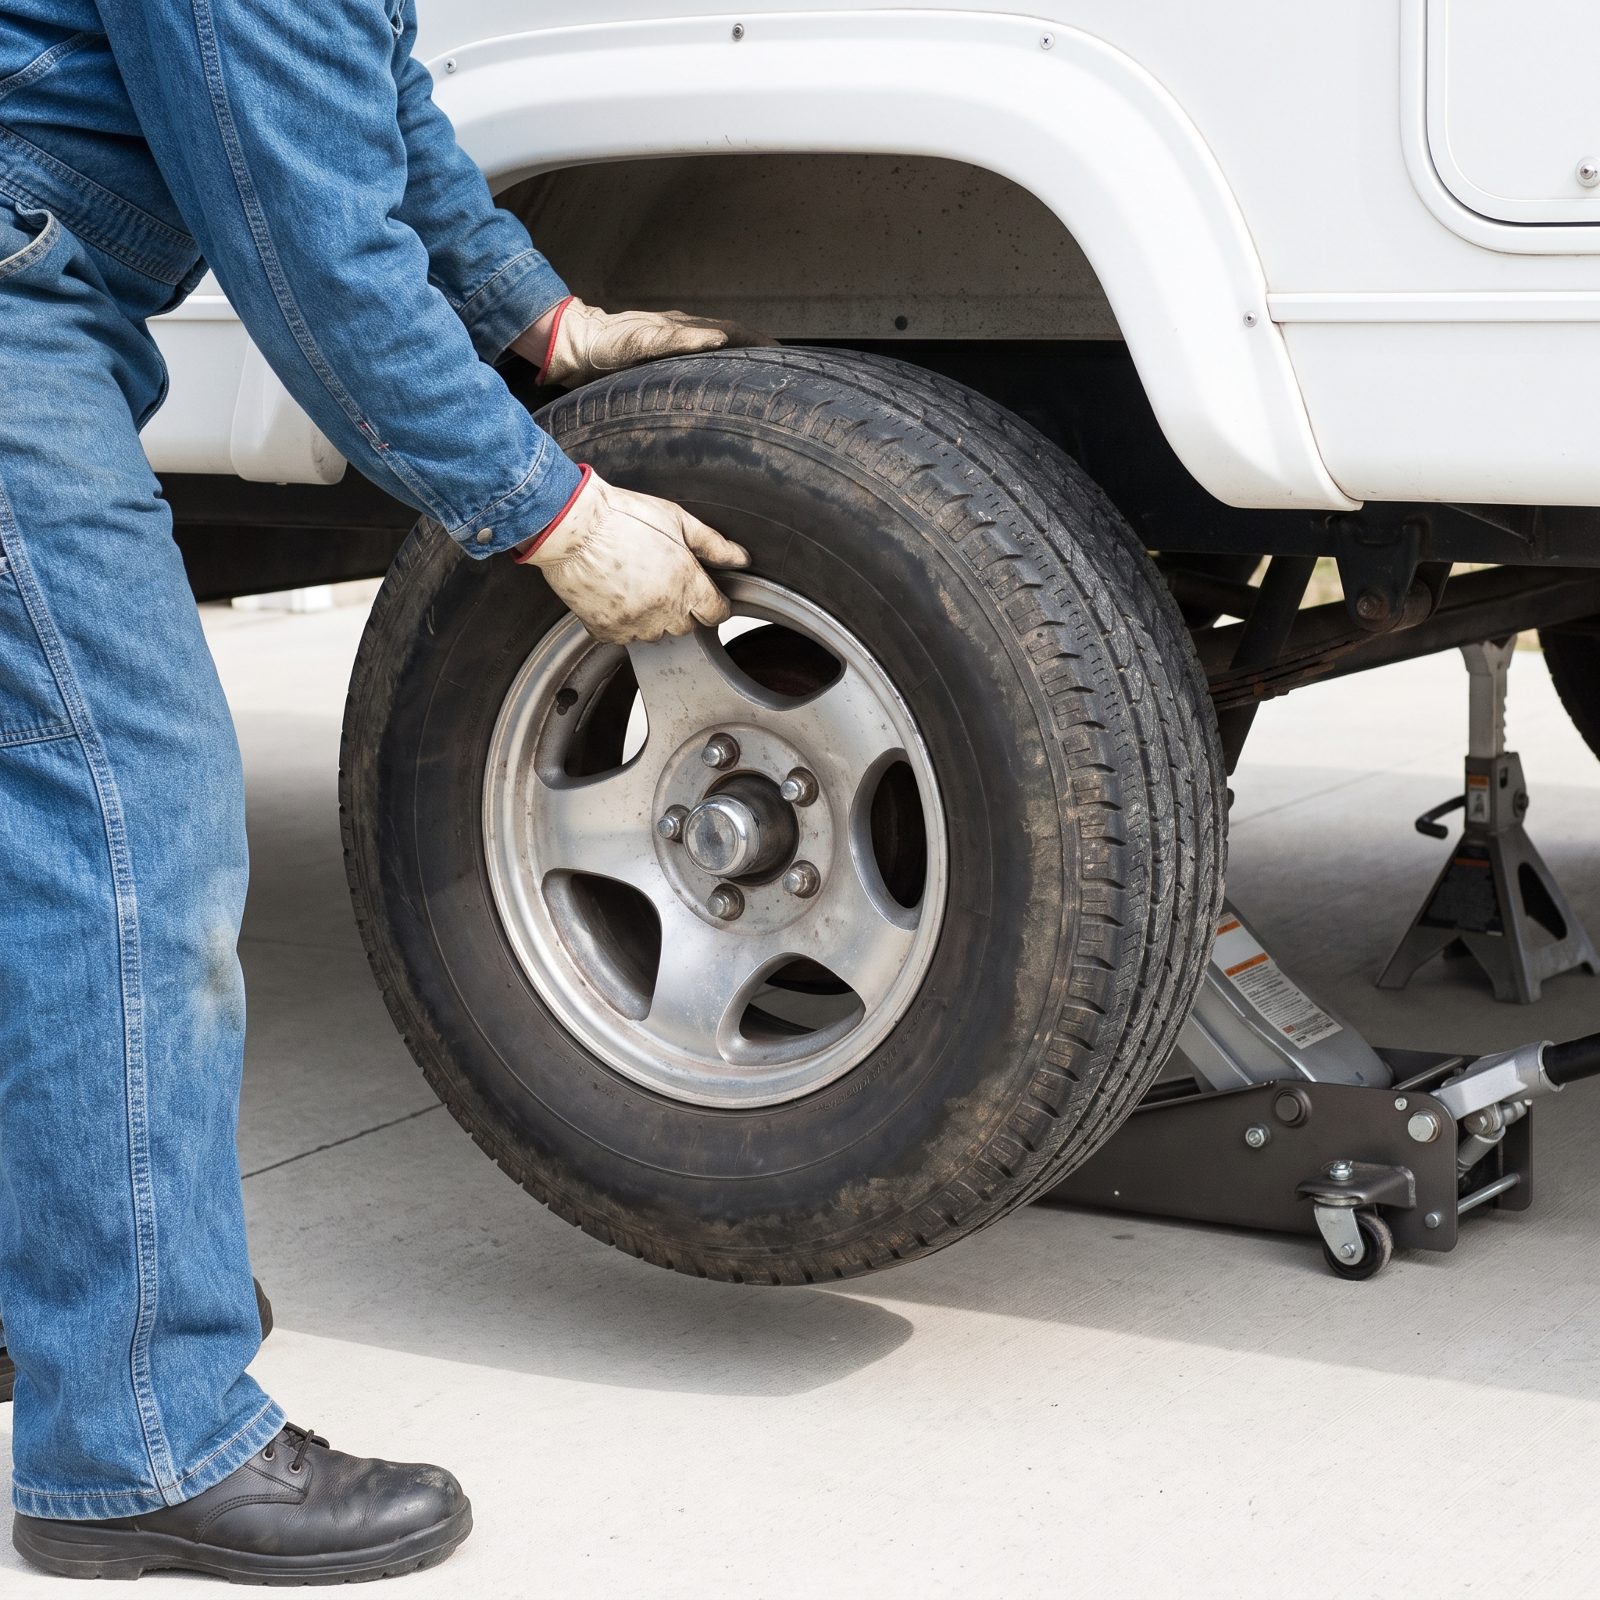
Jack one wheel off the ground, grab the tire top and bottom, and rock it in and out. A healthy bearing is tight, no wobble. Feel a clunk, or watch the wheel rock on its spindle, and that bearing is loose or worn.
Spin it too. A rough, gritty, growling rotation is a bearing crying for help. Repacking bearings is routine maintenance, cheap and easy. But a bearing run loose or dry long enough to feel play may have already scored the spindle, and a spindle repair is a whole different afternoon.
22. Cut, Dangling or Poorly Spliced Trailer-Brake Wires
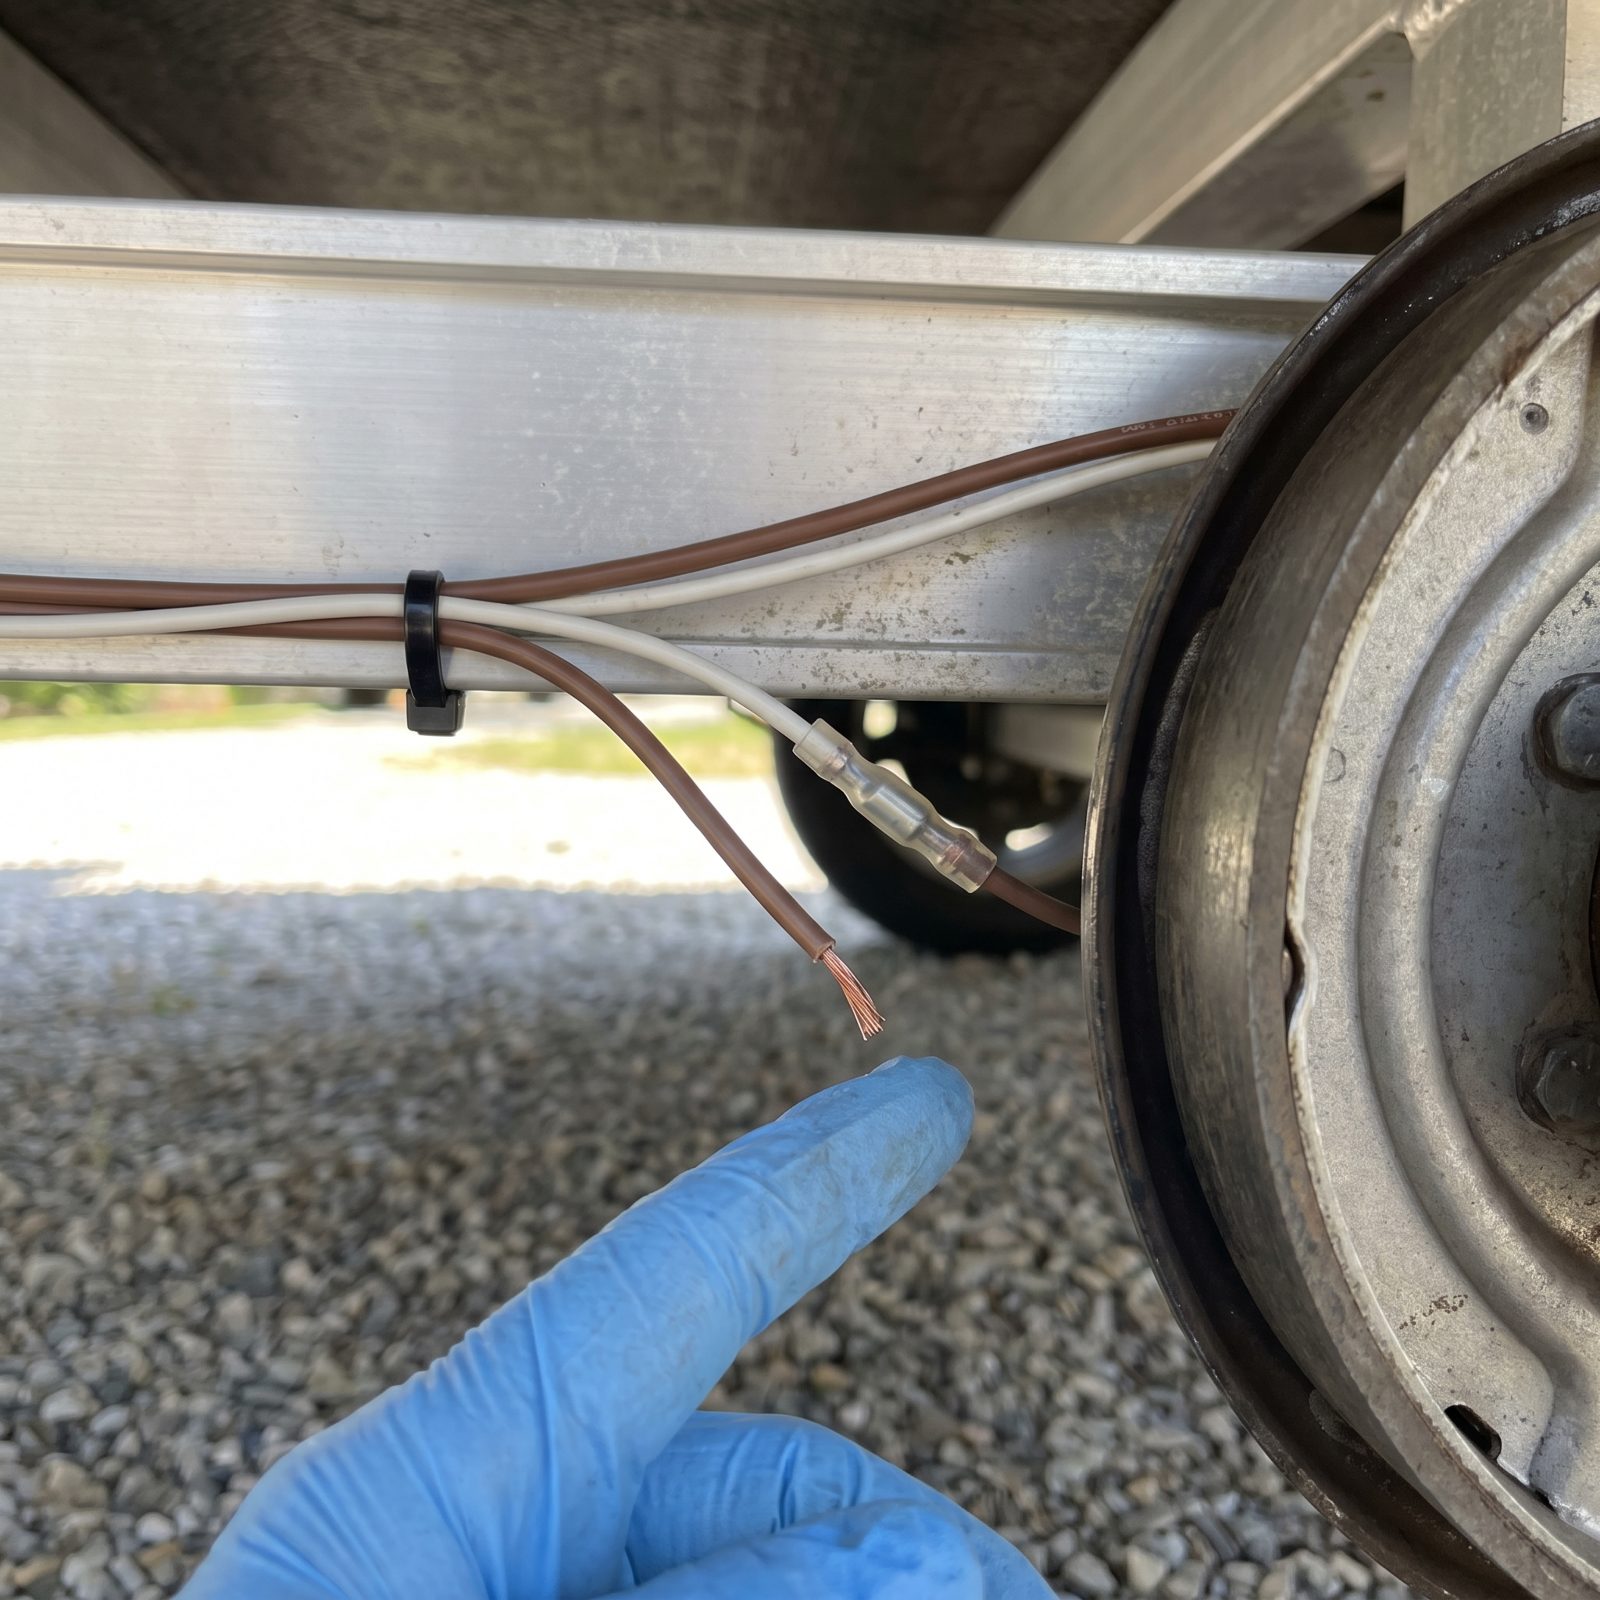
Follow the wiring from the frame to each brake assembly. Clean factory wiring is tidy and secured. What you don’t want: wires wrapped in crumbling electrical tape, bare copper poking out of corroded crimps, or a cut lead just dangling in the breeze near the brake drum.
Electric trailer brakes are only as good as the weakest connection in the circuit. A bad splice means that wheel’s brake works on and off, or not at all, which you’ll discover at the worst possible moment halfway down a long hill. Test the brakes with a controller before buying. Treat sketchy wiring as proof the previous owner cut corners everywhere you can’t see.
Brakes you can’t trust on one wheel of a loaded trailer aren’t a discount item. They’re a reason to keep shopping.
21. Cracked or Flattened Leaf Springs
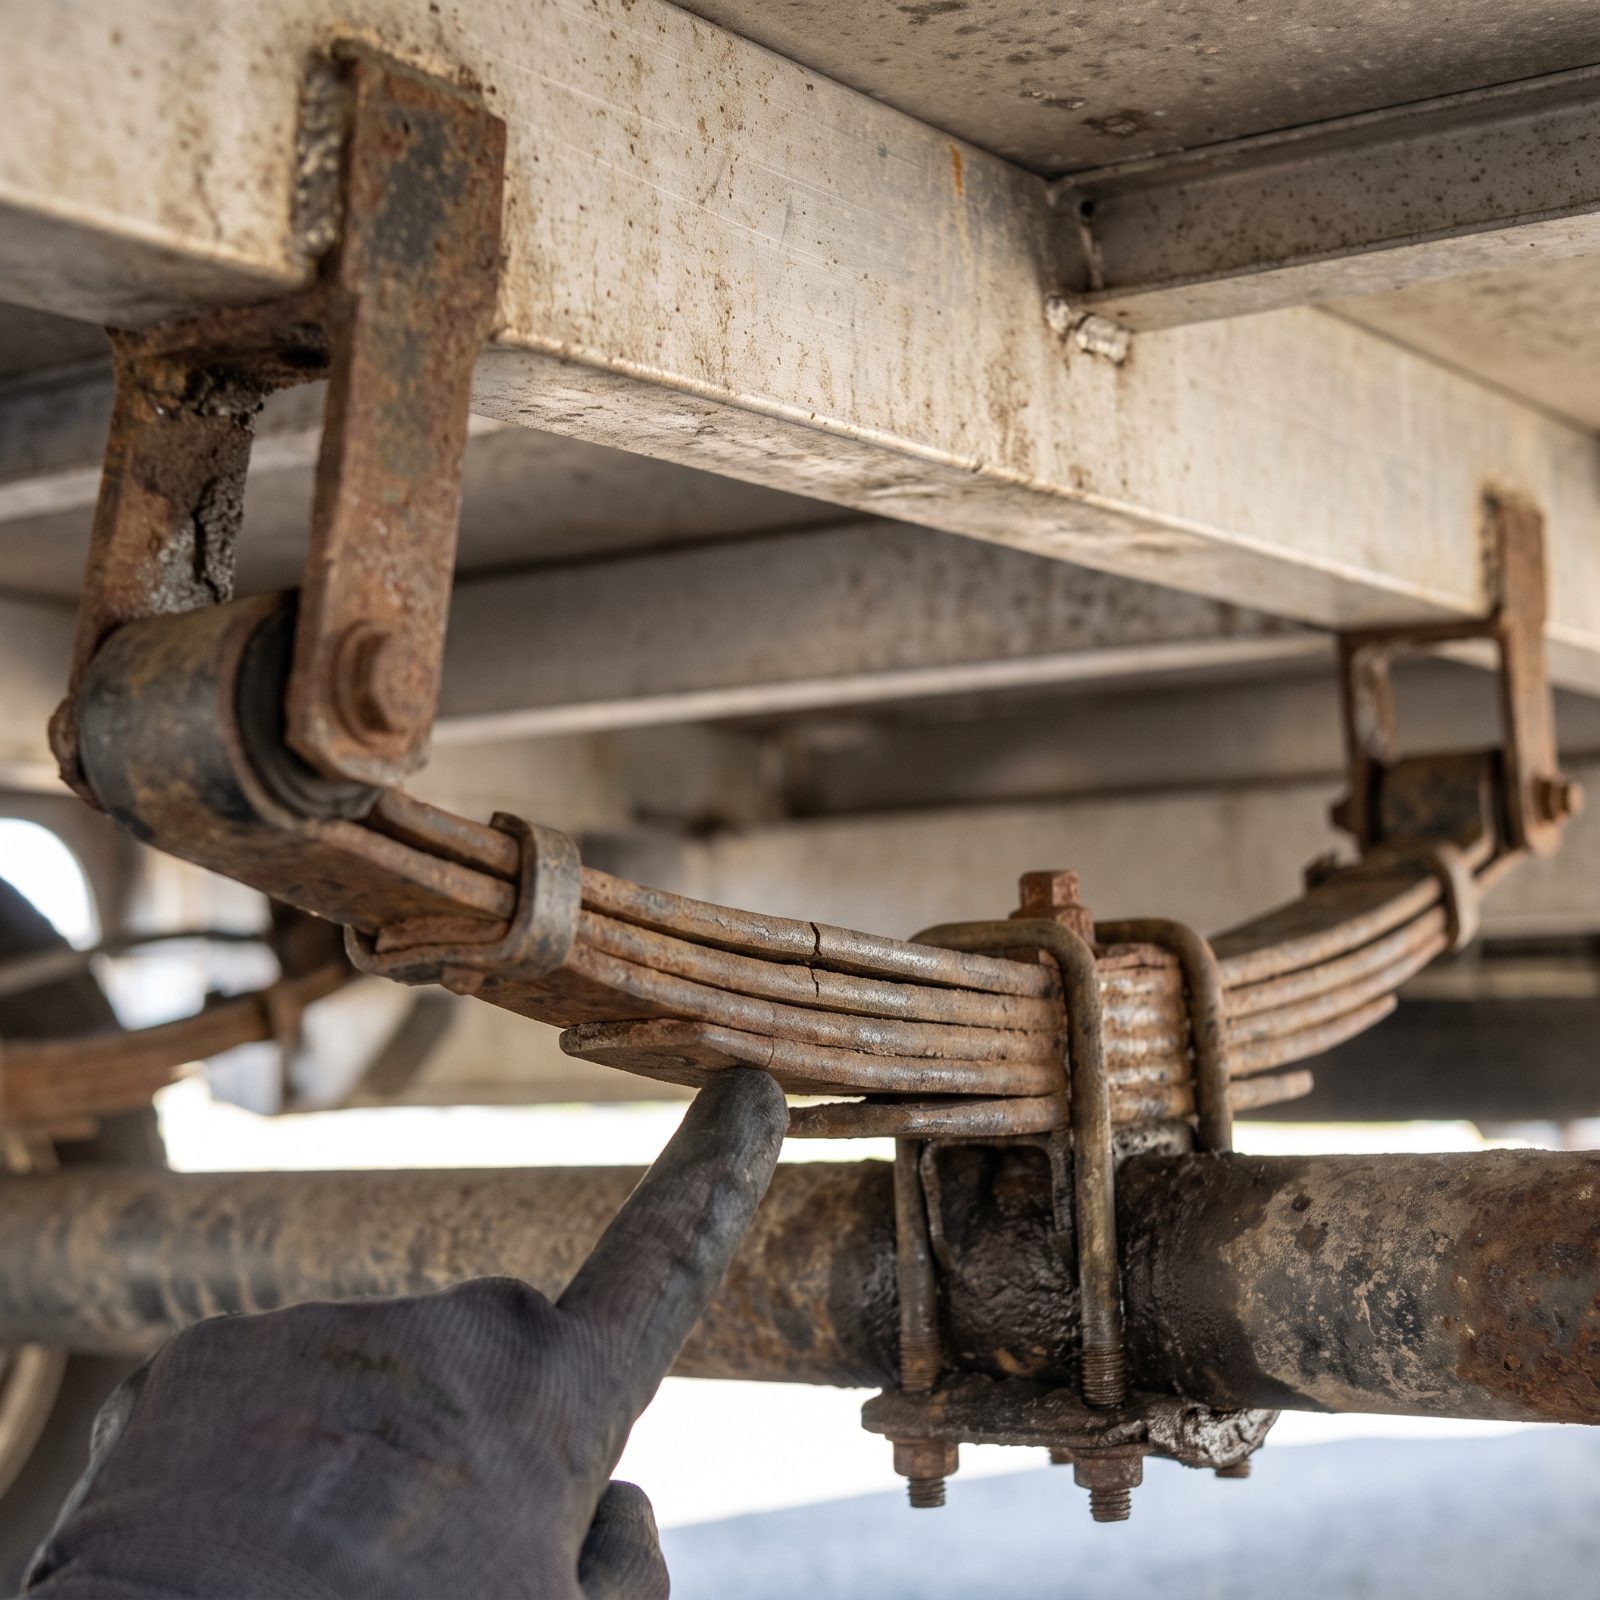
A leaf spring should arch. When the pack has gone flat, or worse, settles into a reverse sag, it’s lost its ability to carry load and soak up the road. Look closer for cracks, especially around the center bolt and the spring eyes.
A cracked or collapsed spring throws the whole trailer out of level, loads the tires unevenly (there’s your feathered wear), and can let the axle shift. It’s a roadside breakdown waiting for the next pothole. Springs are cheap enough to replace. The trouble is that a flattened pack usually travels in bad company: worn shackles, tired bushings, and all the wear that comes from years of being loaded past what the suspension was built for.
20. Cracks Around the Hitch Receiver or Pin Box
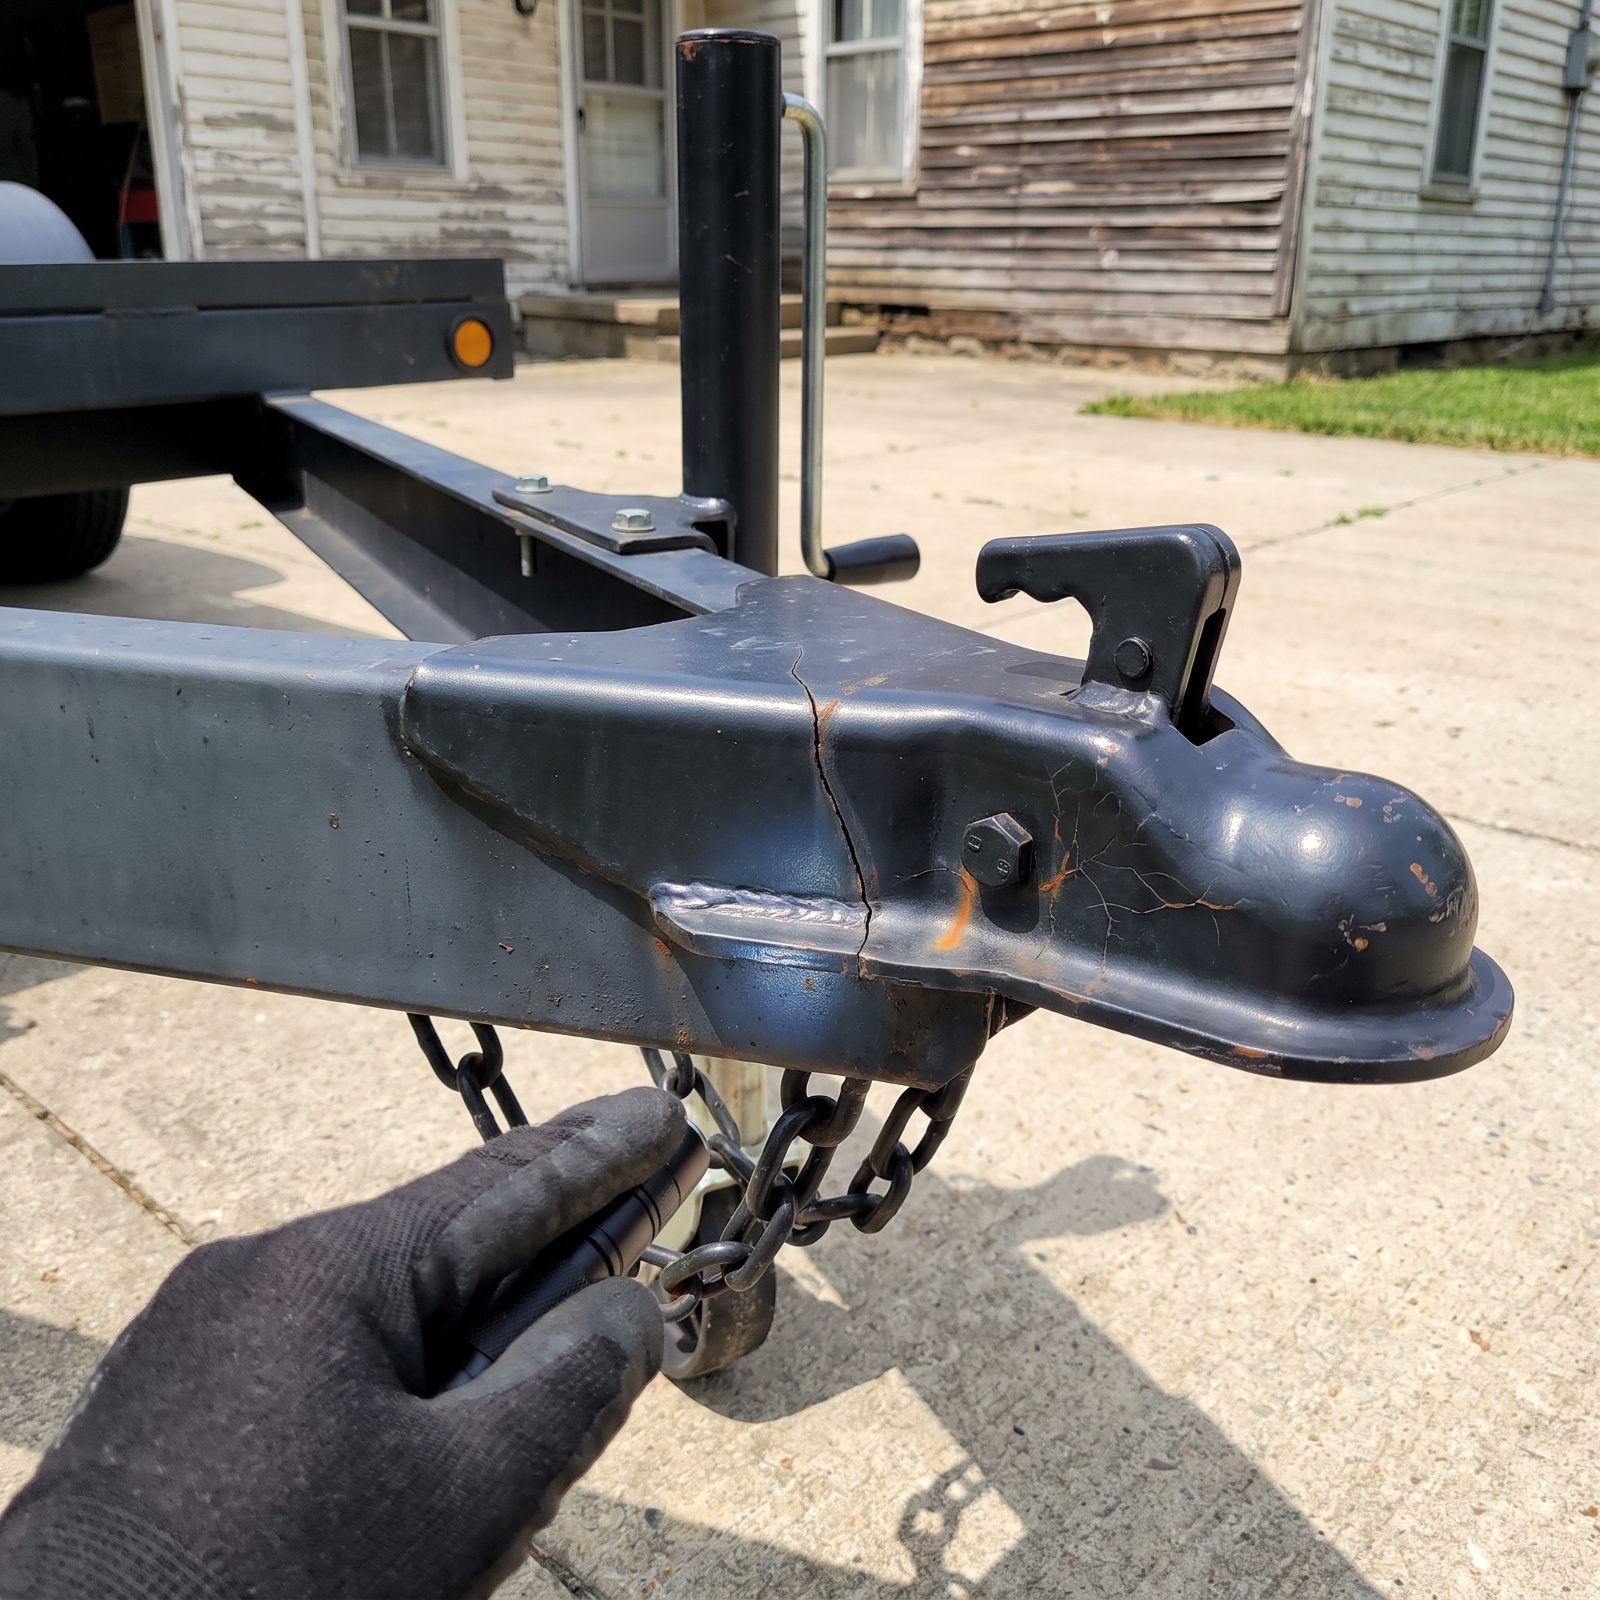
This is the one part of the whole rig you absolutely cannot compromise on. The hitch coupler, the frame it’s welded to, the fifth-wheel pin box: these carry the connection between your tow vehicle and several thousand pounds of trailer.
Get a flashlight on the welds and bolt points and hunt for hairline cracks, rust weeping from a seam, or paint stress-cracked around a fastener. Any fracture here is an automatic walk-away. Doesn’t matter how clean the interior is or how good the price looks. A separation on the highway is catastrophic for you and everyone behind you.
19. A Melted or Blackened Shore-Power Plug

Pull the shore-power cord all the way out and look at the plug end. If the prongs are brown, the housing is warped, or there’s a sooty halo around one blade, you’re looking at heat that got loose. Melted plastic means the connection was arcing, and arcing means resistance where there shouldn’t be any.
That’s no cosmetic ding. A plug that’s already cooked itself will keep running hot, and brown prongs today become an electrical fire tomorrow, burning away inside a wall you can’t reach.
So walk up to the pedestal, plug it in, and run the air conditioner for ten minutes. Unplug and touch the blades. Warm is fine. Hot enough to flinch means the cord, the pedestal, or the RV’s inlet all deserve a closer look before you write a check.
18. Household Extension Cords Used as Permanent Wiring
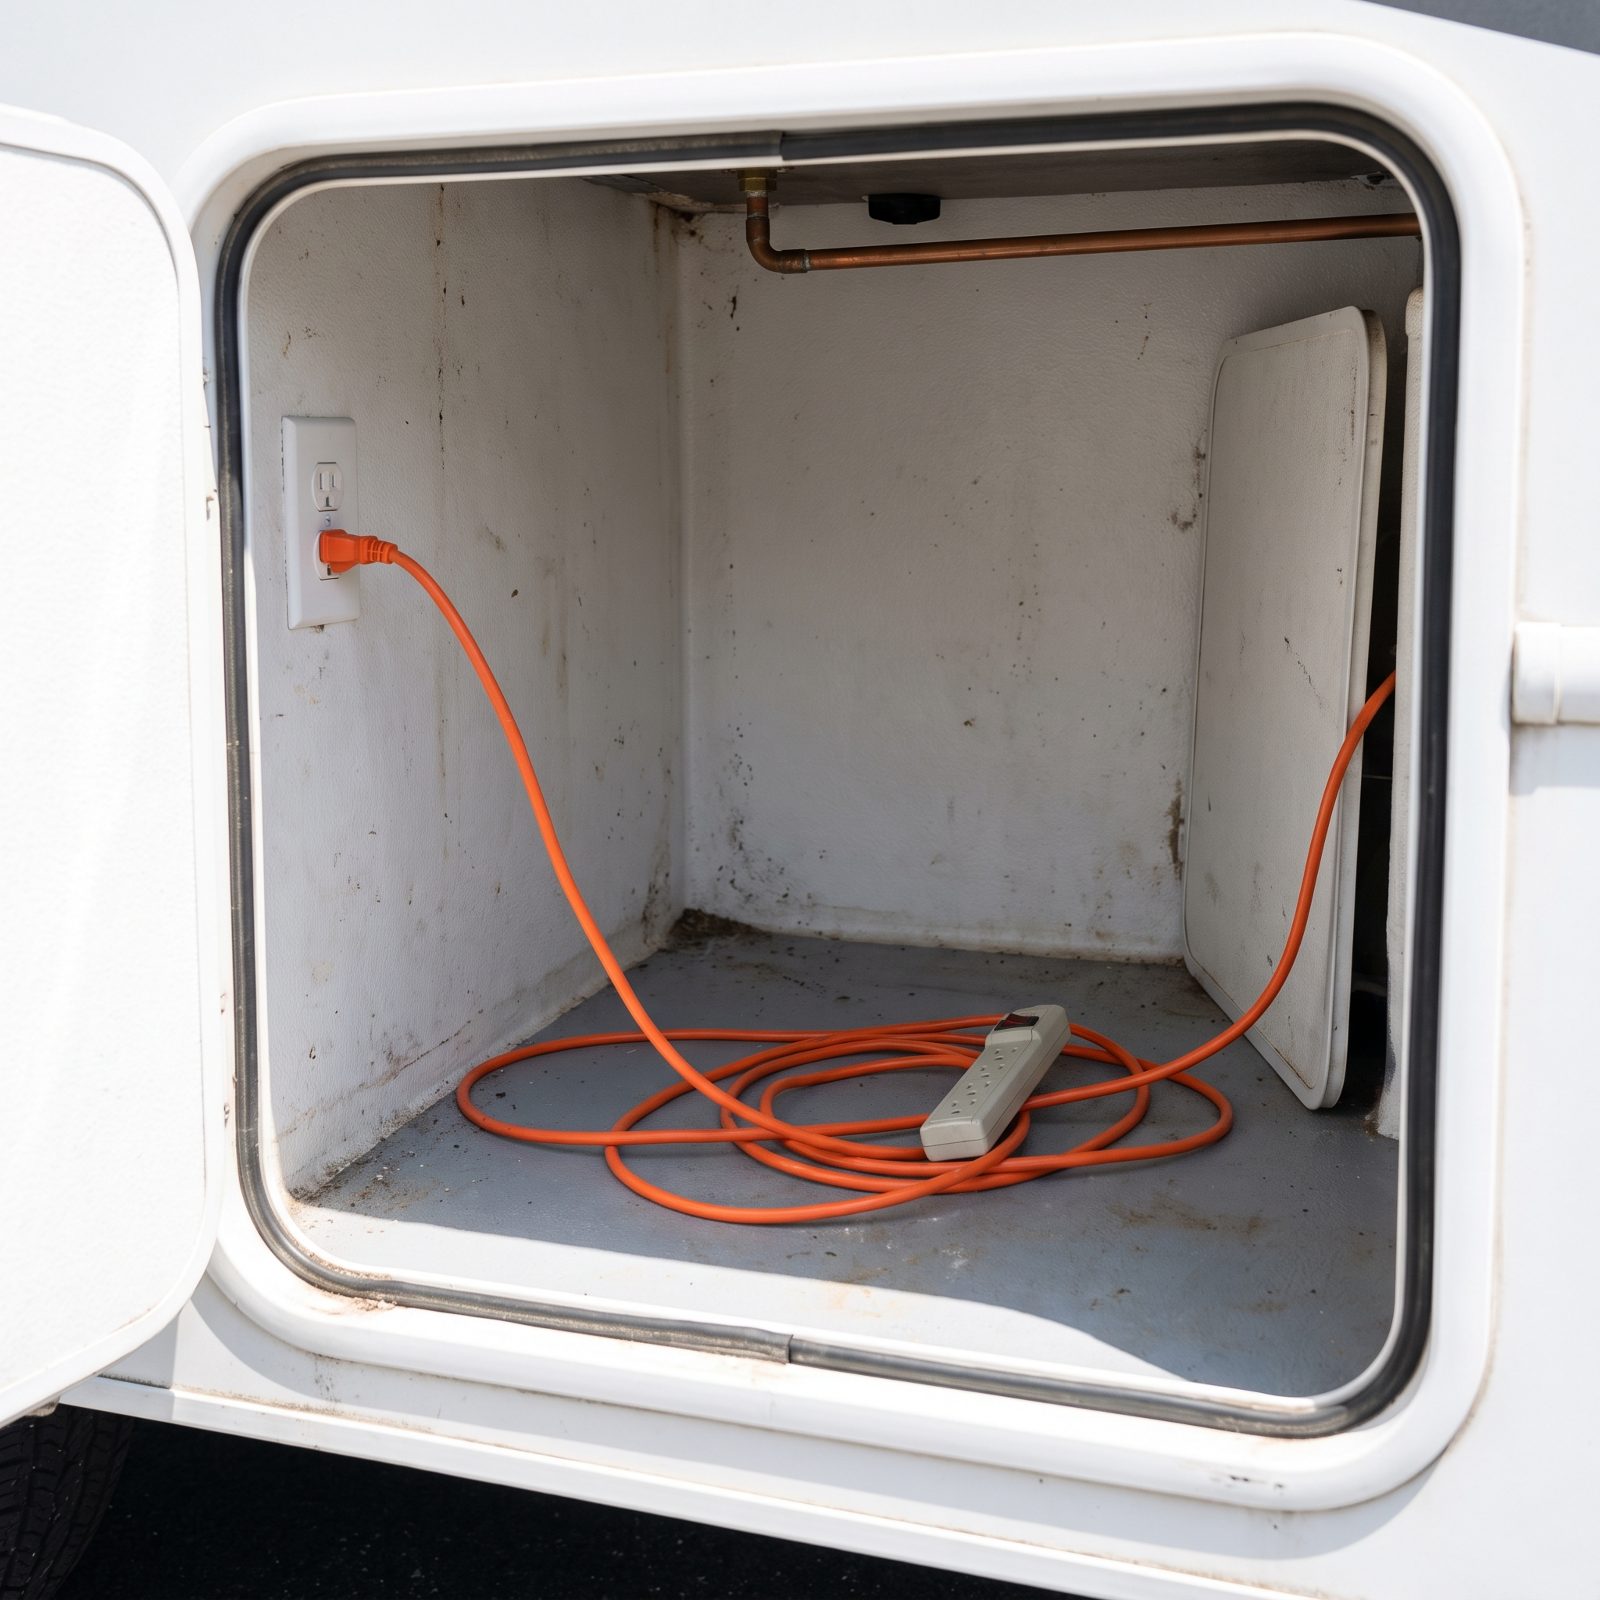
Flip open the storage bays and trace the wiring with your eyes. The moment you spot a thin orange extension cord feeding something permanent — a fridge, a fan, a water pump charger — stop admiring the awning and start asking questions.
Household cords aren’t built for continuous load in an enclosed, vibrating space. They heat up, the insulation hardens and cracks, and you’ve got propane lines and fabric a few inches away. In an RV, that’s a problem waiting for an excuse.
A proper fix uses RV-rated wire run to a real circuit. If the seller patched a failing system with hardware-store cords instead, assume the original wiring quit for a reason nobody bothered to diagnose. Budget for an electrician, or walk.
17. Scorch Marks or Heat Discoloration Inside the Breaker Panel
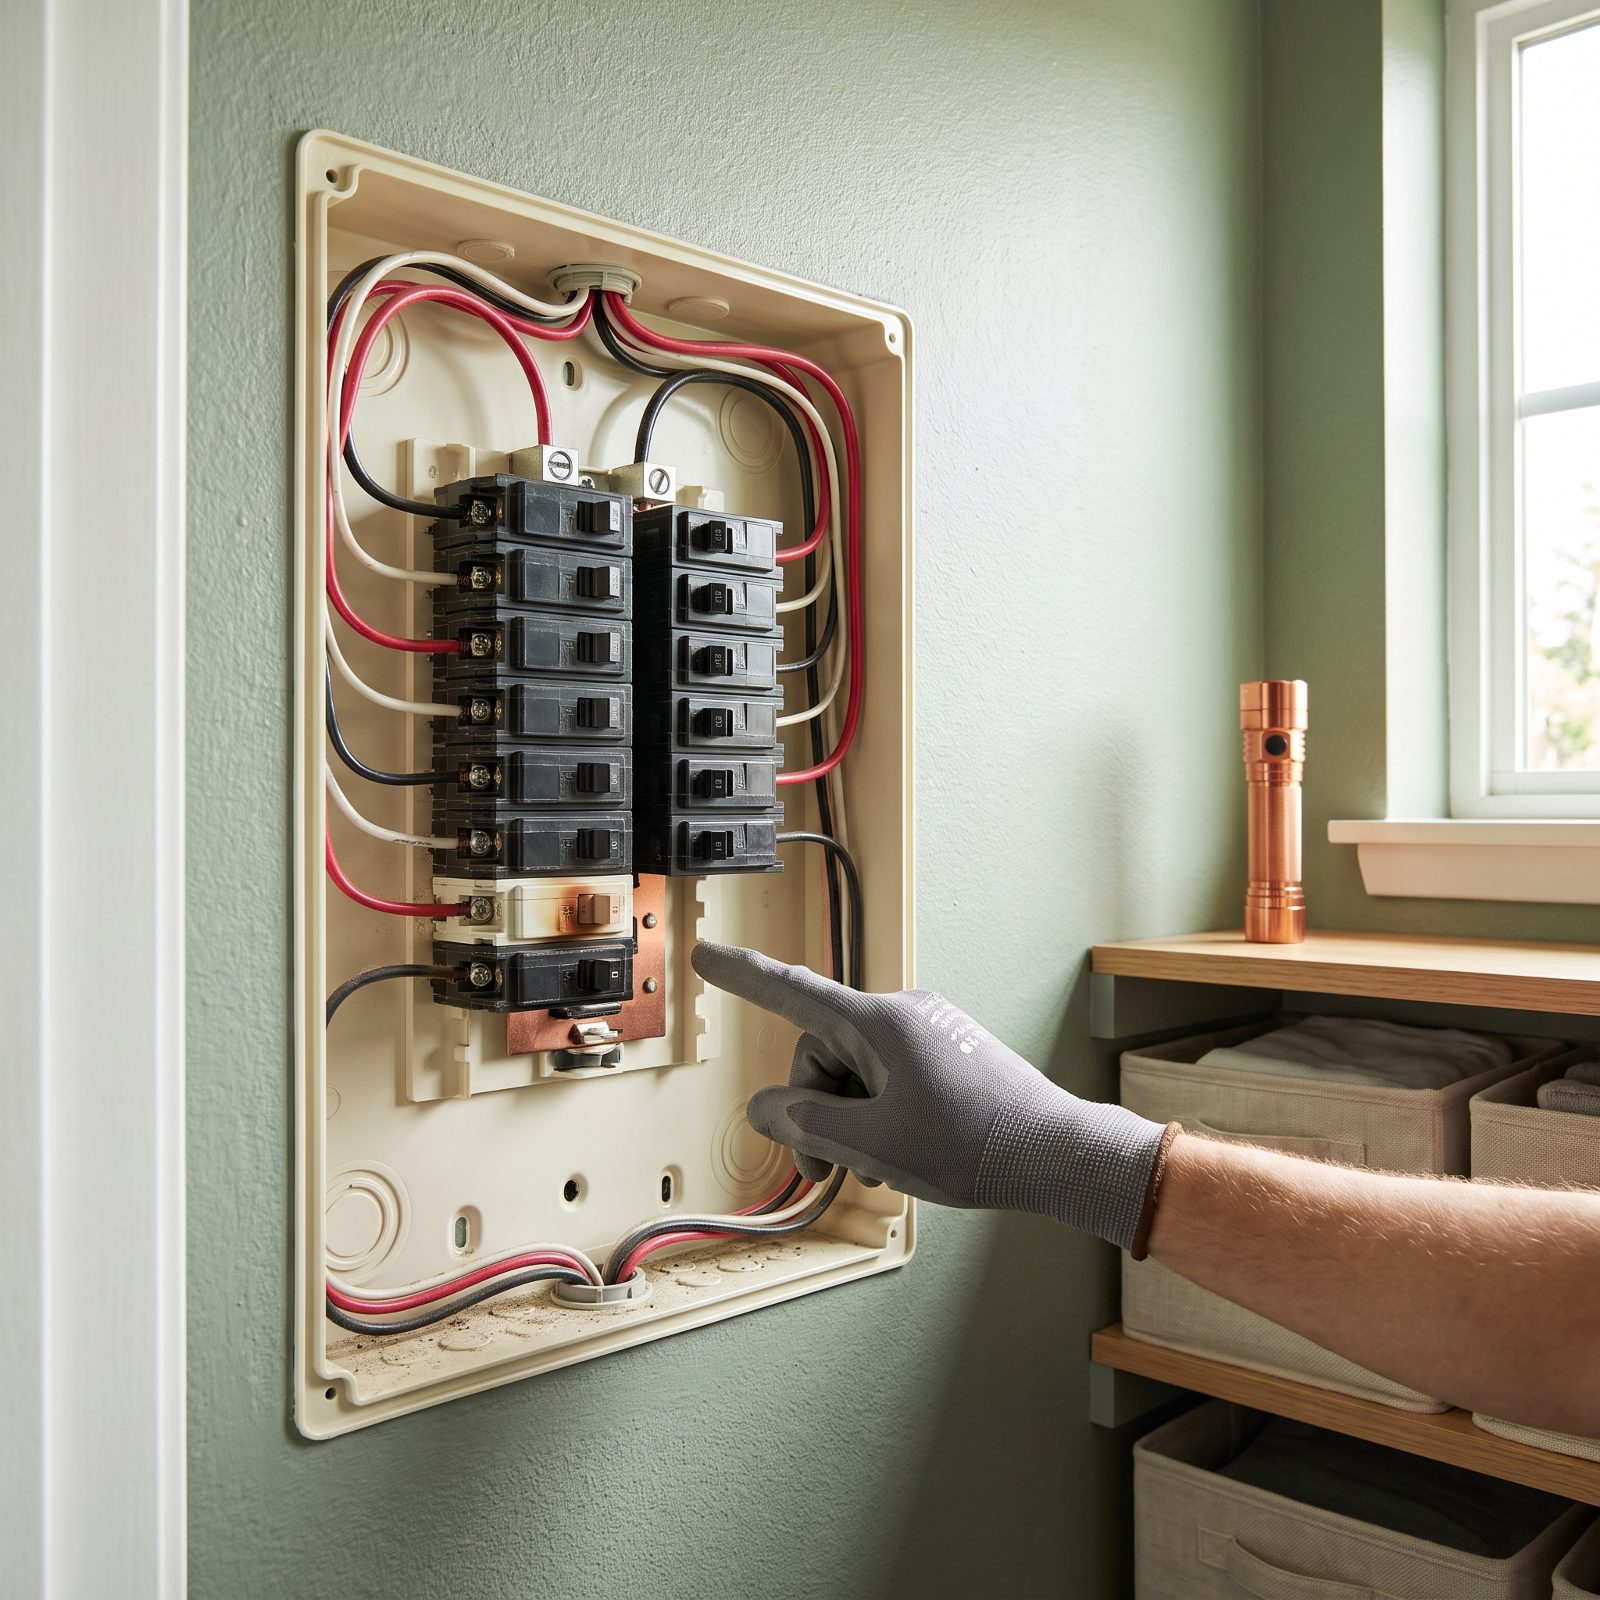
Ask to pull the cover off the breaker panel. Any seller with a clean rig will hand you a screwdriver without blinking. Shine a light on the terminal screws and the bus bar, and look for brown halos, darkened copper, or that faint smell of plastic that got too warm — all of it points to a loose connection quietly roasting itself behind the cover.
Loose lugs cause arcing. Arcing cooks the panel. A cooked panel is where RV fires start.
A breaker that trips too often got replaced. A terminal that discolored got ignored. Only one of those is still dangerous.
Discoloration isn’t automatically a dealbreaker, but it’s a licensed-tech conversation before purchase. Factor the inspection into your offer.
16. A Generator That Struggles to Start From Cold
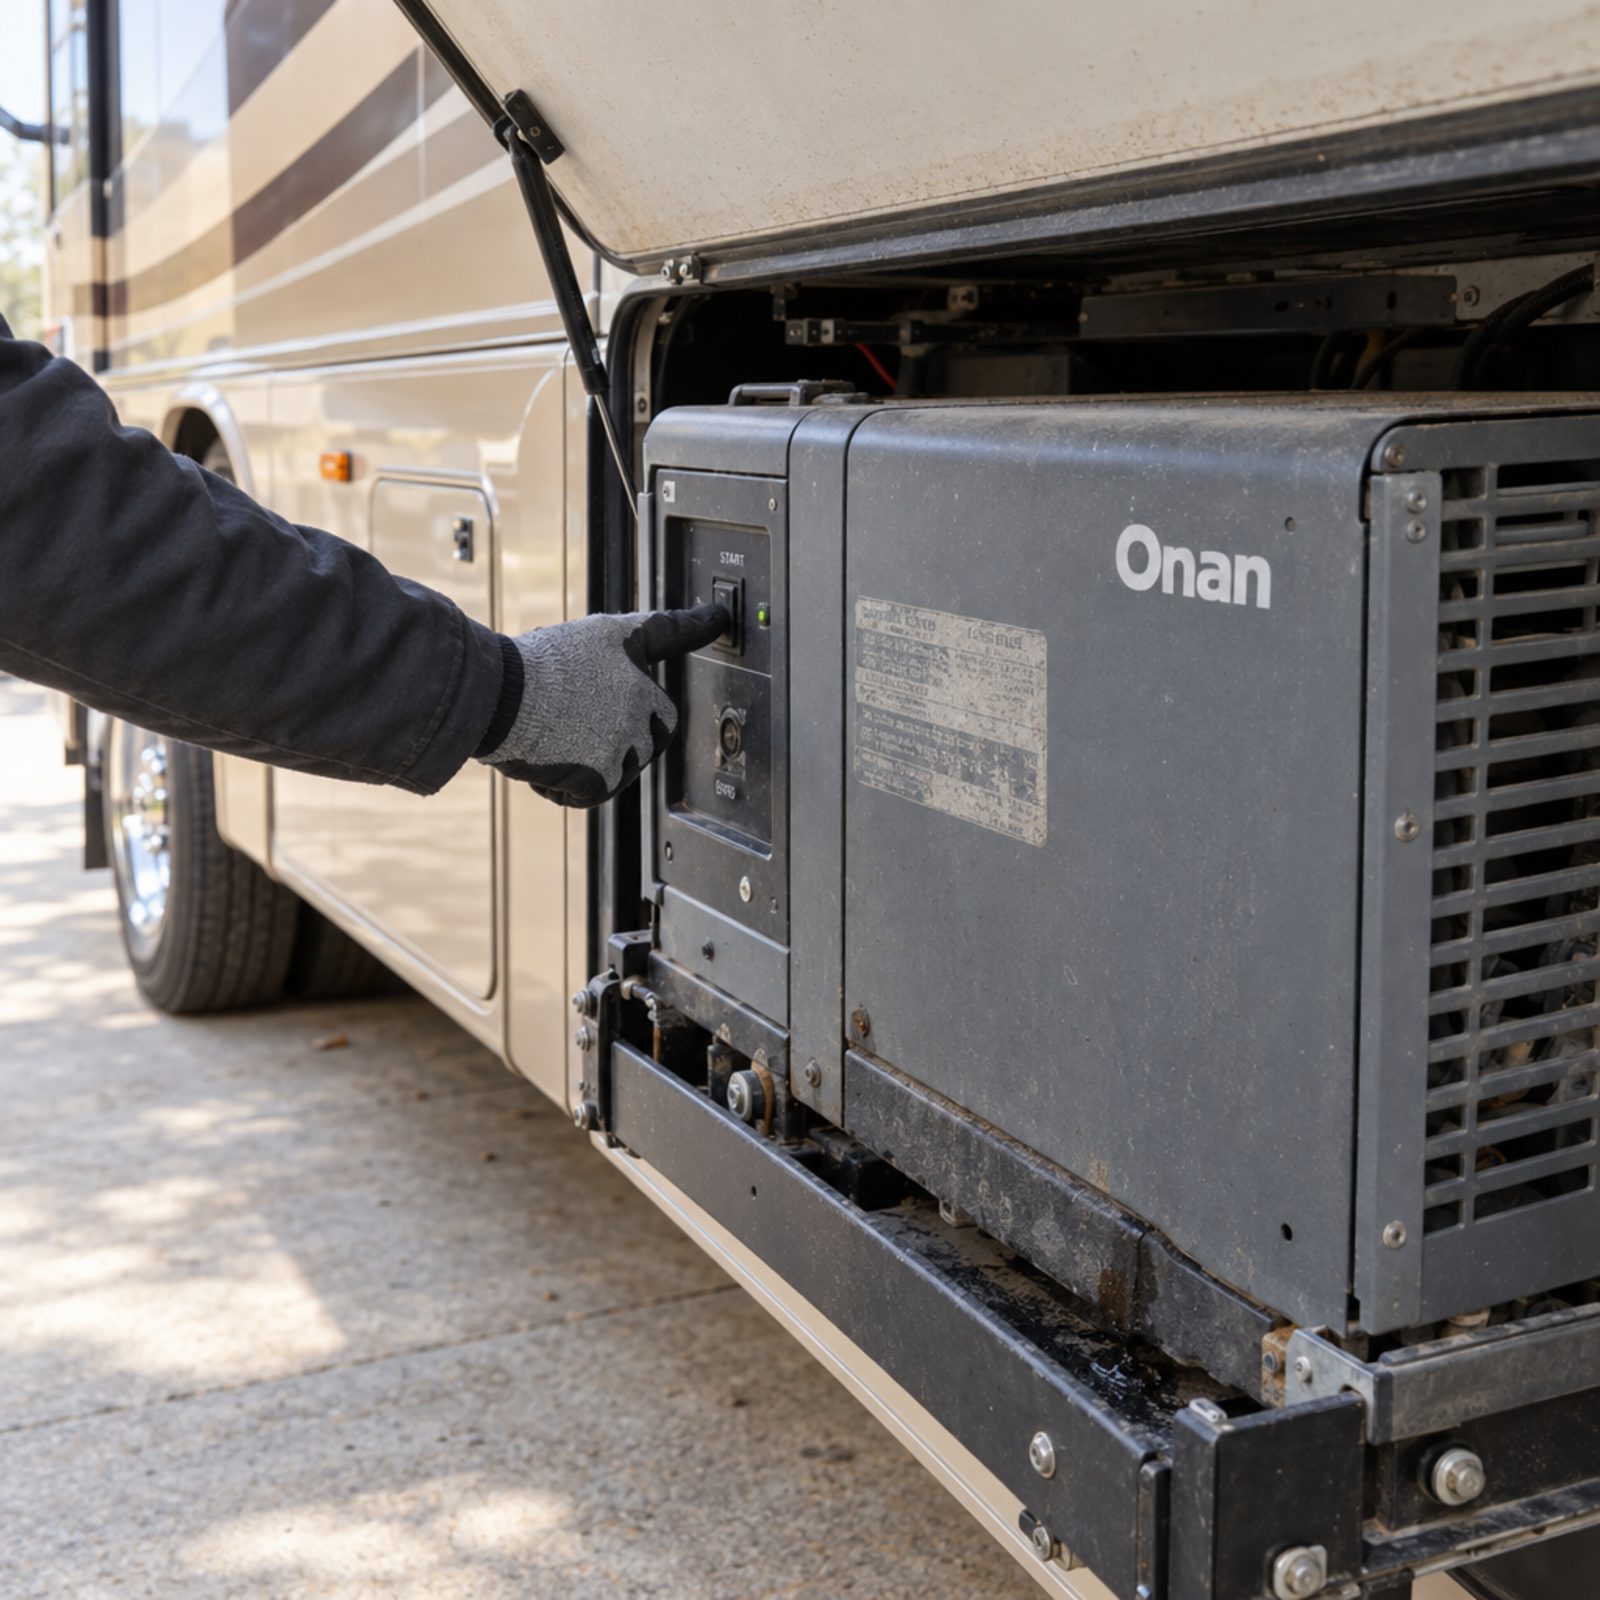
Here’s the trick sellers hate: ask to start the generator cold, before they’ve had a chance to warm it up for you. A healthy genset cranks, catches, and settles into a steady idle in a few seconds. One that churns and churns, coughs, then finally stumbles to life is telling you about old fuel, a weak battery, carbon-fouled jets, or a valve problem.
Generators get expensive fast. A carb rebuild is annoying. A top-end job is a real bill.
Let it run twenty minutes under load with the air conditioner on. Listen for surging and watch for smoke. A generator that won’t hold a steady RPM isn’t ready for a summer in Arizona, and neither is your wallet.
15. Bubbles During a Pressurized Propane Leak Test
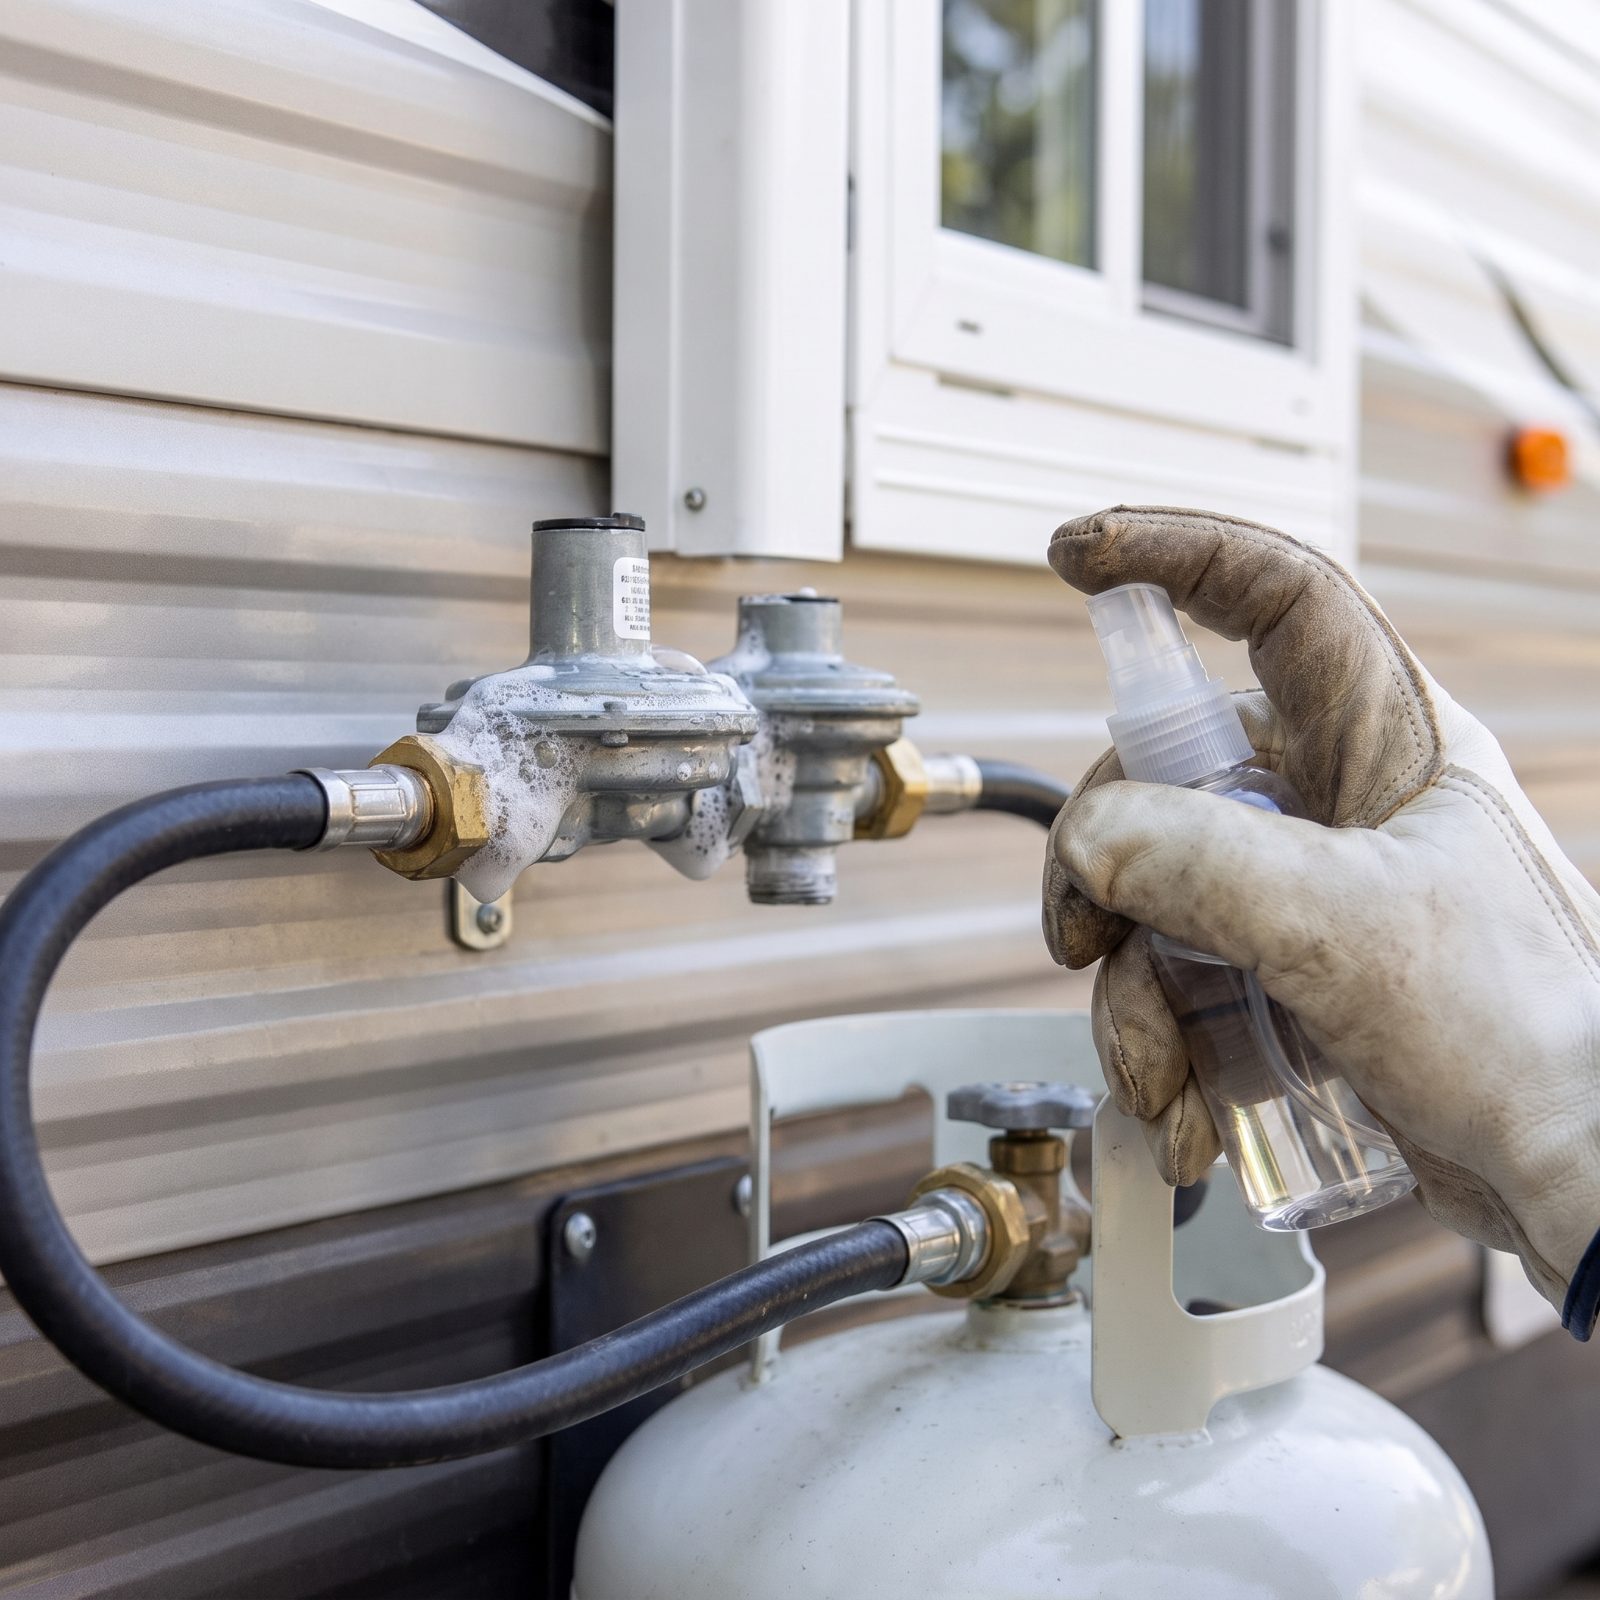
Propane leaks don’t announce themselves. You find them with a cheap spray bottle of soapy water and your own two eyes. With the tank open and the system pressurized, mist every fitting, every regulator joint, every flex line. Bubbles swelling at a connection mean gas is escaping right there.
In a sealed RV, a slow propane leak doesn’t give you a second chance.
Some bubbles come from a loose fitting you can snug up for a few dollars. Others come from a cracked regulator or a corroded line that needs replacing. Either way, you want to know before you’re sleeping twenty inches from the source.
14. Black Soot Above an Appliance Vent
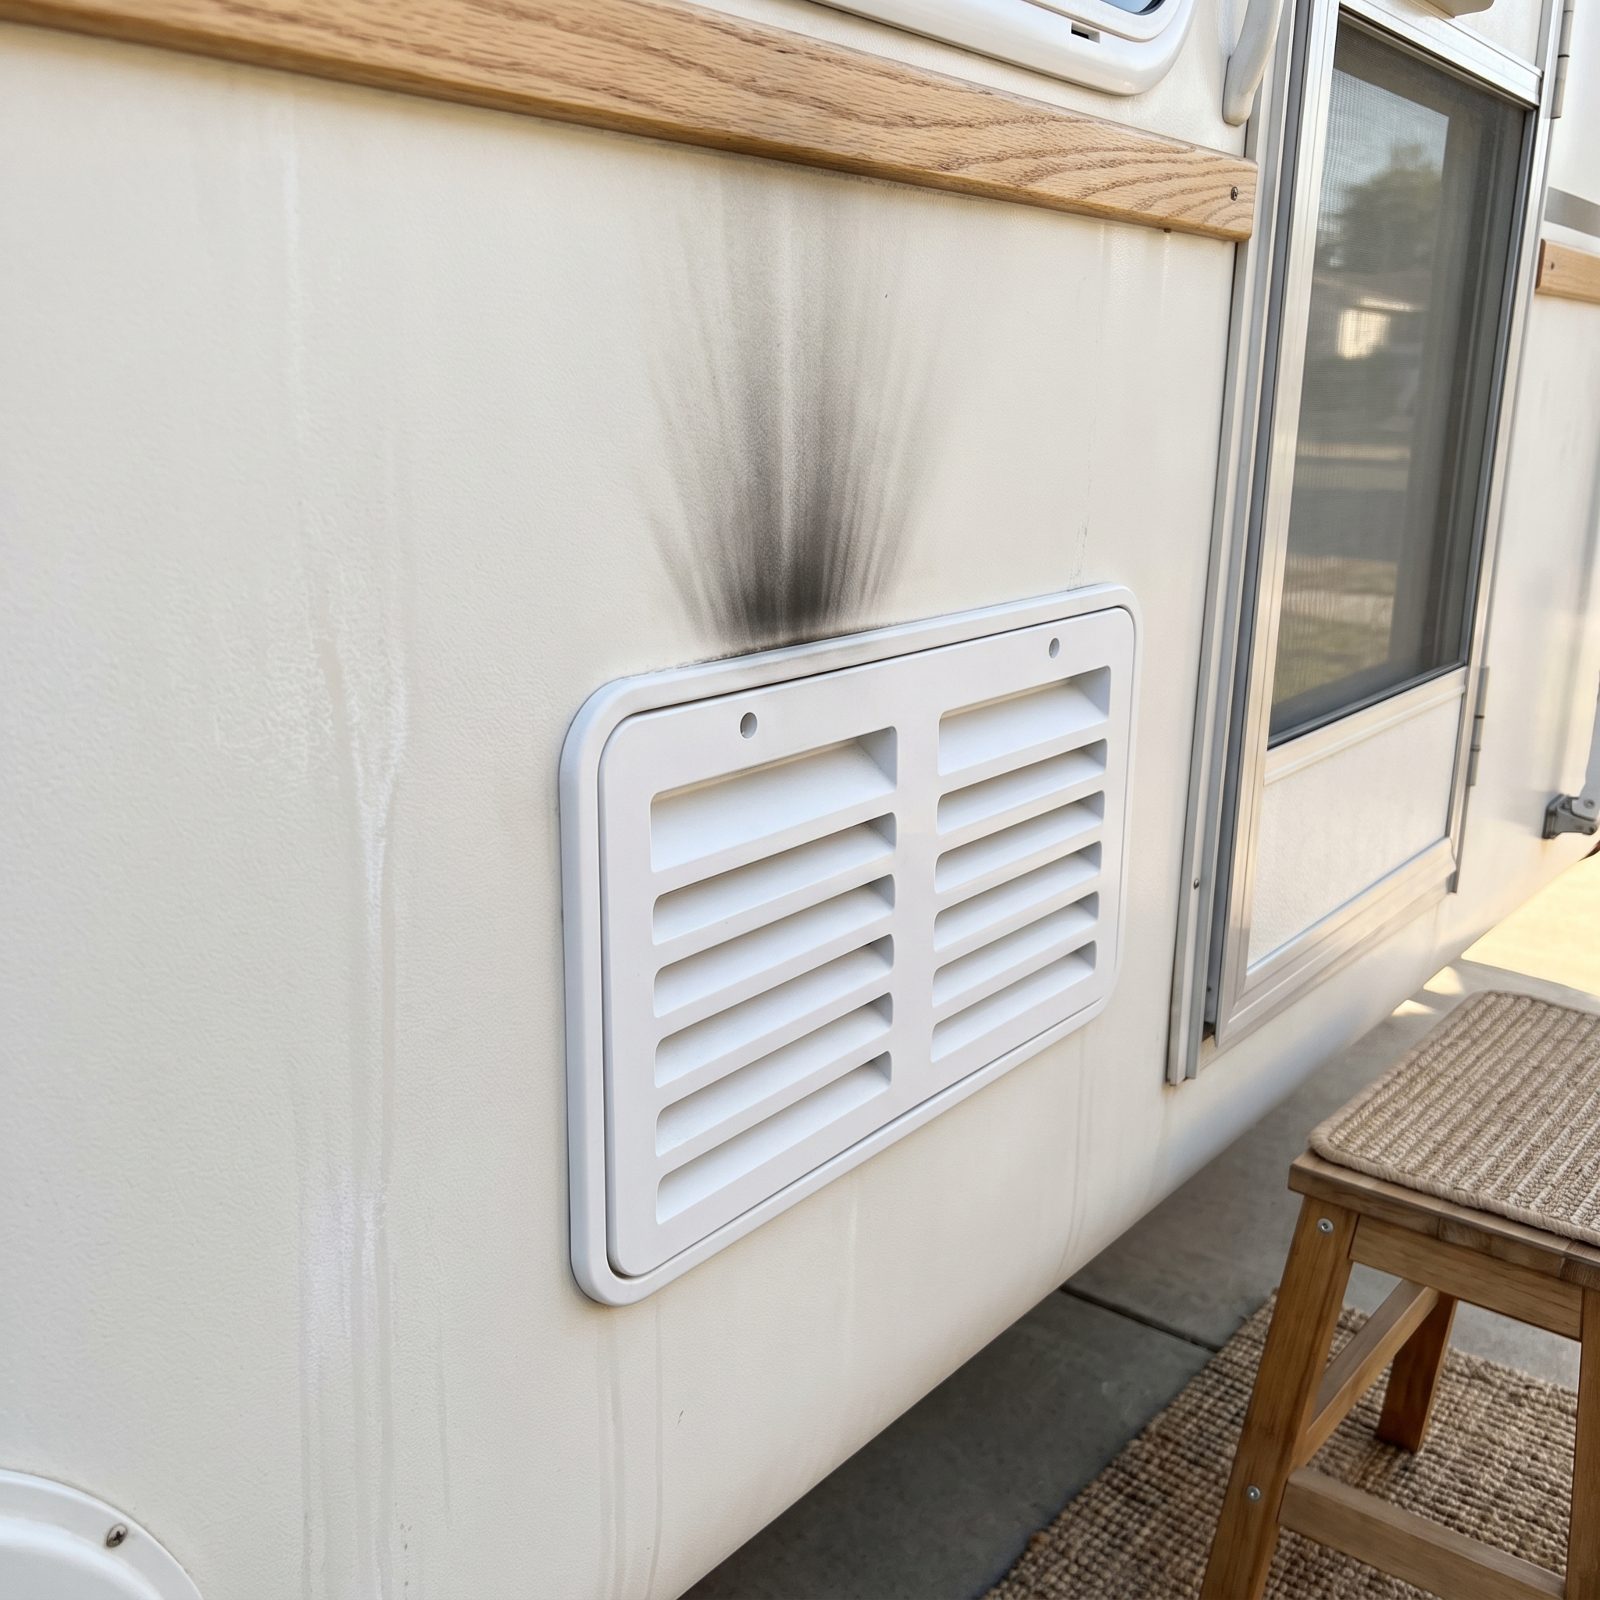
Walk the outside walls and look above the appliance vents — the little louvered covers for the fridge, the furnace, the water heater. A fan of black soot climbing up the fiberglass means something inside burned dirty.
Soot is incomplete combustion, and incomplete combustion produces carbon monoxide. That stain is a symptom of a burner that needs cleaning, a flue that’s partly blocked, or something worse.
Don’t let anyone wave it off as dirt. Wipe it. If it smears black and greasy, that’s combustion byproduct, and no amount of shrugging changes it. Get the appliance serviced and verified before you trust it to run while you’re asleep.
13. Yellow Ammonia Residue Behind the Refrigerator
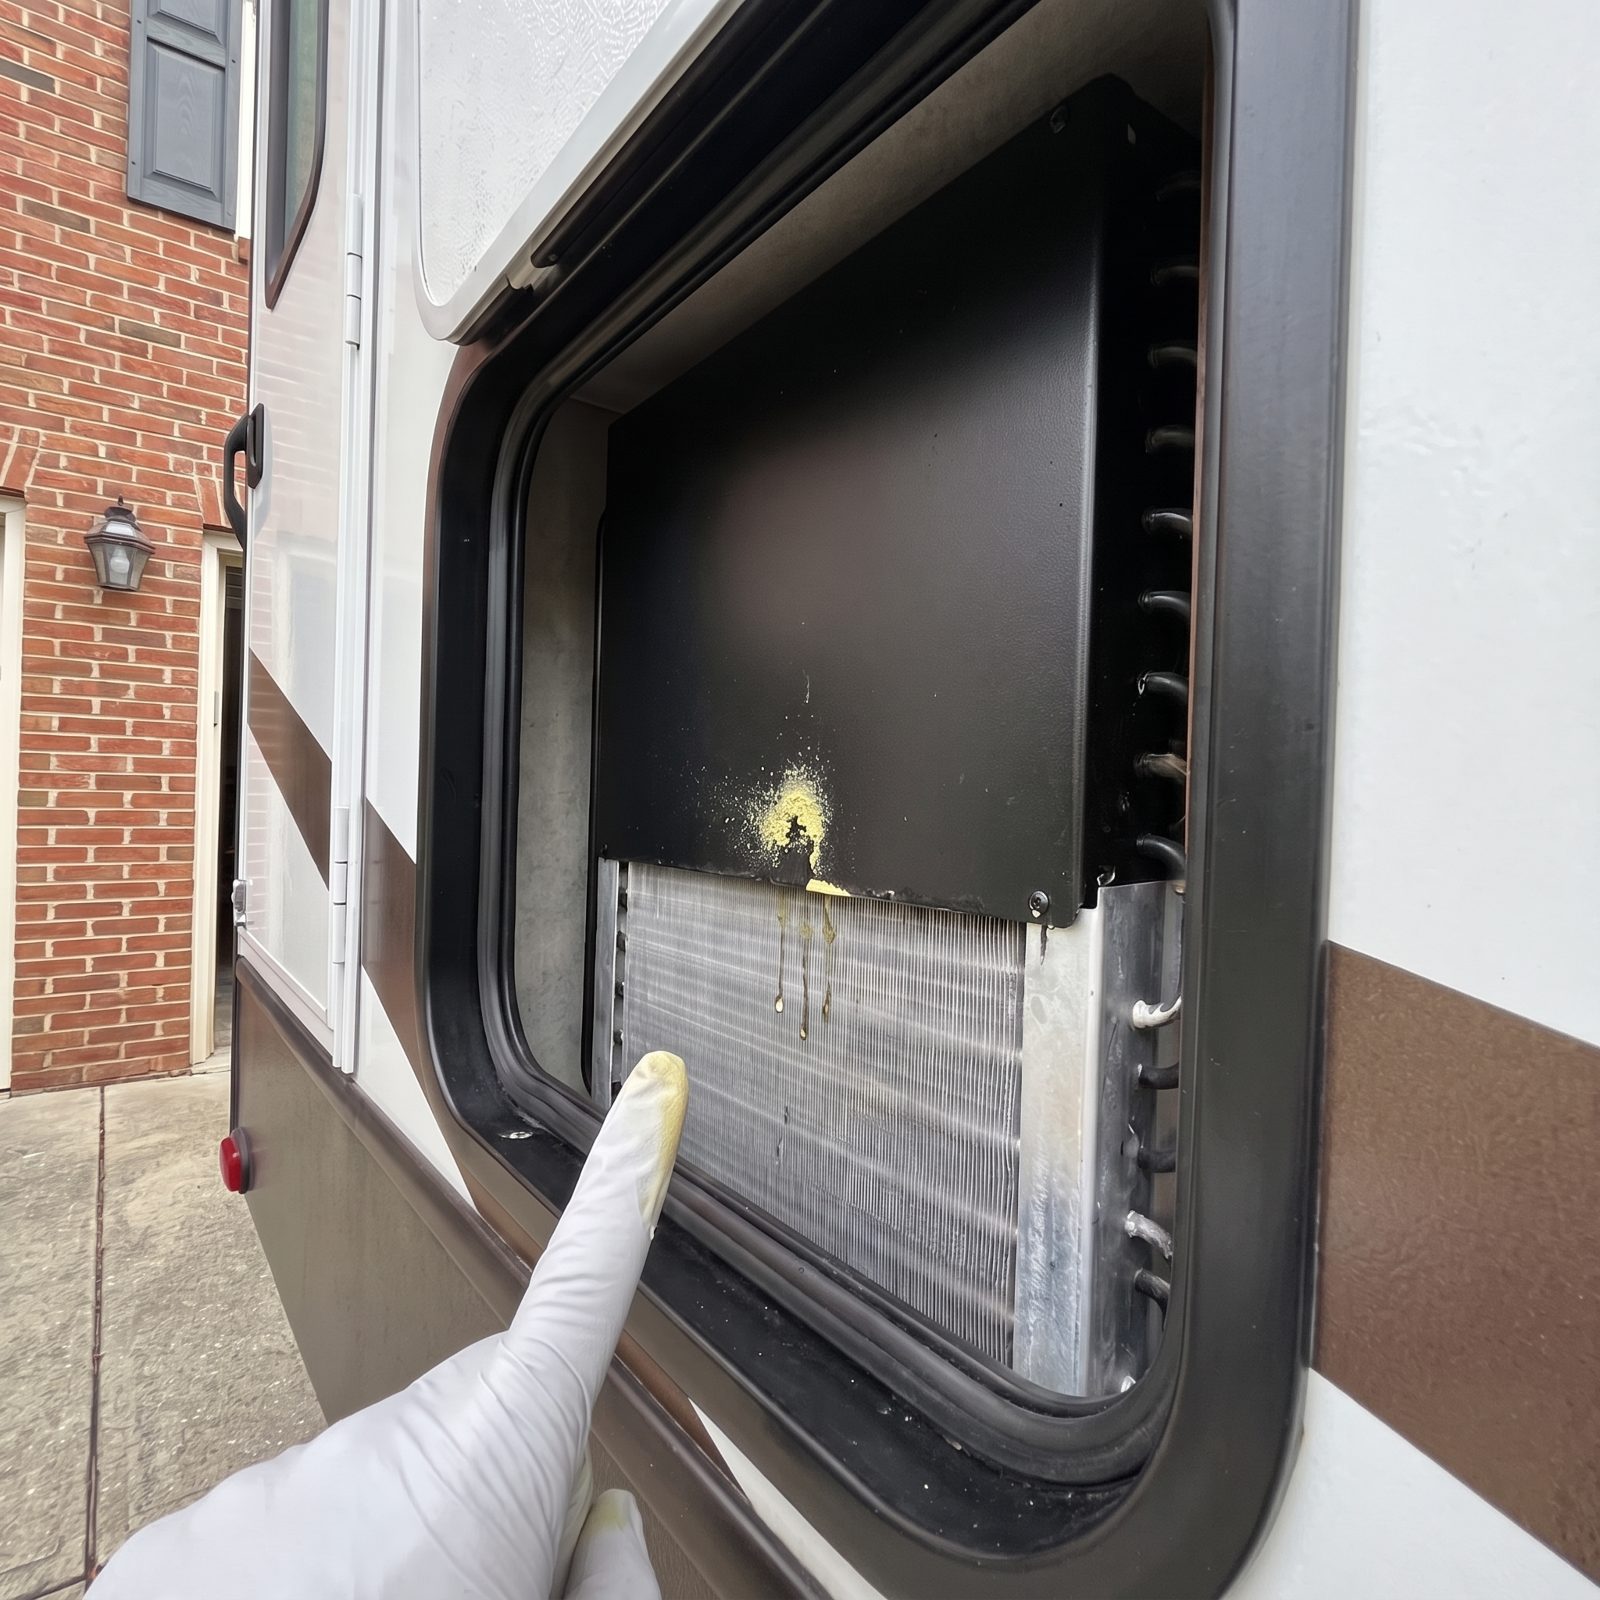
Look through the exterior access opening in the RV’s outside wall behind the fridge and get a flashlight on the black panel and condenser coils there. A powdery yellow or yellow-green splotch on the panel, often dusting down onto the coils and the cabinet floor, with a sharp smell, is ammonia residue. That’s the coolant — and it’s supposed to stay sealed inside forever.
Once a fridge’s sealed system leaks ammonia, it’s done. You don’t repair it. You replace the whole sealed cooling system, which often costs most of what a new fridge would.
Don’t just open the door and feel for cold air. A dying unit can run fine for a day or two while it quietly fails. The yellow residue is the honest answer the control panel won’t give you.
12. Rust Streaks or Drips Beneath the Water Heater
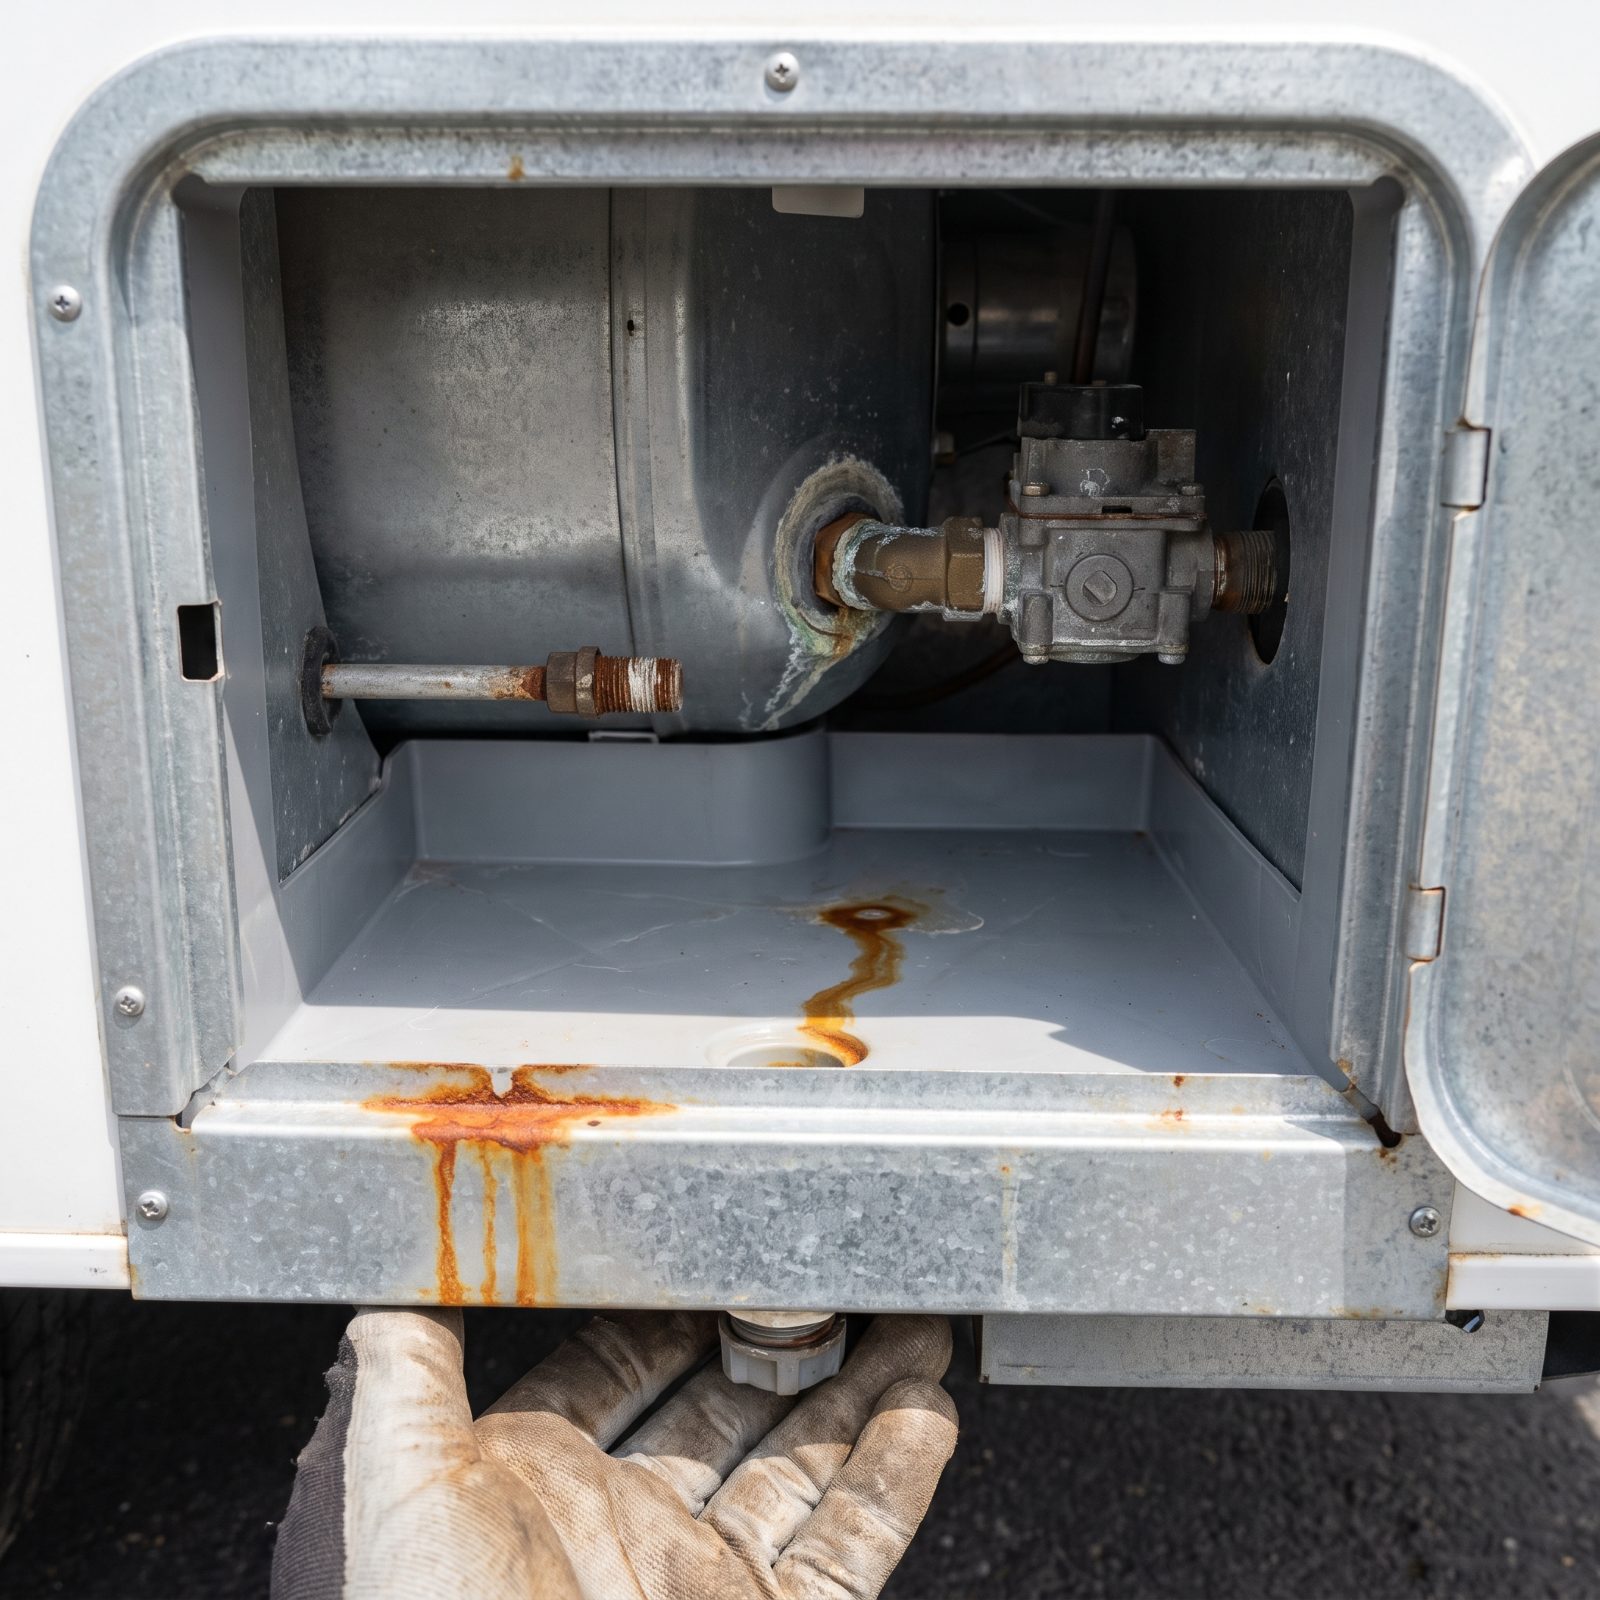
Pop the water-heater access panel and look low — at the drain plug, the fittings, the floor of the compartment. Rust streaks running down the housing or a dried drip trail on the pan tell you water has been escaping where it shouldn’t.
A weeping water heater soaks the surrounding wood. Soft floor and wall rot starts right here, hidden behind a panel most buyers never open.
A fresh anode rod and a new plug are cheap. A rusted-through tank plus the rot it caused is a whole different conversation. So press the wall below the heater with your thumb. If it gives, keep looking — there’s more water damage than they’re showing you.
11. A Water Pump That Cycles With Every Faucet Closed
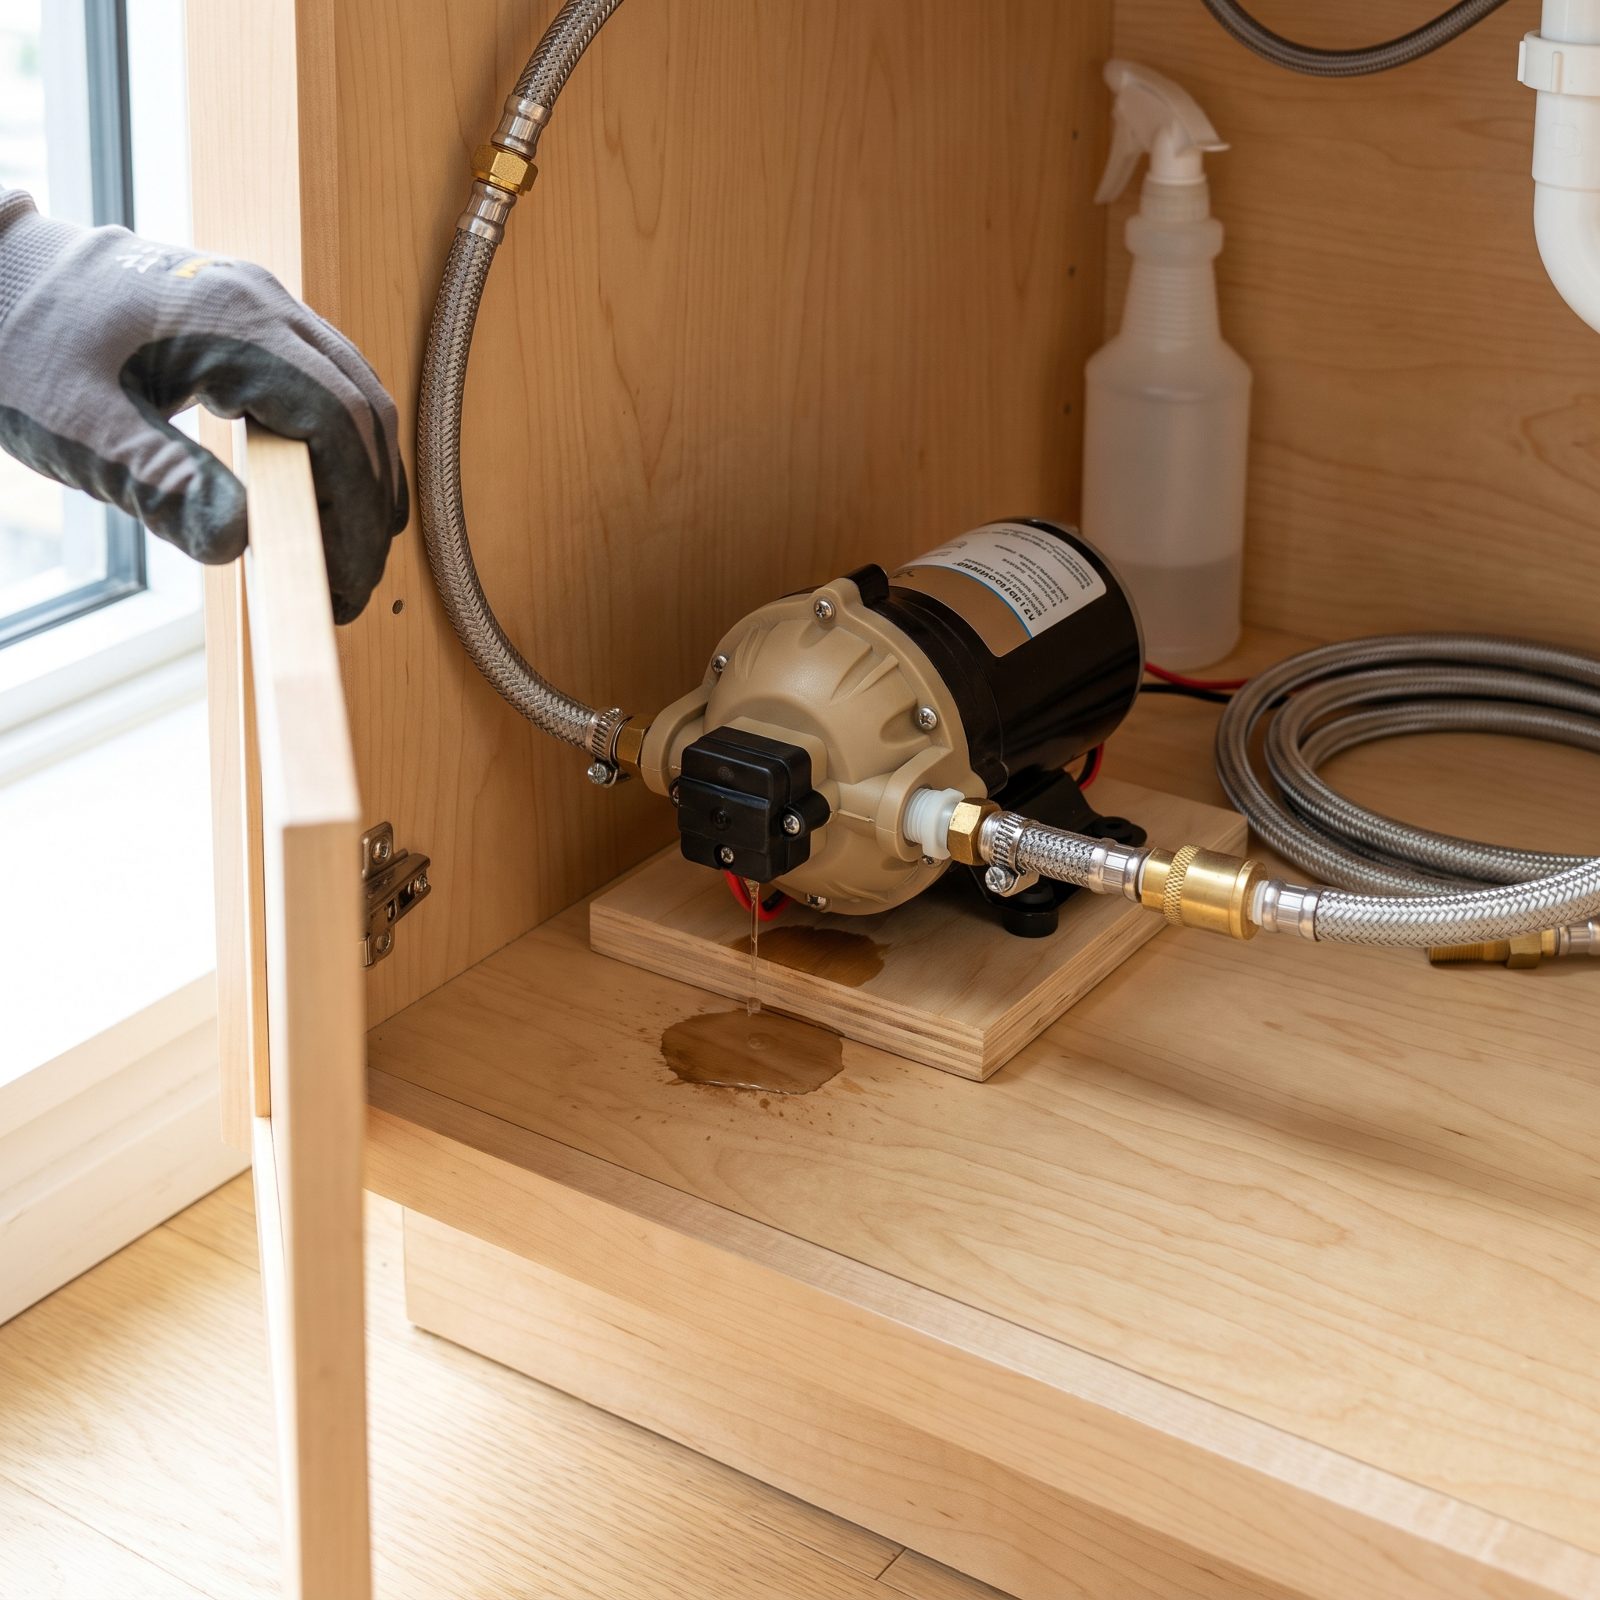
Fill the fresh tank, switch on the pump, and open a faucet until the lines pressurize. Then shut every faucet and just listen. A healthy pump builds pressure, clicks off, and stays quiet.
If it keeps cycling on and off in short bursts with nothing running, pressure is bleeding out somewhere — a leak in a line, a loose fitting, or a failing check valve, and some of those leaks live inside the walls and floor where you’ll never spot them from the galley.
Short cycling also burns out the pump early. Trace the sound while it hunts for pressure. Where it’s loudest is usually where the water’s going.
10. Liquid Dripping From the Waste Outlet With Both Valves Closed
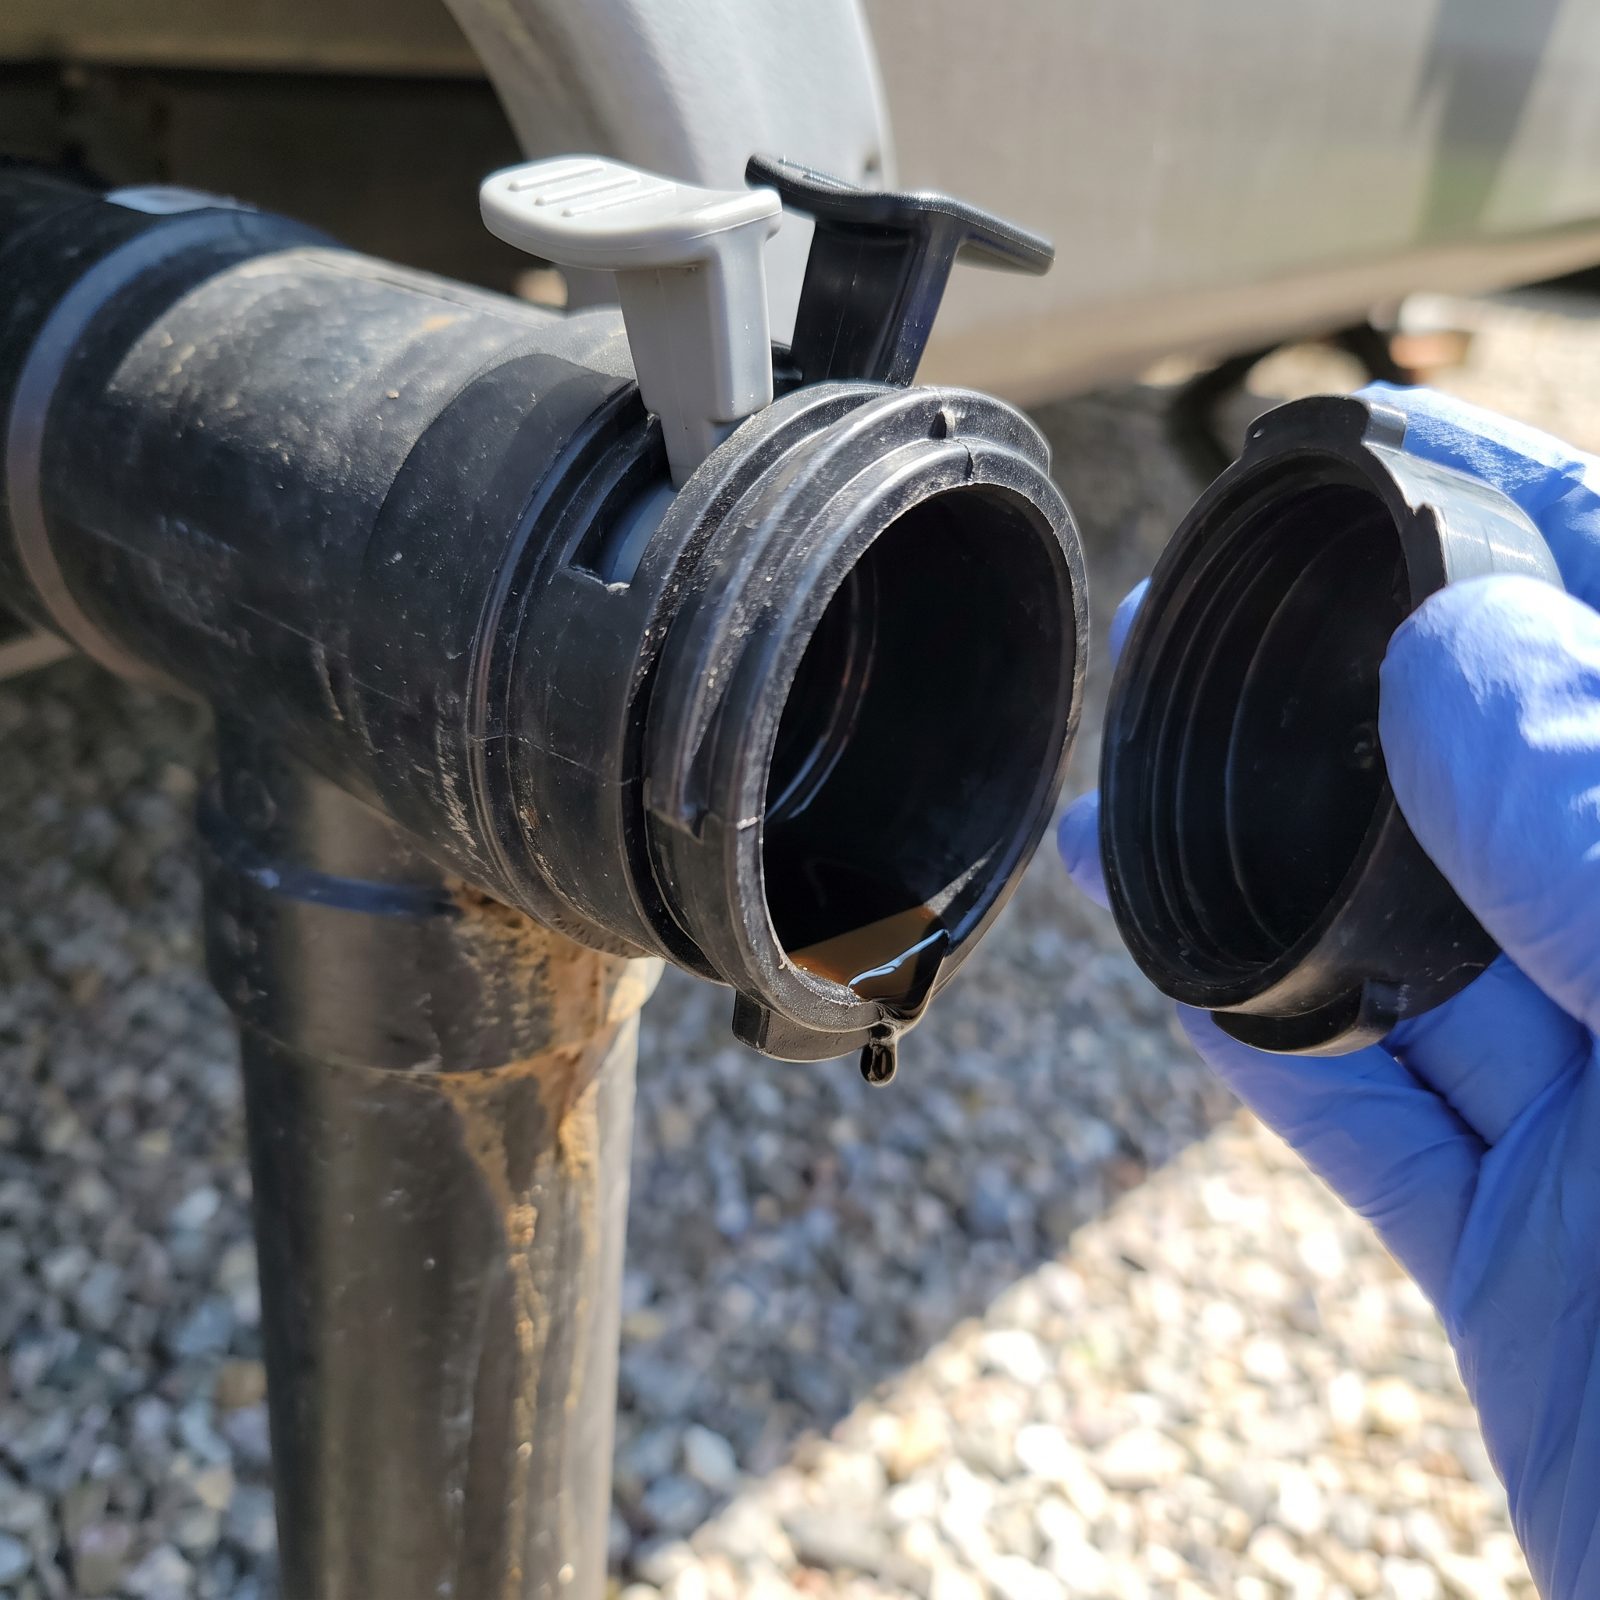
This is the inspection nobody wants to do, which is exactly why you should. Pull the cap off the sewer outlet with both gate valves closed. If liquid weeps or drips out, a valve isn’t sealing.
A leaking gate valve means waste can escape while you’re driving or parked, and the seal only gets worse from there. And a seller who left this unaddressed probably skipped other maintenance you can’t see as easily.
Valves are a known, replaceable part. The question isn’t whether it can be fixed. It’s what else got the same inattention.
9. A Roof Air Conditioner With a Weak Temperature Drop
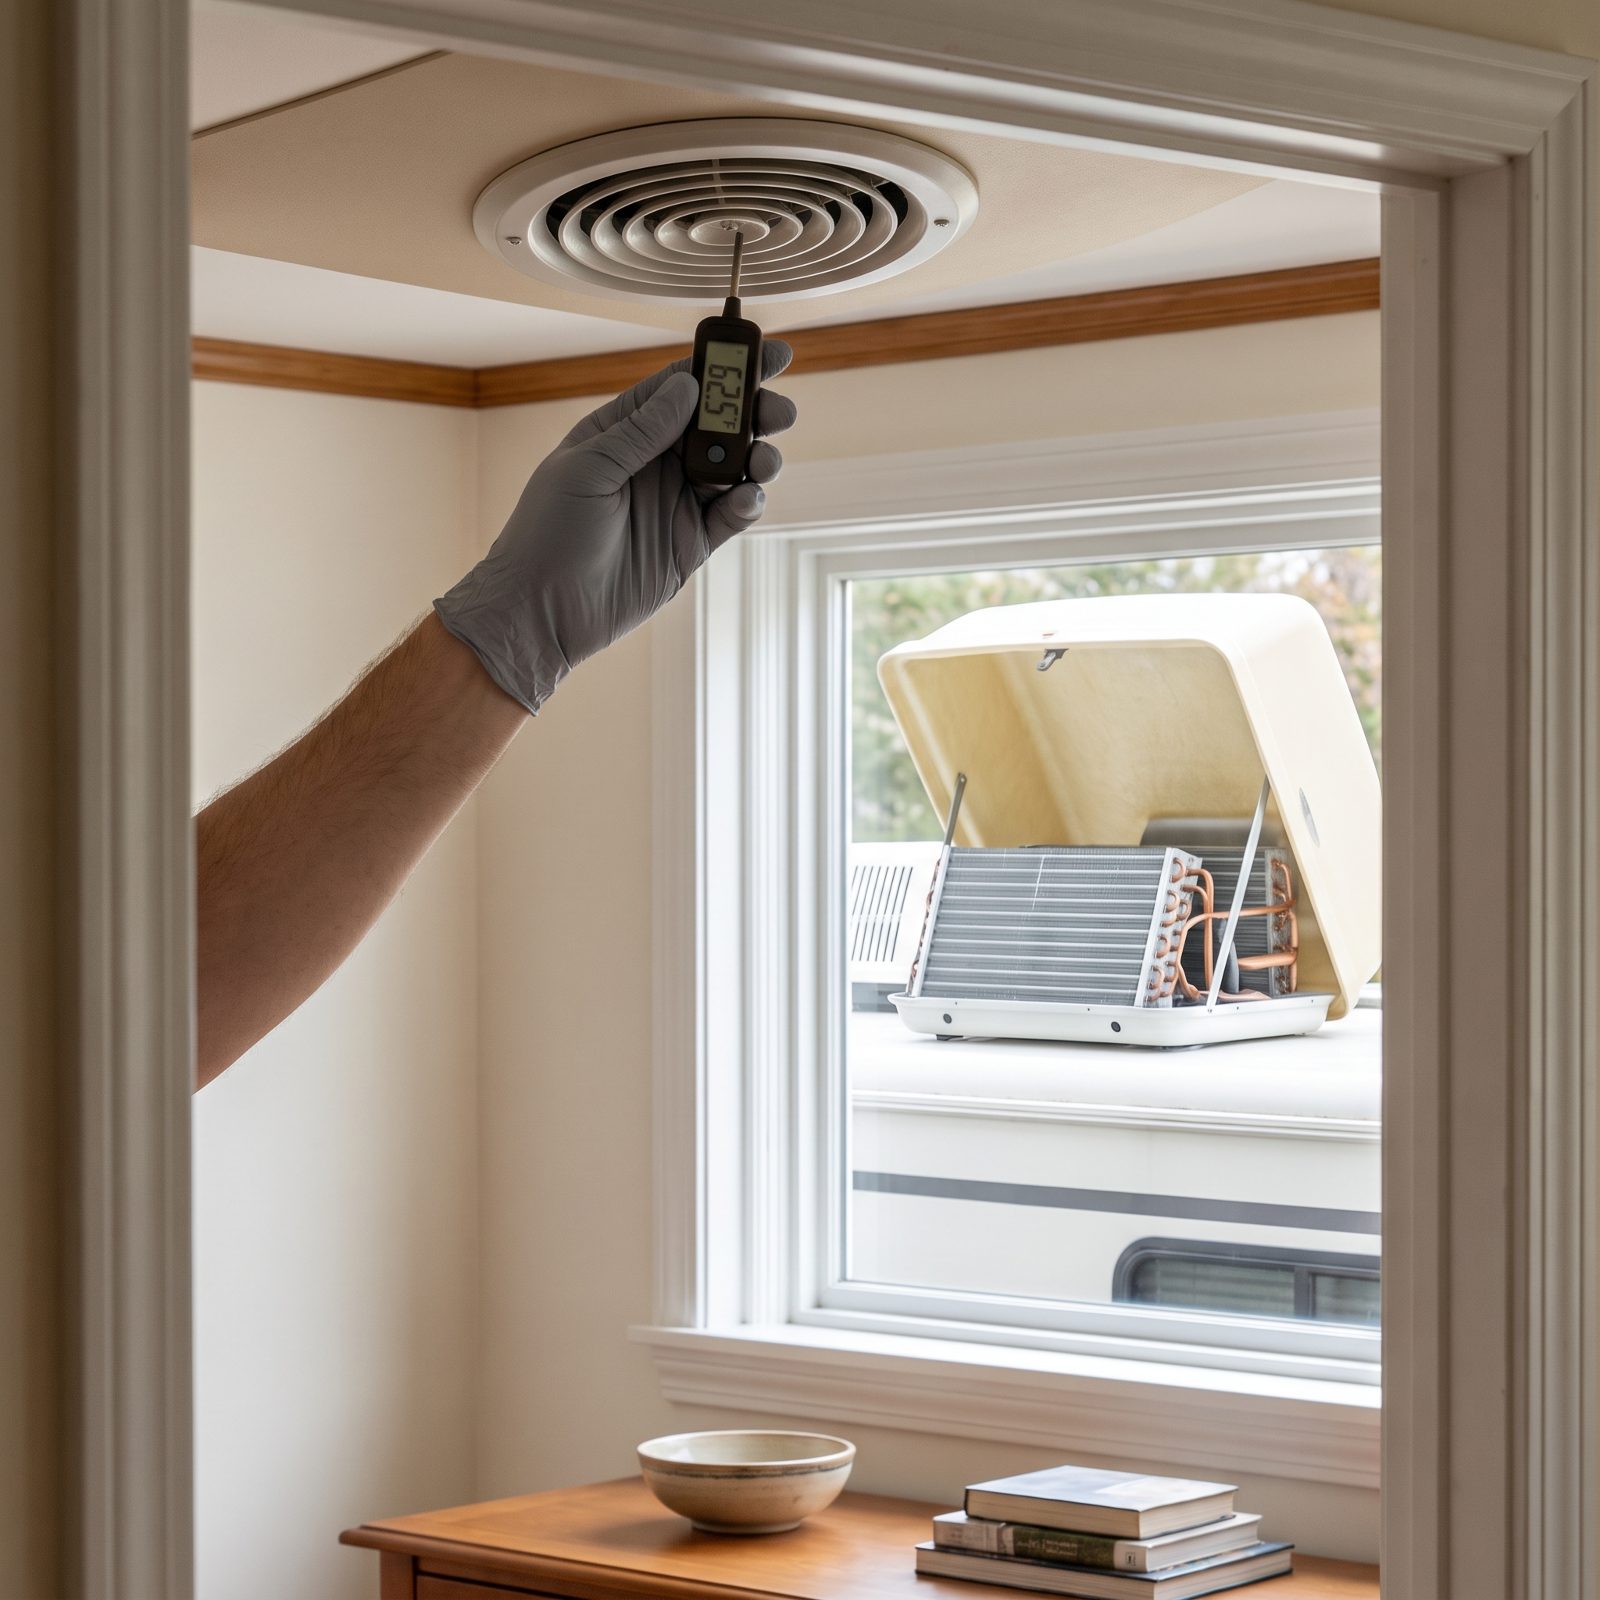
Hold a thermometer at the return grille, then at the ceiling register. The gap between the two tells you everything. A healthy rooftop unit pulls the air coming out noticeably colder than the air going in. Anything thinner and you’re looking at a tired compressor, low refrigerant, or a coil choked with years of road dust.
A weak cooler is a slow leak of money. Replacing a rooftop unit runs well over a thousand dollars installed, and sellers know a cool spring walkthrough hides a lot.
Run it on high for about fifteen minutes before you measure. Hold a probe thermometer in the airflow at the return grille, then the supply vent. If the drop is weak, pop the shroud and check for crushed fins before you argue price.
8. Heavy Crankcase Blow-By From a Motorhome Engine
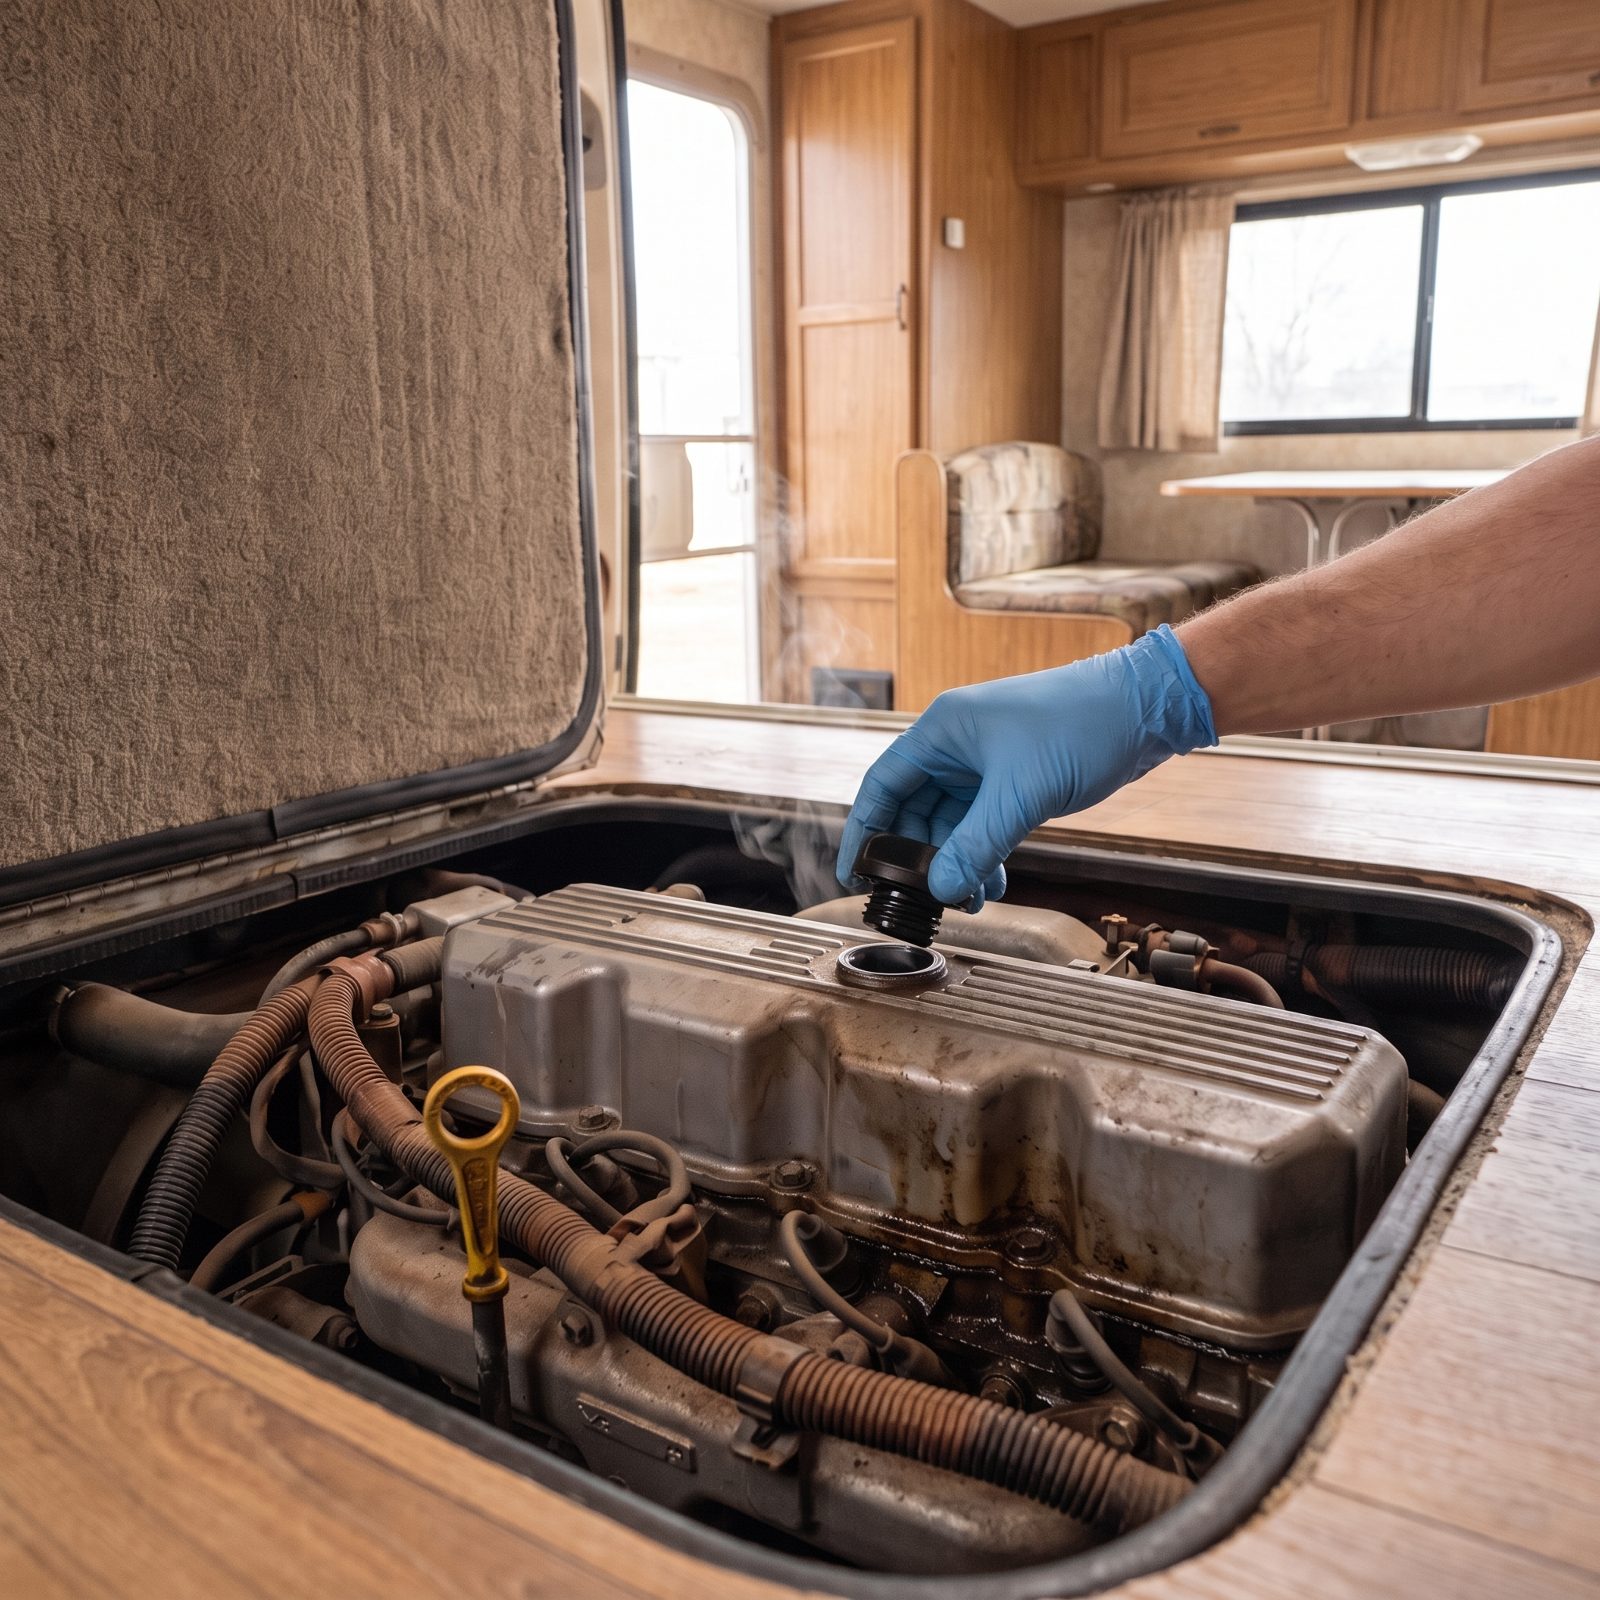
Pull the oil filler cap with the engine idling and hold your hand near the opening. A little puff is normal. But a steady, pressurized gust of gray vapor shoving the cap off the deck? That’s trouble.
That pressure is combustion gas slipping past worn piston rings and into the crankcase. The engine’s in the back half of its life, and an engine rebuild on a motorhome mill can swallow your entire negotiating room and then some.
Do the oil-cap dance warm, then watch how the cap sits on the neck. If it rattles or gets blown clear, you’ve found your reason to insist on a compression test before any money changes hands. We’ve walked away from rigs that cleaned up beautifully everywhere except right here.
7. Milky Engine Oil on the Dipstick or Filler Cap
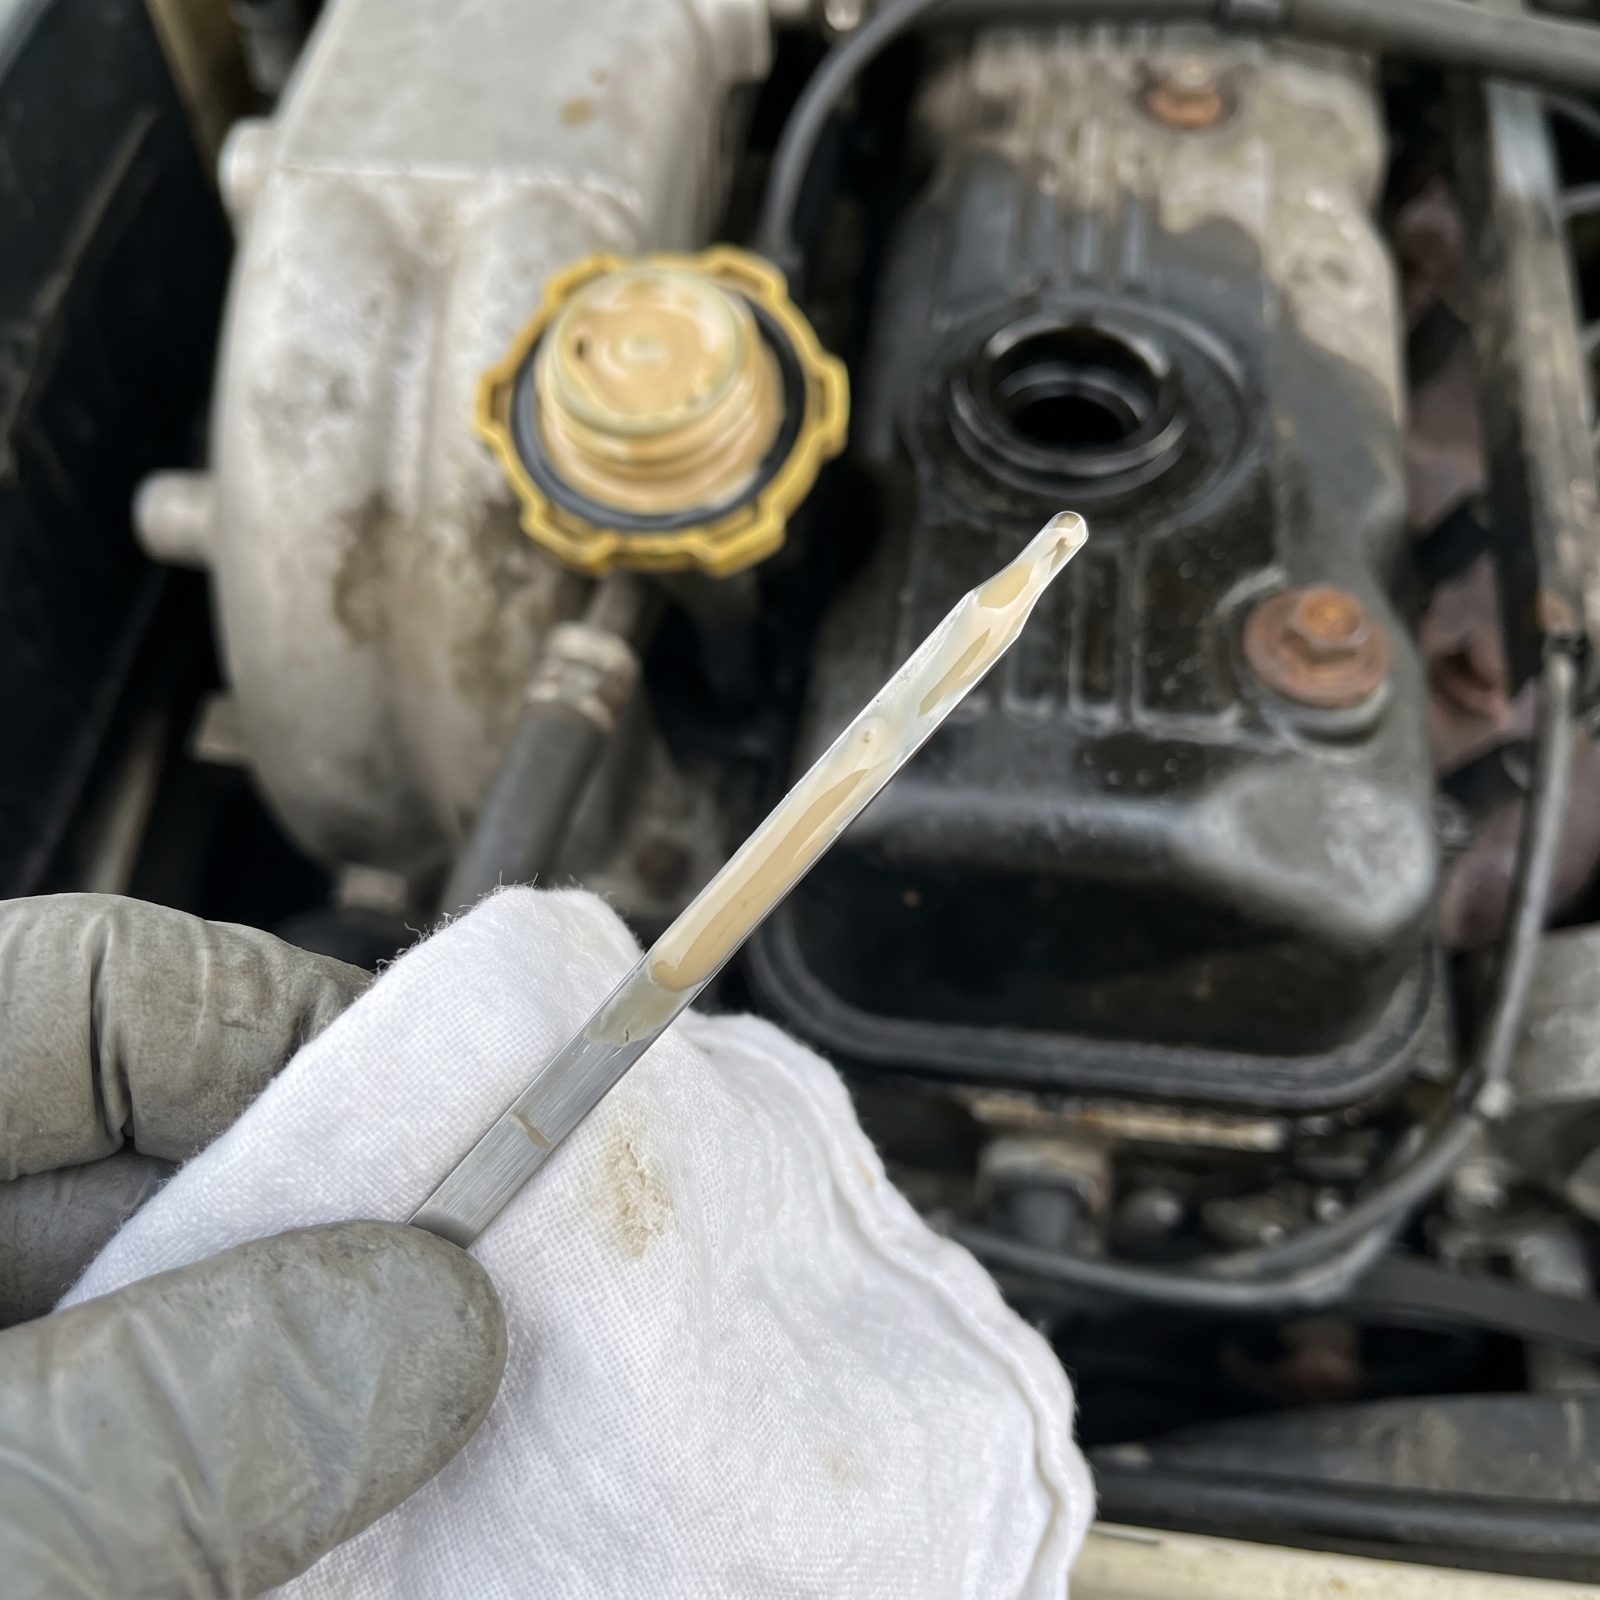
Coffee-with-cream on the dipstick is one of the scariest things you can find in a used rig. Oil should be amber to dark brown and slick. When it turns the color of a milkshake and leaves a tan froth under the filler cap, coolant and oil are mixing where they absolutely should not.
Usually that’s a blown head gasket or a cracked block, and both land squarely in the thousands-of-dollars-and-weeks-in-the-shop category.
Check the coolant overflow too. Oily sheen floating on the antifreeze is the same story told from the other side.
6. Dark, Burnt-Smelling Automatic Transmission Fluid
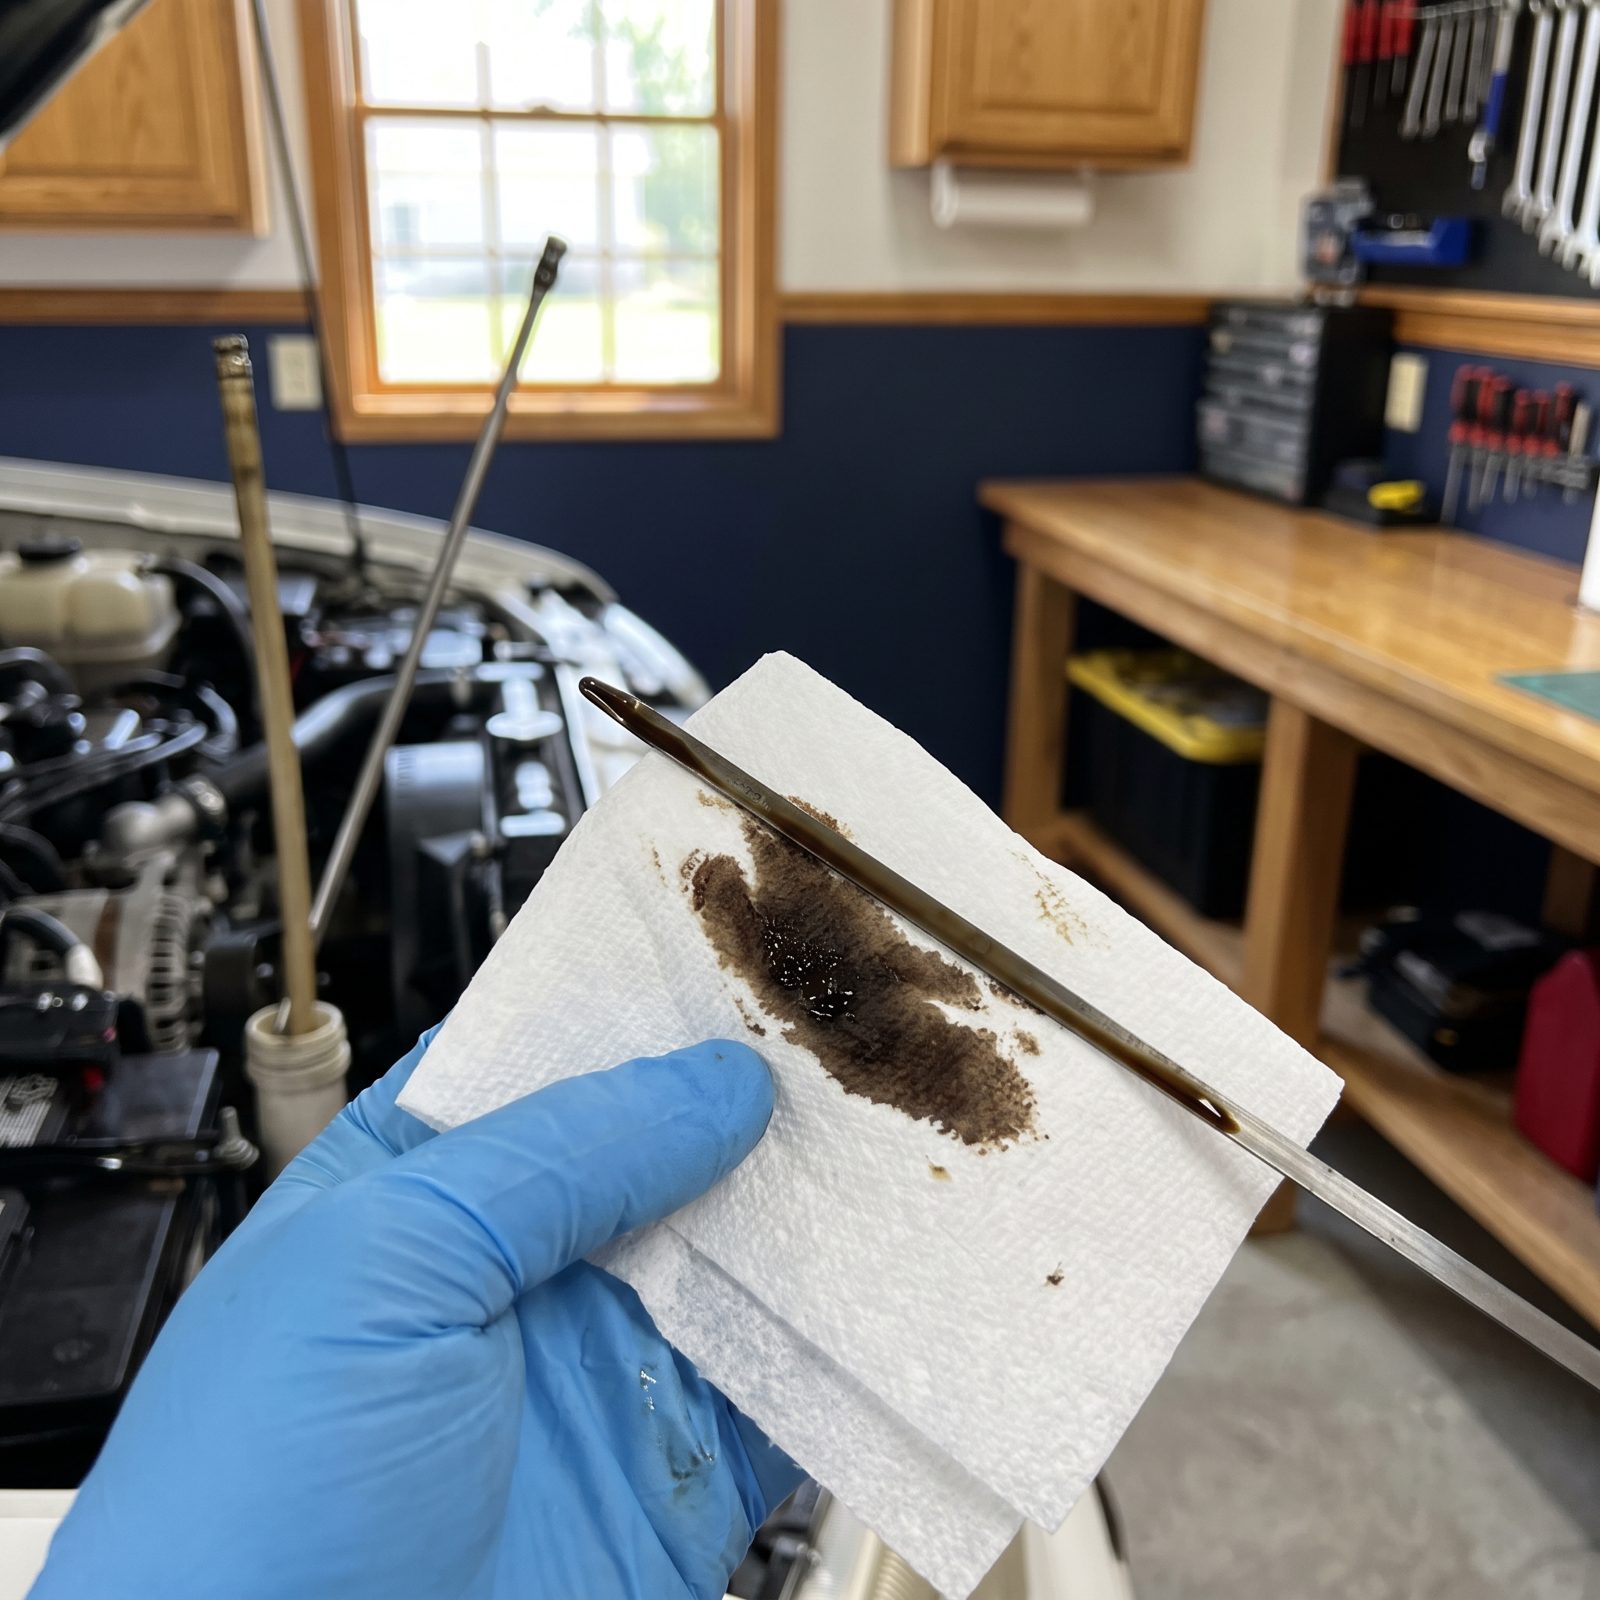
Fresh transmission fluid is bright cherry red and smells faintly sweet. Pull the dipstick, wipe it on a paper towel, and hold it to the light. Brown fluid is tired. Near-black fluid that reeks like scorched toast means the transmission has been cooking itself for a while.
Towing a heavy trailer or climbing grades without an auxiliary cooler burns fluid, and burnt fluid means worn clutches inside. A rebuilt RV transmission is easily a four-figure repair, sometimes worse.
So smell it. That burnt note is hard to fake and harder to ignore. If the fluid is dark and the seller shrugs, assume the slushbox is on borrowed time and price accordingly.
5. Blue, White or Persistent Black Exhaust Smoke
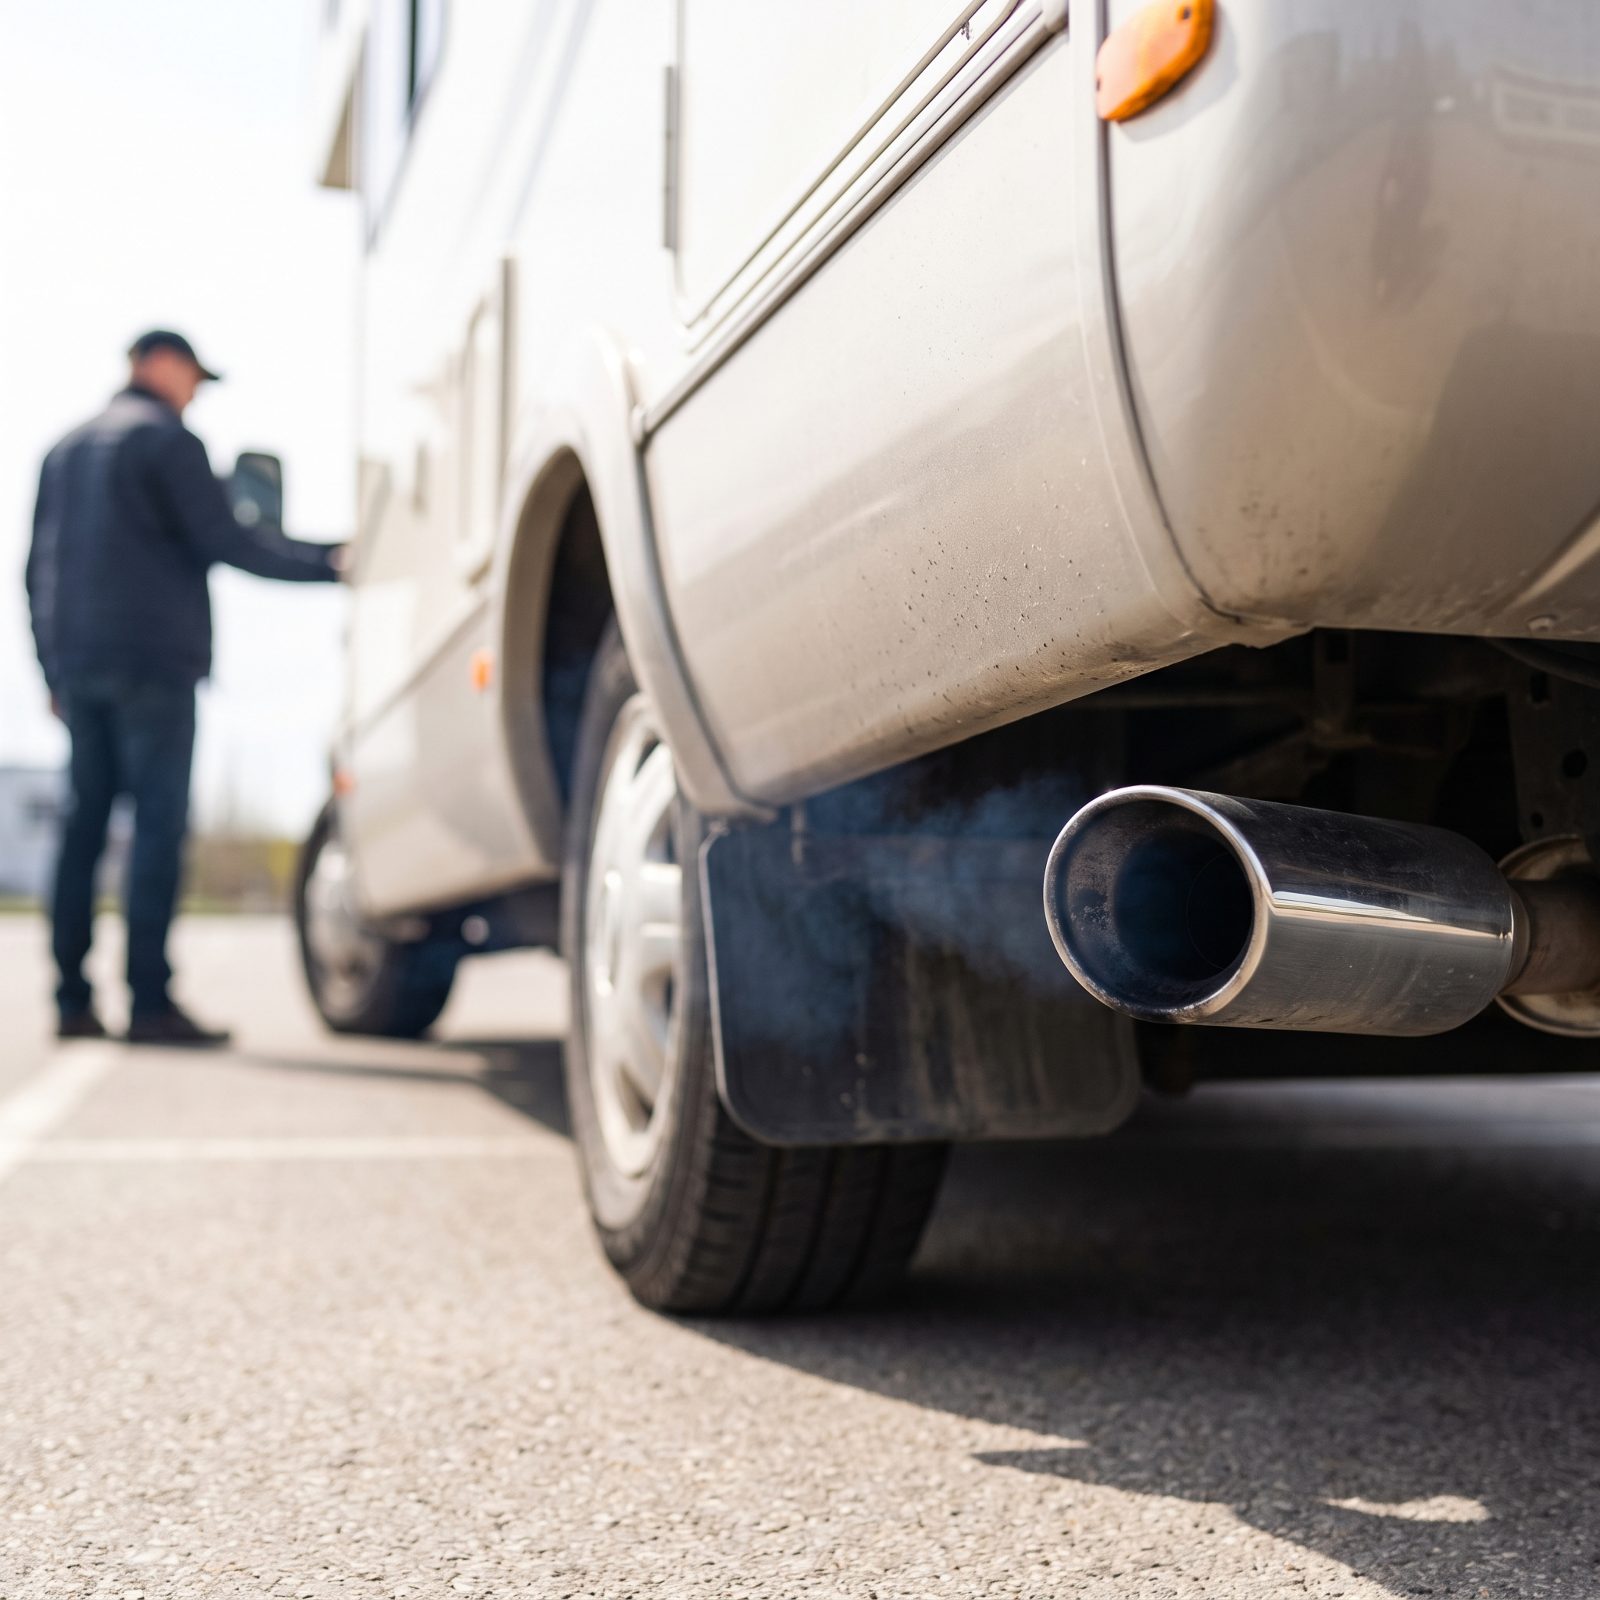
Have someone stand behind the rig while you start it cold, then watch the tailpipe when they goose the throttle. The color of the smoke reads like a diagnosis.
- Blue smoke: oil burning in the cylinders. Worn rings or valve seals.
- White smoke that won’t clear: coolant entering combustion. A sweet smell confirms it. Head gasket territory.
- Black smoke that keeps coming: on a diesel, a fuel or injector problem; on gas, a rich-running mess.
A quick white puff on a frosty morning is just condensation, nothing to fear. The trouble is smoke that hangs around after the engine warms up.
Run it long enough to clear that first-minute puff. Real smoke tells on an engine like nothing else will.
4. Recently Cleared OBD Readiness Monitors
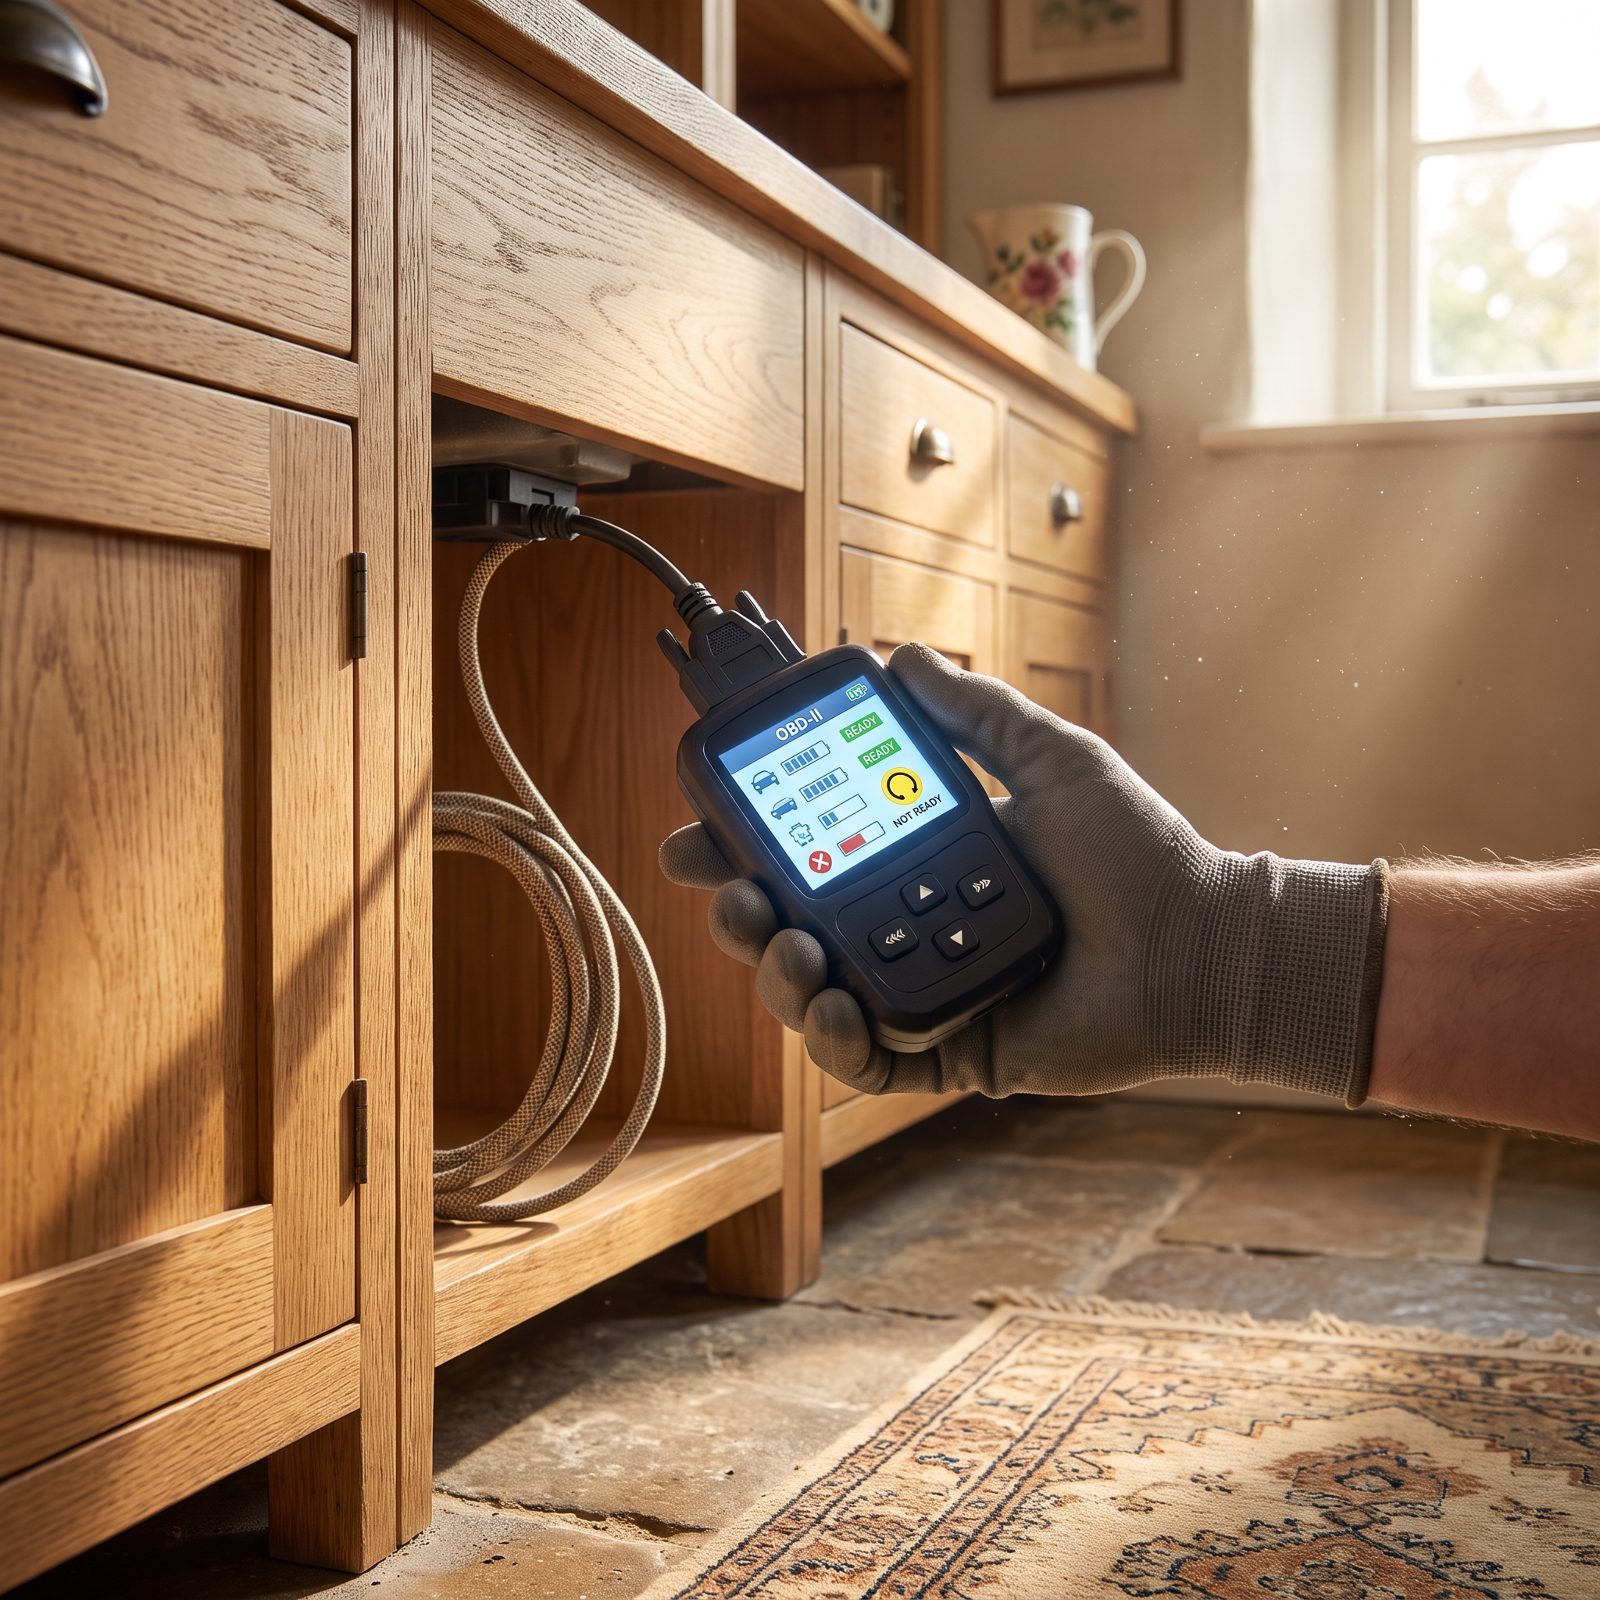
A dashboard with no warning lights isn’t always good news. Clear the engine codes right before a buyer shows up and the check-engine light can’t illuminate until the computer re-runs its self-tests. Those self-tests are the readiness monitors, and they take a drive cycle or two to finish.
Plug in a cheap OBD2 scanner and check how many monitors show “not ready.” On a rig that’s been driven normally, nearly all of them should read “ready” or “complete.” Several incomplete monitors on a vehicle the seller swears runs great? That’s a quiet confession.
Think fresh paint rolled over a water stain. The stain is still back there.
3. Excessive Free Play in the Steering Wheel
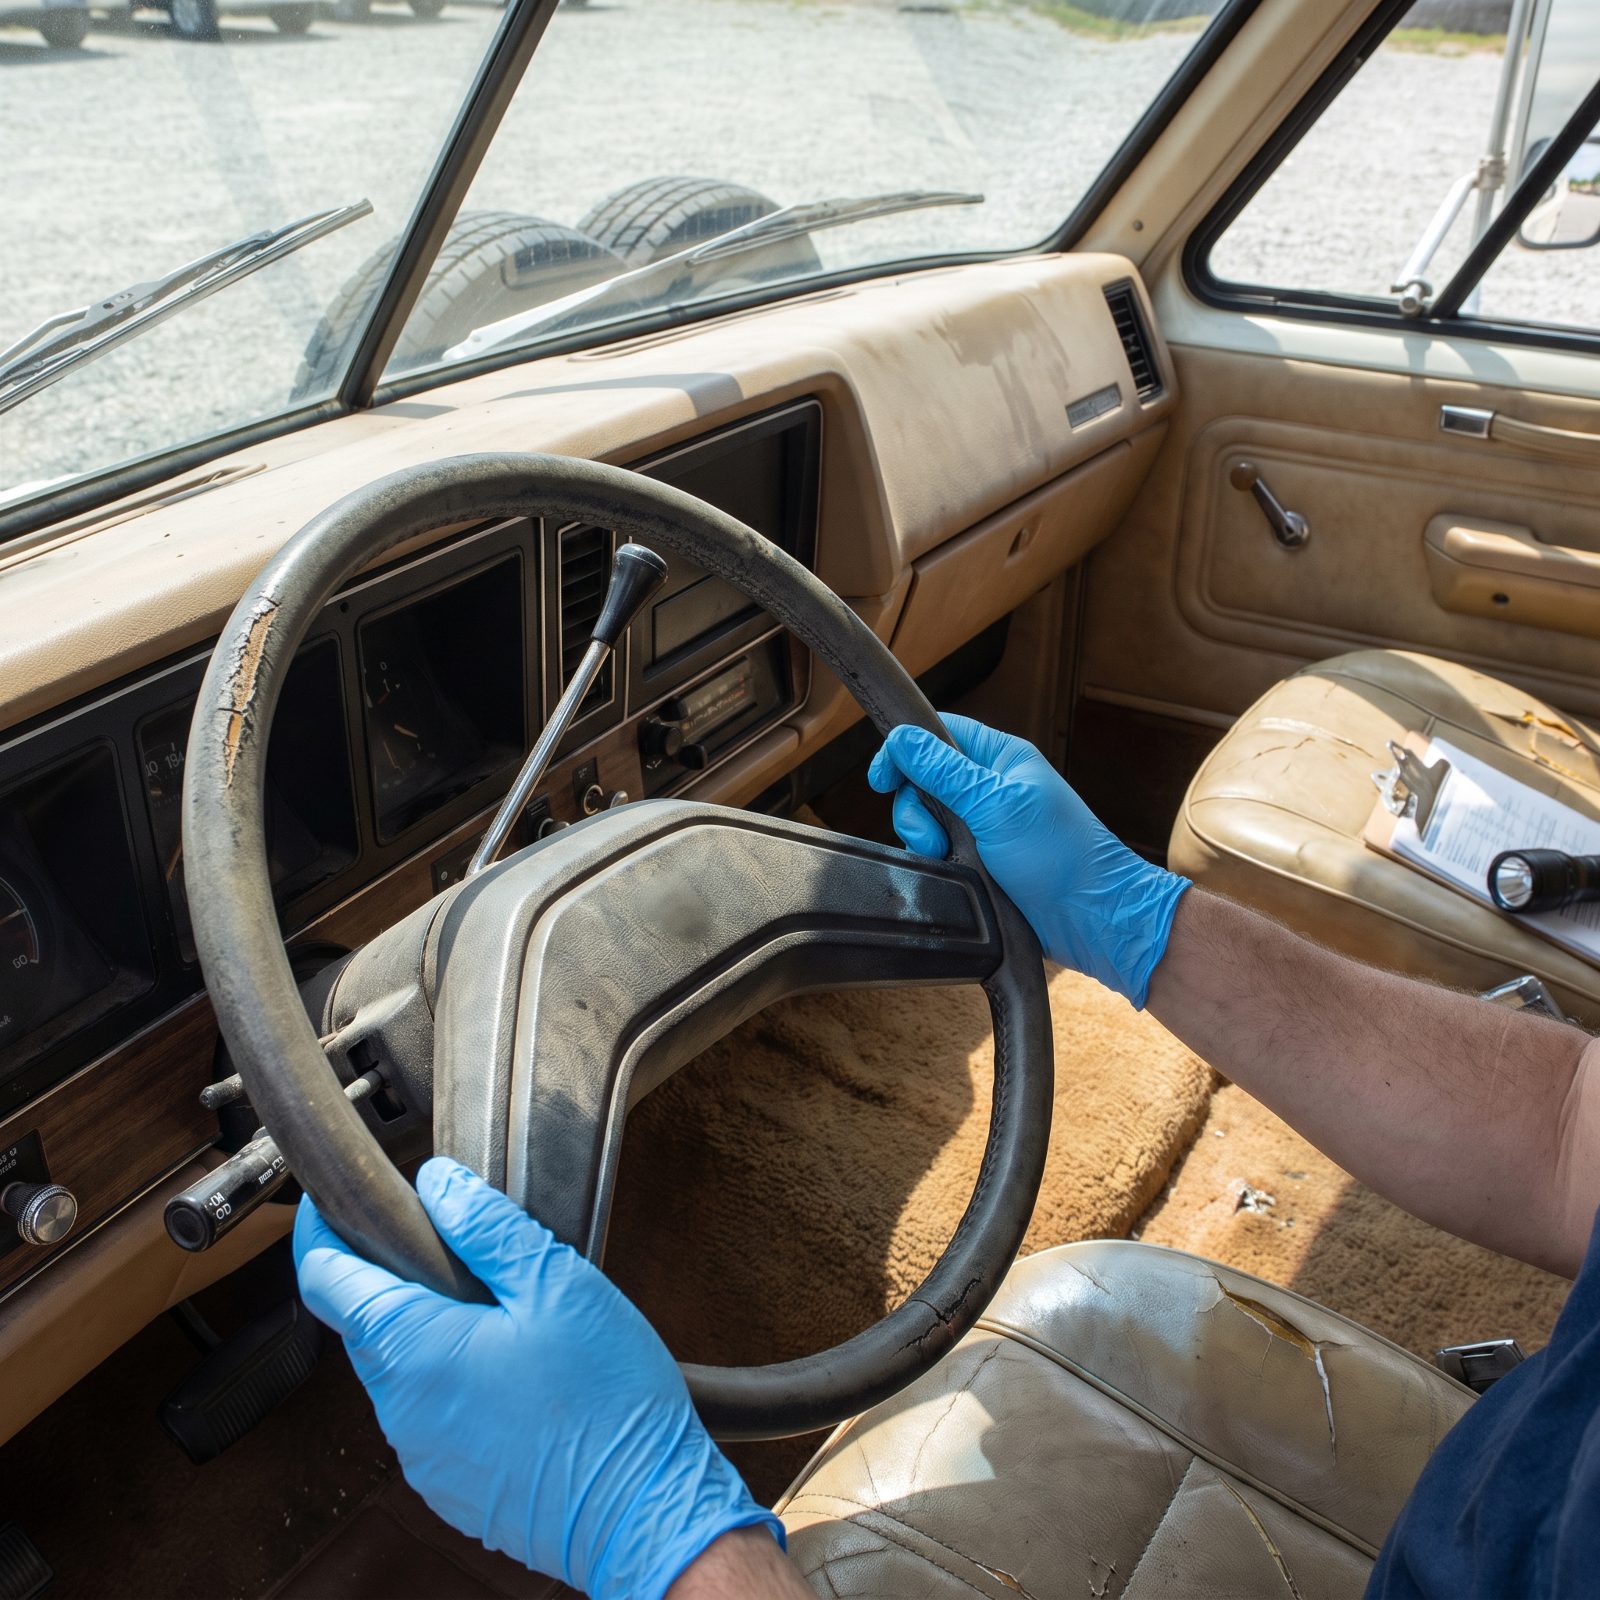
Sit down, grip the steering wheel, and gently rock it back and forth. On a tight rig the front tires start to move almost the instant you turn. Wiggle the wheel two or three inches before anything happens at the wheels and the linkage is worn.
Slop in the steering means tie rod ends, a loose steering box, or a dying gear — and on a heavy motorhome, that wander at highway speed is exhausting and genuinely unsafe.
Movement at the wheel with no movement at the tire is your free play. More than a couple of inches, and you want a steering inspection before you commit.
2. Brake-Pedal Pulsation During the Road Test
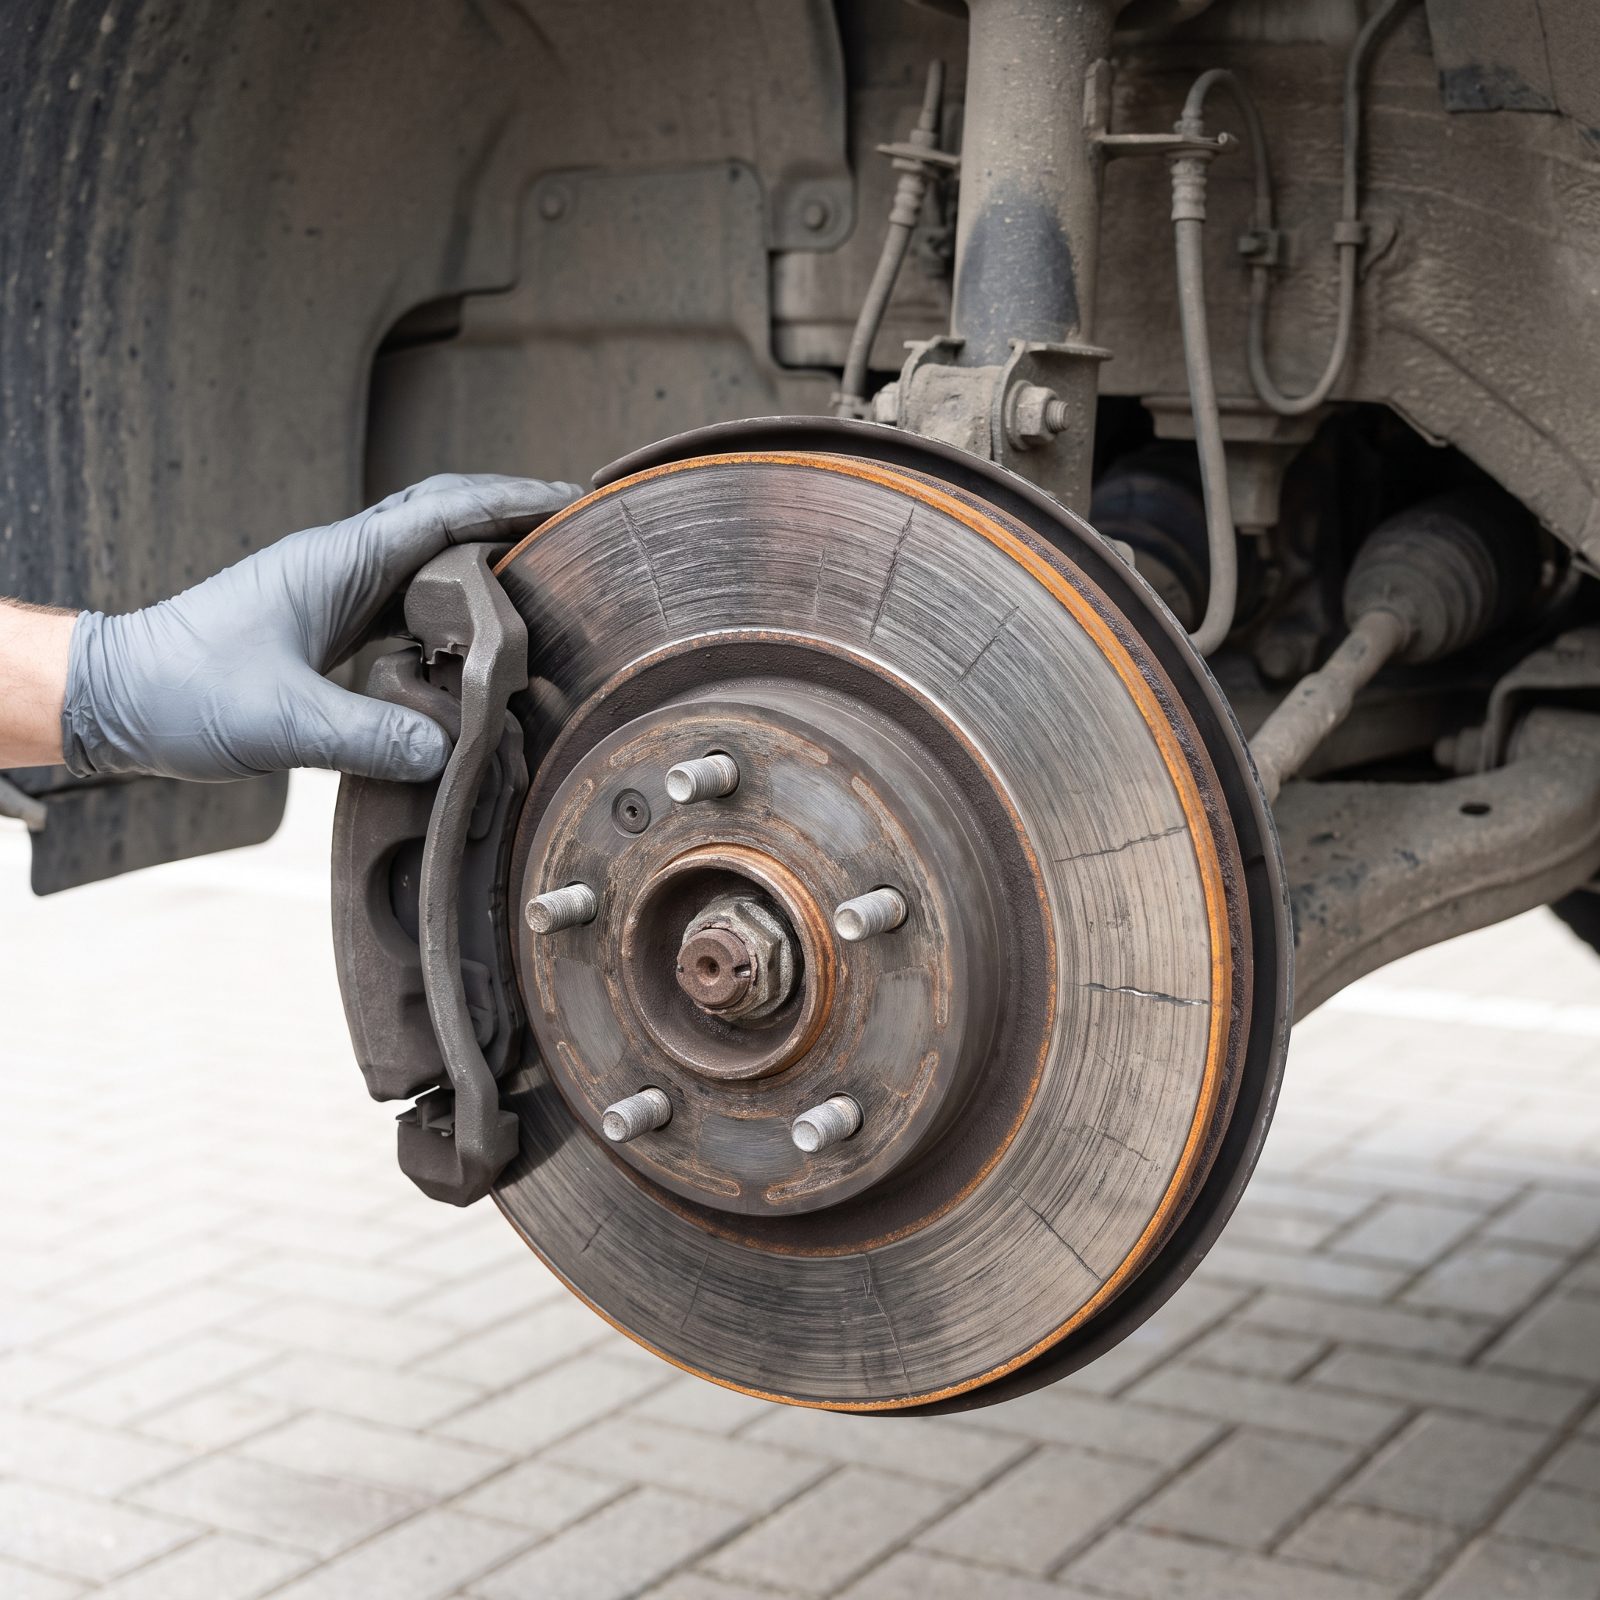
You’ll feel this one before you see it. Bring the rig up to a safe speed on your road test, then brake firmly. You want a steady, even slowdown. A rhythmic shudder through the pedal, or a wheel that pulses under your foot, means the rotors are warped or unevenly worn.
Warped rotors on a heavy RV aren’t just annoying. They lengthen stopping distance, and nobody wants a surprise about stopping distance while descending a mountain grade with a trailer behind them.
Test the brakes twice, once gentle and once firm, in an empty lot. Pulsation plus a long, mushy pedal can also point to tired brake fluid or a failing component in the system. Factor a full brake service into your offer.
1. A VIN That Does Not Match the Title and Registration
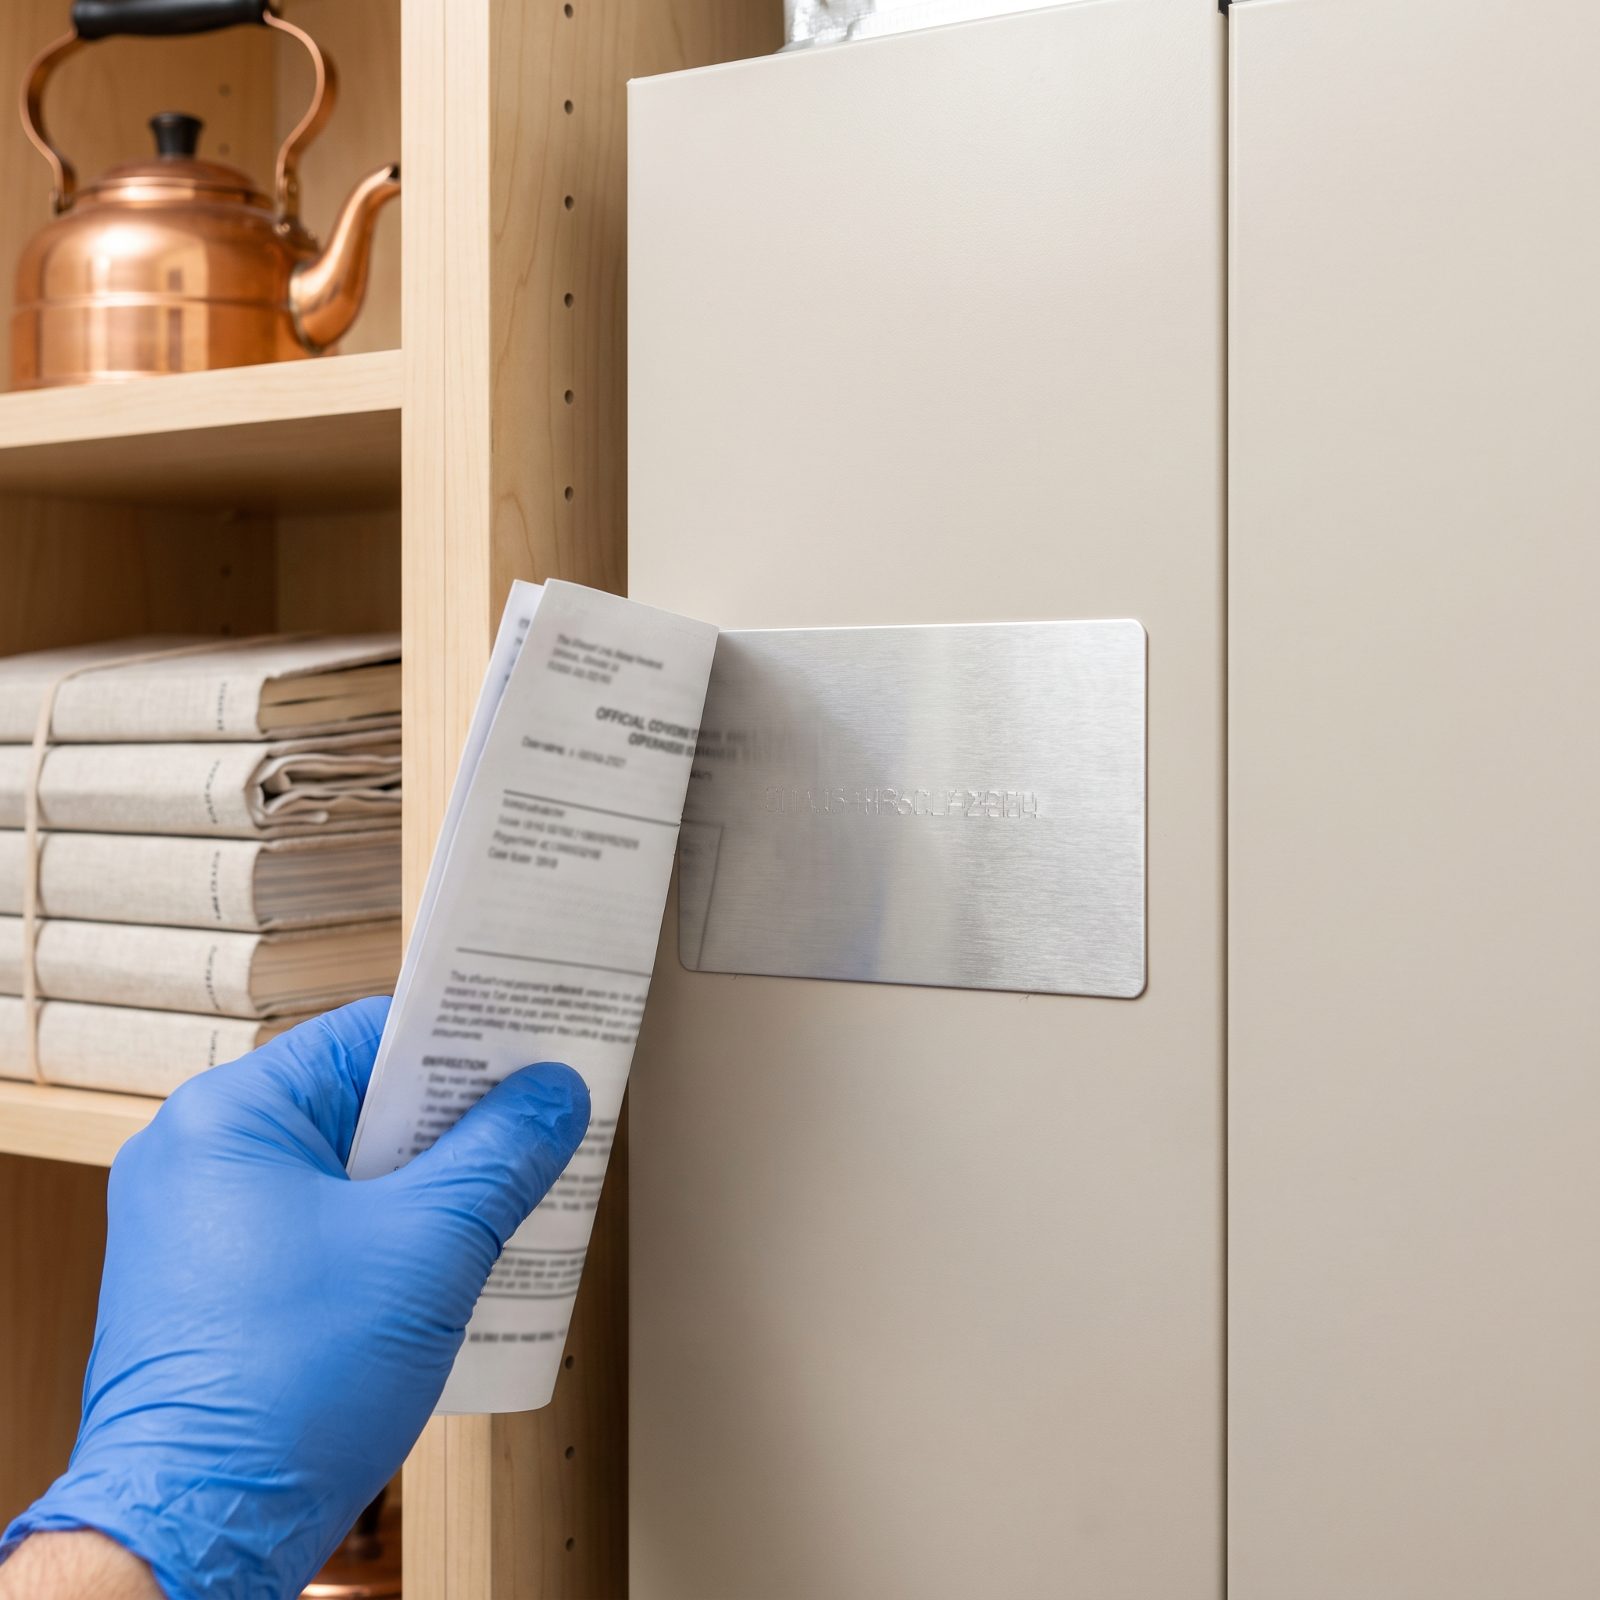
This is the one that can cost you the whole purchase, not just a repair. The VIN stamped on the brushed-metal plate should match every other VIN tag, the title, and the registration. Every character. No exceptions.
A mismatch can mean a cloned vehicle, a stitched-together salvage, or a seller who doesn’t actually have the right to sell. Any of those can leave you holding a rig the state won’t register and the bank won’t finance.
Read the plate’s VIN out loud and have someone check it against the paperwork, then run it through a history service. A clean title in hand, matching every plate on the vehicle, beats any shiny awning or fresh set of tires.
Walk from this one. No second thought, no deal sweet enough to inherit someone else’s legal mess.