
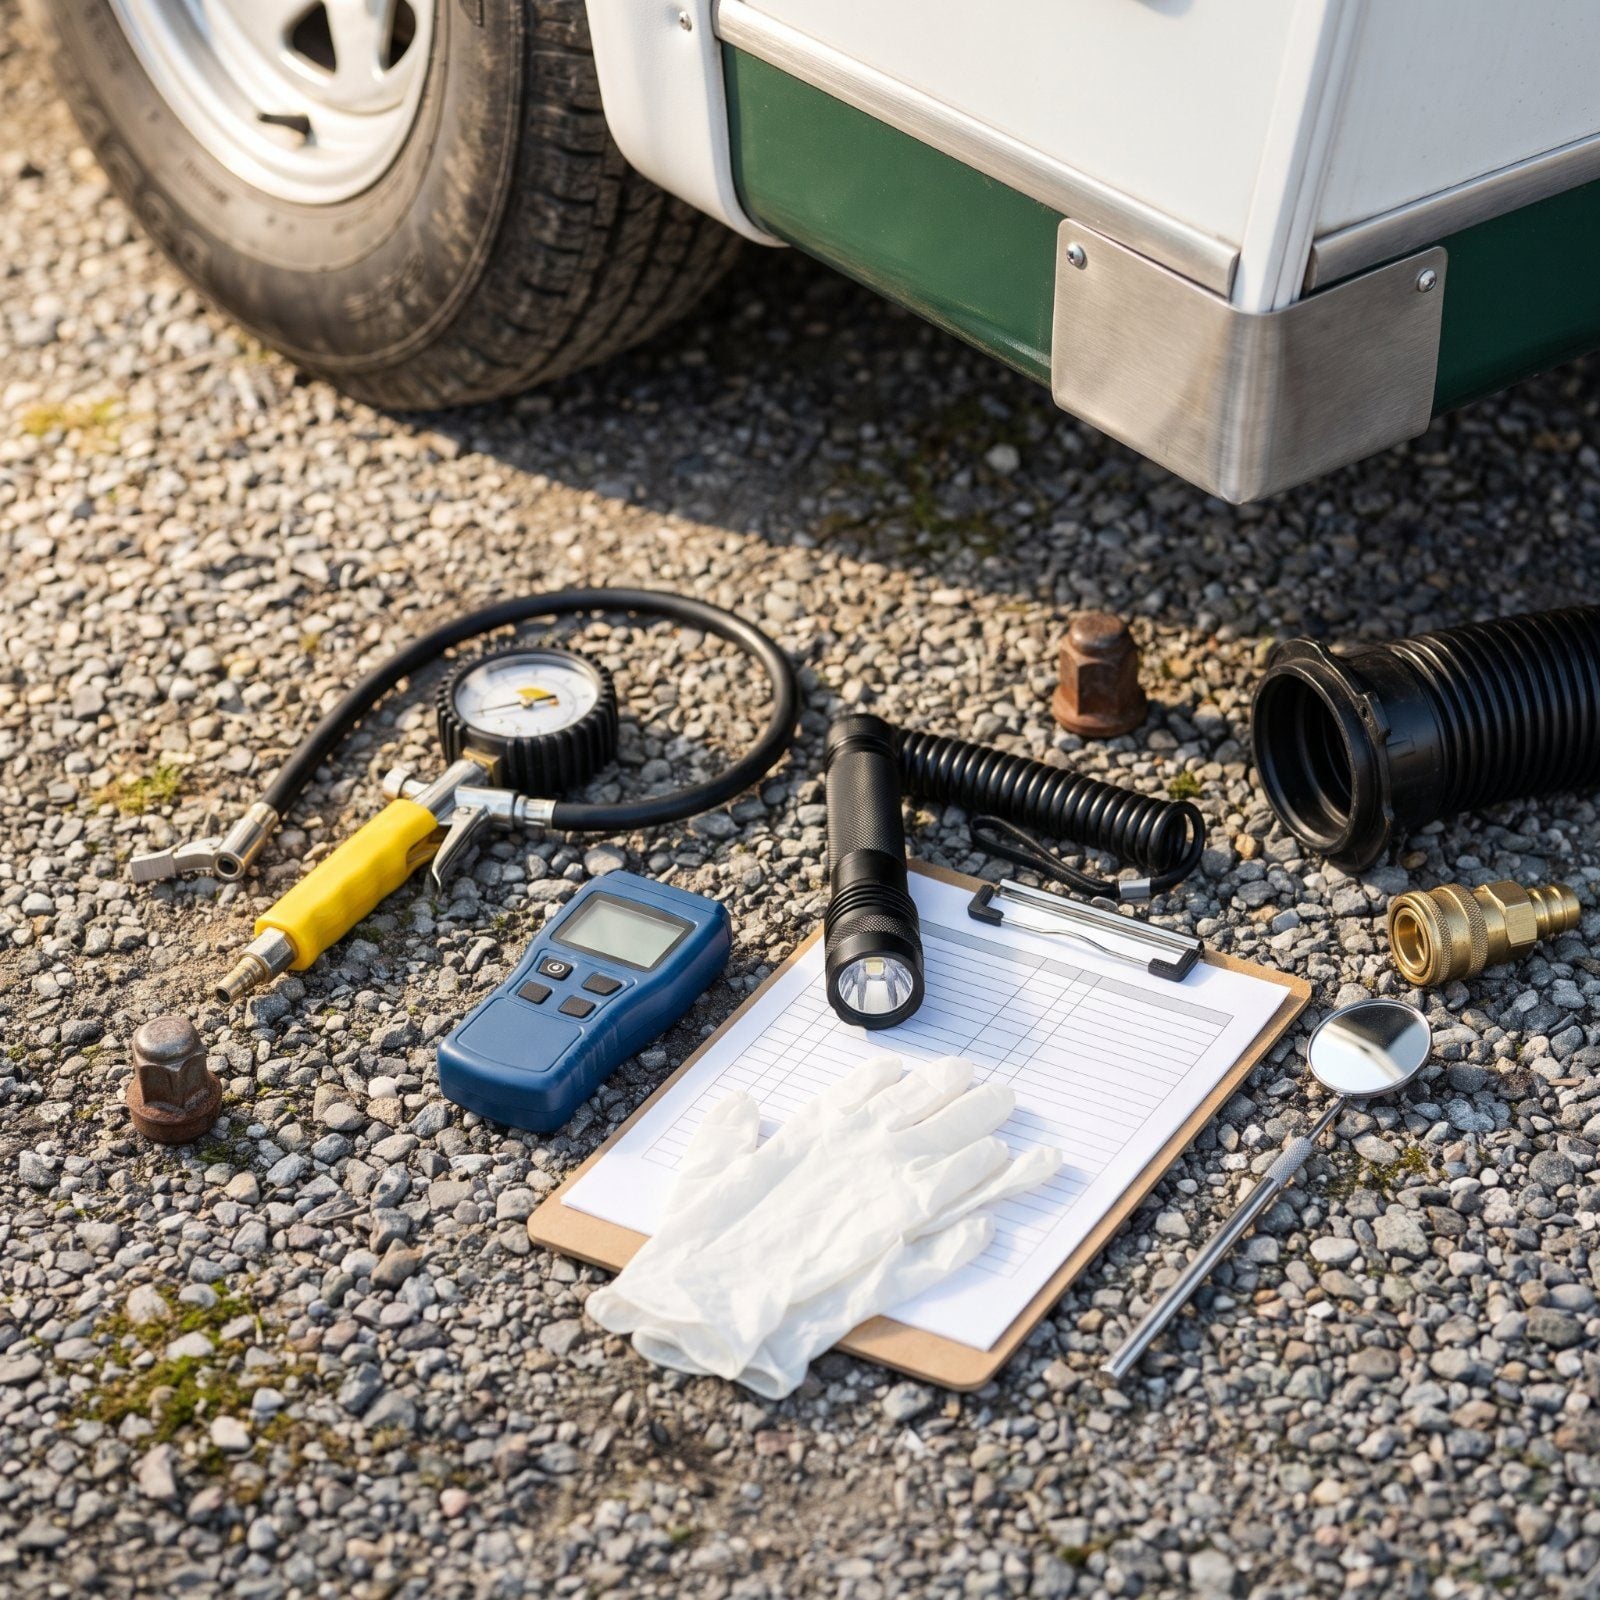
A good inspector slows down before the walkaround even starts. Coffee still in hand, eyes already working the rig like a used-car lot veteran. The paint, the tires, the stains on the gravel underneath — most expensive surprises announce themselves on the outside first, long before anyone climbs in and smells trouble. You just have to know what you’re looking at. These are the tells the pros read in the first two minutes, the ones that separate a solid buy from a money pit wearing a fresh wax job. Learn to see them and you’ll save yourself a weekend you can’t get back.
Please note that some of the images in this article were created with the assistance of AI.
44. A Coach That Sits Low on One Corner
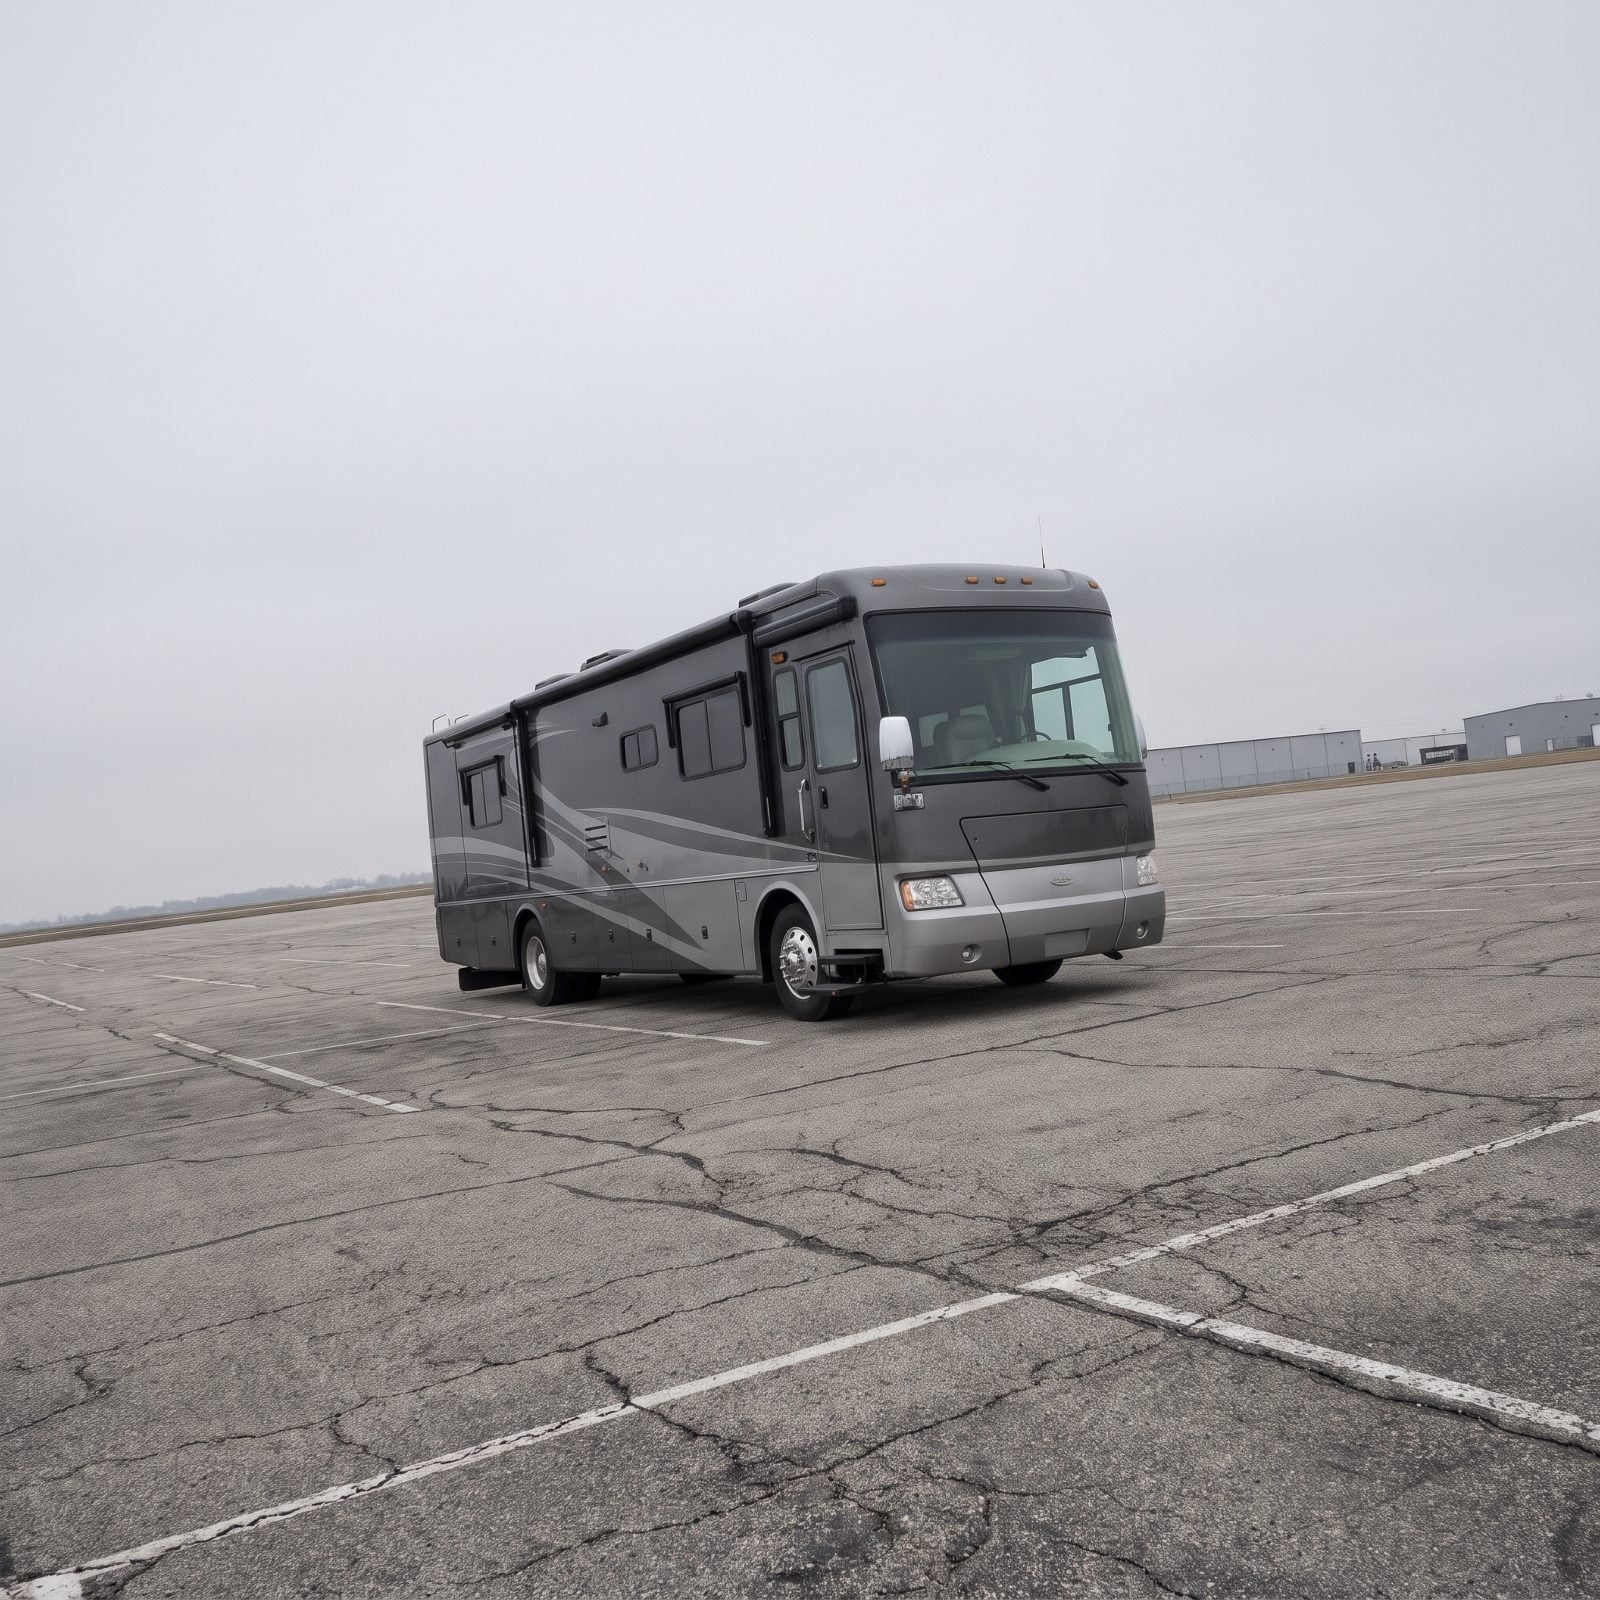
Park it on a flat lot and step back twenty feet. A rig that leans into one corner is telling you something expensive. Could be a tired suspension spring or a dead air bag on an air-ride chassis. Could be worse — a soft floor, water-logged framing, or a shifted load from damage you can’t see yet.
Inspectors sight the roofline and the floor seam against the horizon like a carpenter reading a wall. If those lines don’t run parallel to level ground, the money is usually underneath, in places you’ll pay a shop to reach.
43. Fresh Fluid Spots Beneath a Motorhome
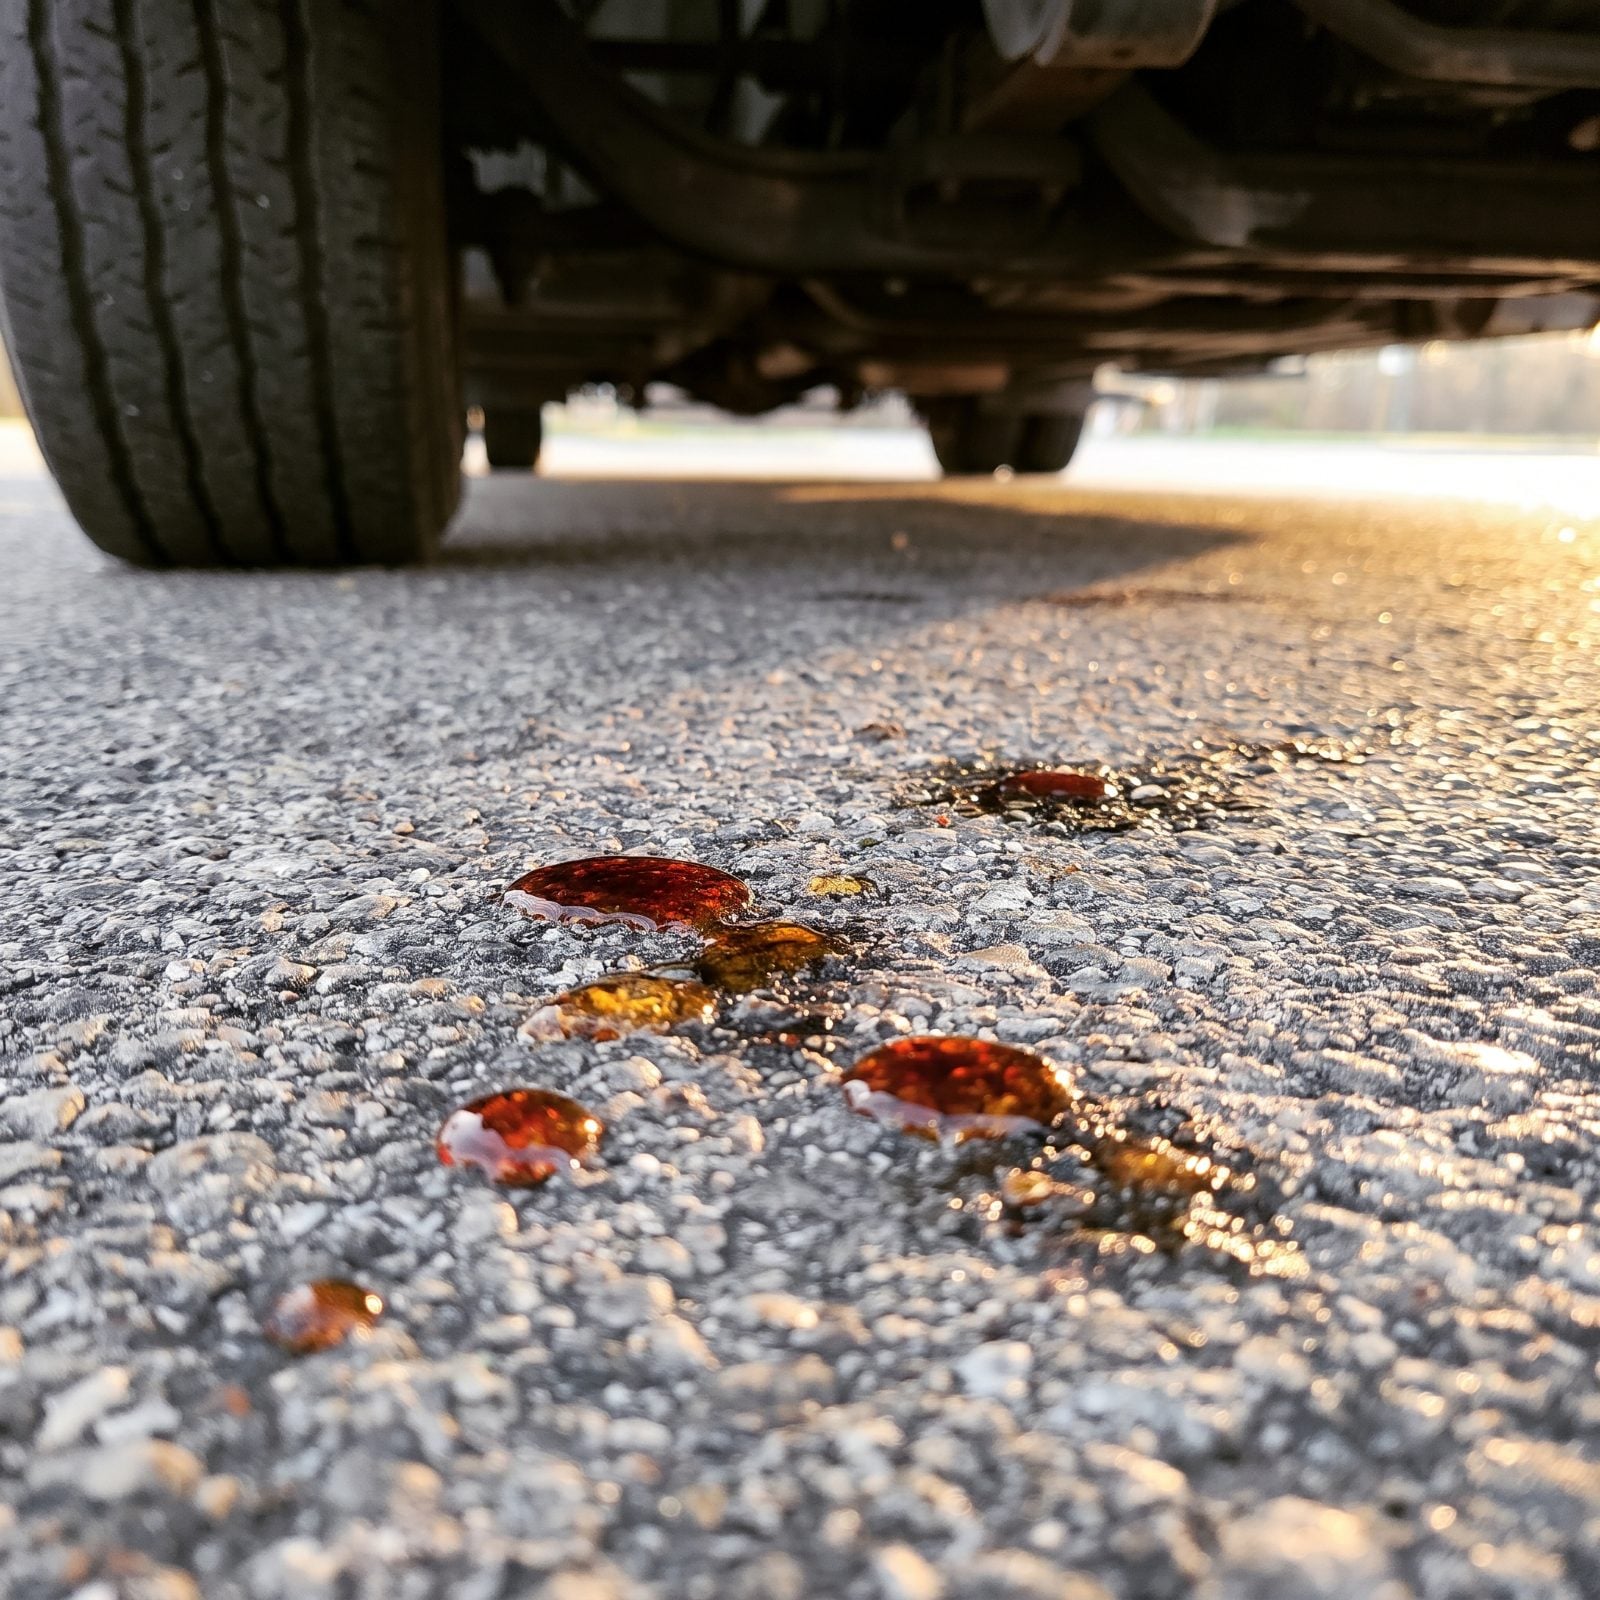
Smart inspectors look at the ground before they look at the rig. Move the coach forward a few feet and read what it left behind. Color matters. Amber or brown points at engine oil, pink or red usually means transmission or power steering, and a green or orange puddle is coolant. Clear and oily could be a brake line — and that one you don’t ignore.
One drop after it’s been sitting overnight is a conversation. A spreading stain the size of a dinner plate is a repair bill with a tow attached. I’ve walked away from rigs for less.
42. A Propane Odor Outside the RV

If you smell rotten eggs near the front of a trailer, stop and take it seriously. Propane is odorless on its own. That sulfur smell is an additive they put in exactly so your nose does the inspecting. A whiff near the tanks or the regulator means gas is escaping somewhere it shouldn’t.
The usual suspects are a loose fitting, a cracked regulator, or a brittle rubber pigtail hose that’s a few summers past its prime. Pros brush soapy water on the connections and watch for bubbles. Cheap to find, dangerous to ignore, and the kind of thing that keeps you up at night if you buy the rig anyway.
41. Persistent Sewer Odor Near the Utility Bay
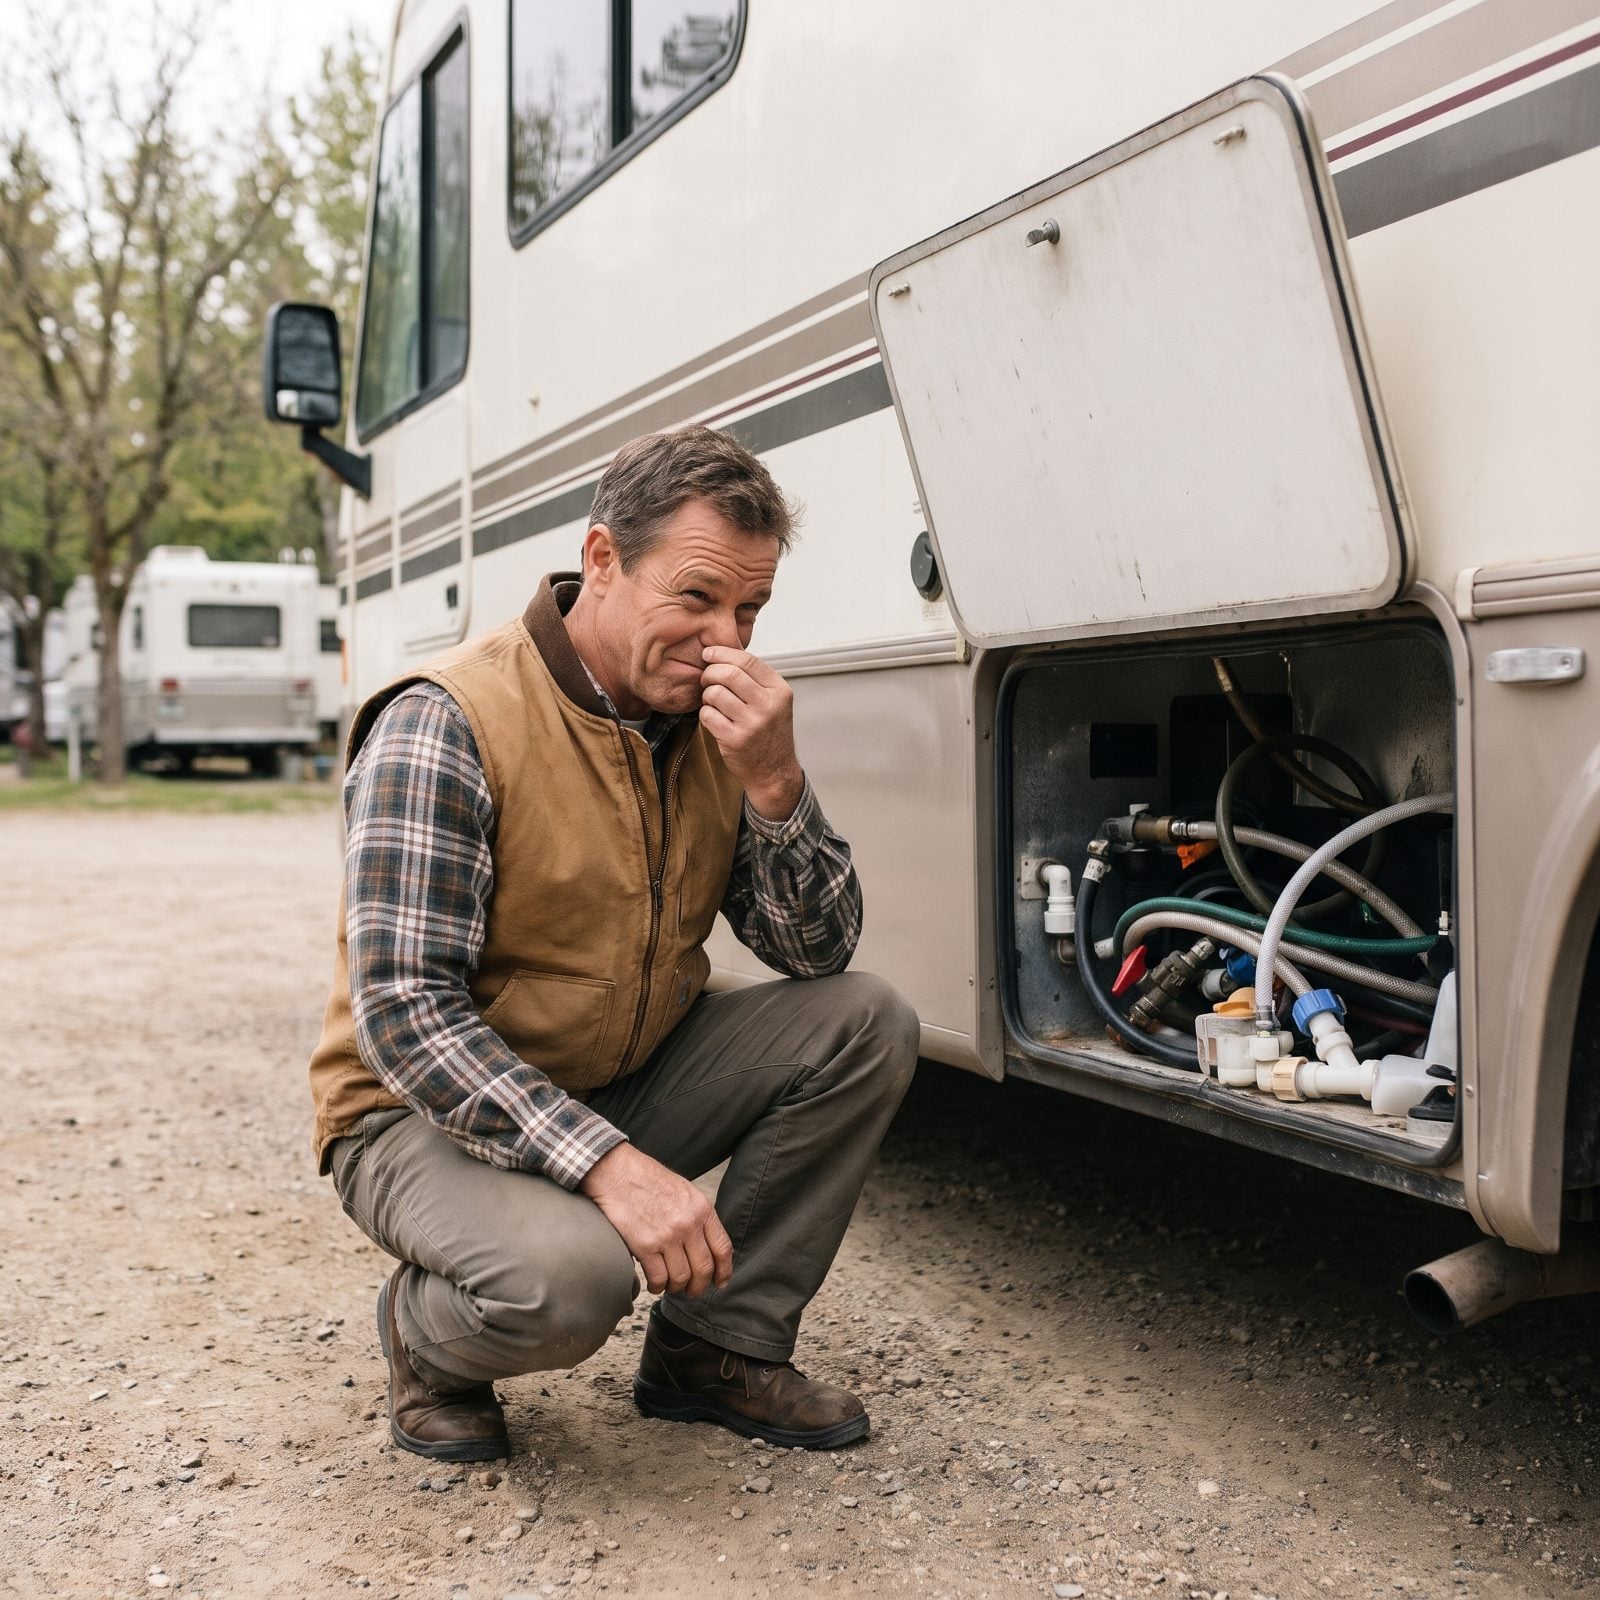
A clean, well-kept RV can still carry a faint sewer smell at the dump bay. That’s normal in the first ten seconds after you open it. What inspectors flag is a smell that lingers, or one that drifts up when the bay is closed and the valves are shut.
That points to a dried-out valve seal, a cracked tank, or a vent pipe that isn’t doing its job. Follow your nose along the underbelly too. A stain on the coroplast below a black tank is one of those clues that looks small and costs big.
40. Tires Older Than Their Tread Suggests
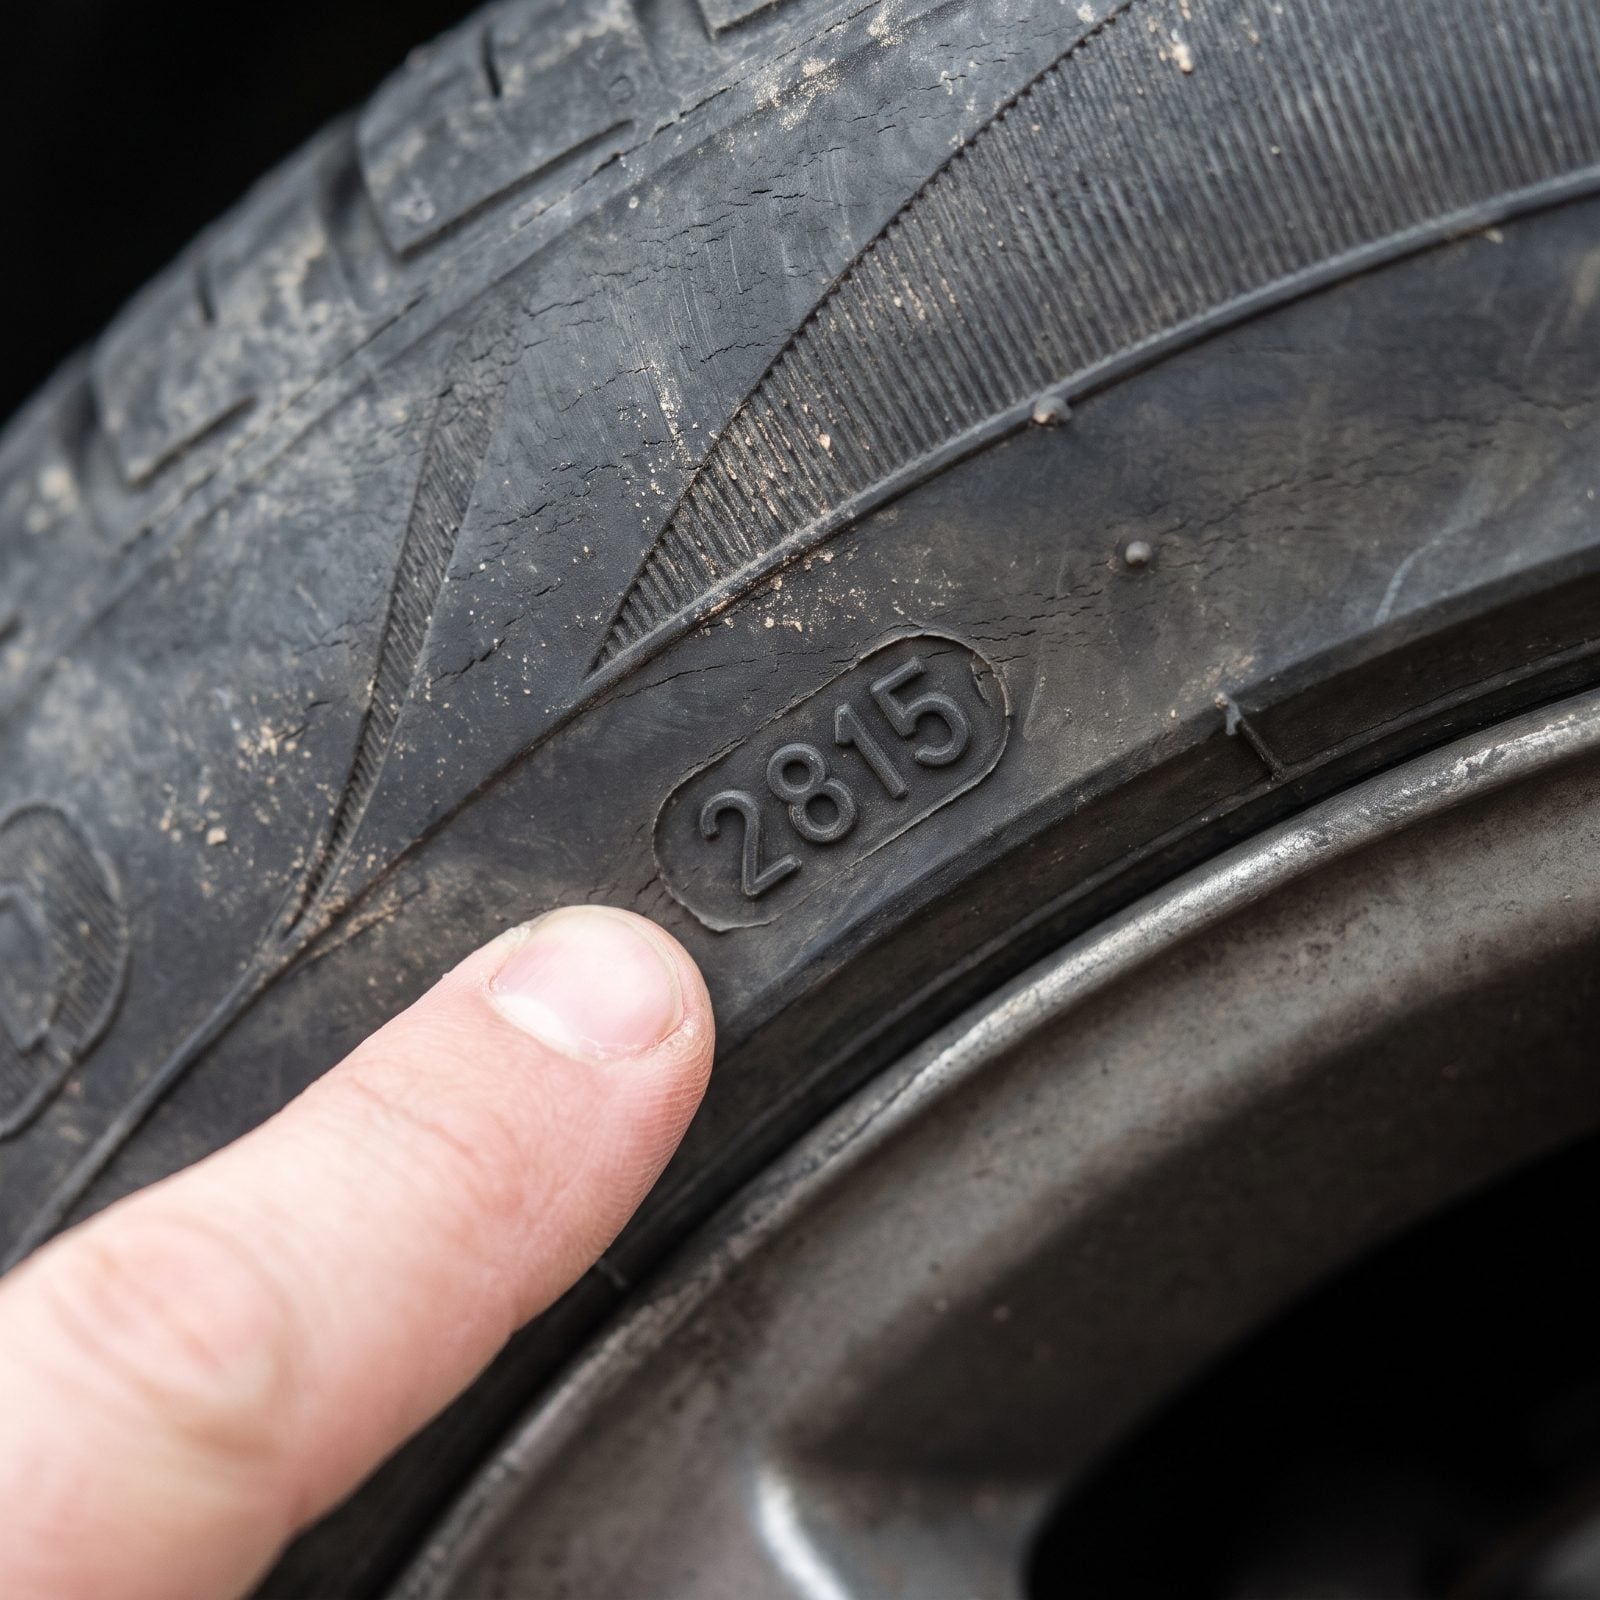
Here’s the one that fools everybody, including me for years. RV tires don’t wear out from miles the way car tires do. They rot while the rig sits in storage, looking perfectly healthy with plenty of tread left.
Inspectors skip the tread and go straight to the DOT date code on the sidewall. The last four digits tell you the week and year it was built — a tire that reads “2217” was made the 22nd week of 2017. Deep tread or not, most pros treat tires past six or seven years old as borrowed time, no matter how shiny they look.
In a tech tip, an RV training academy expert warns that RV tires often age out before they wear out, so plenty of tread does not mean a tire is safe.
39. Fine Cracks Across the Tire Sidewalls
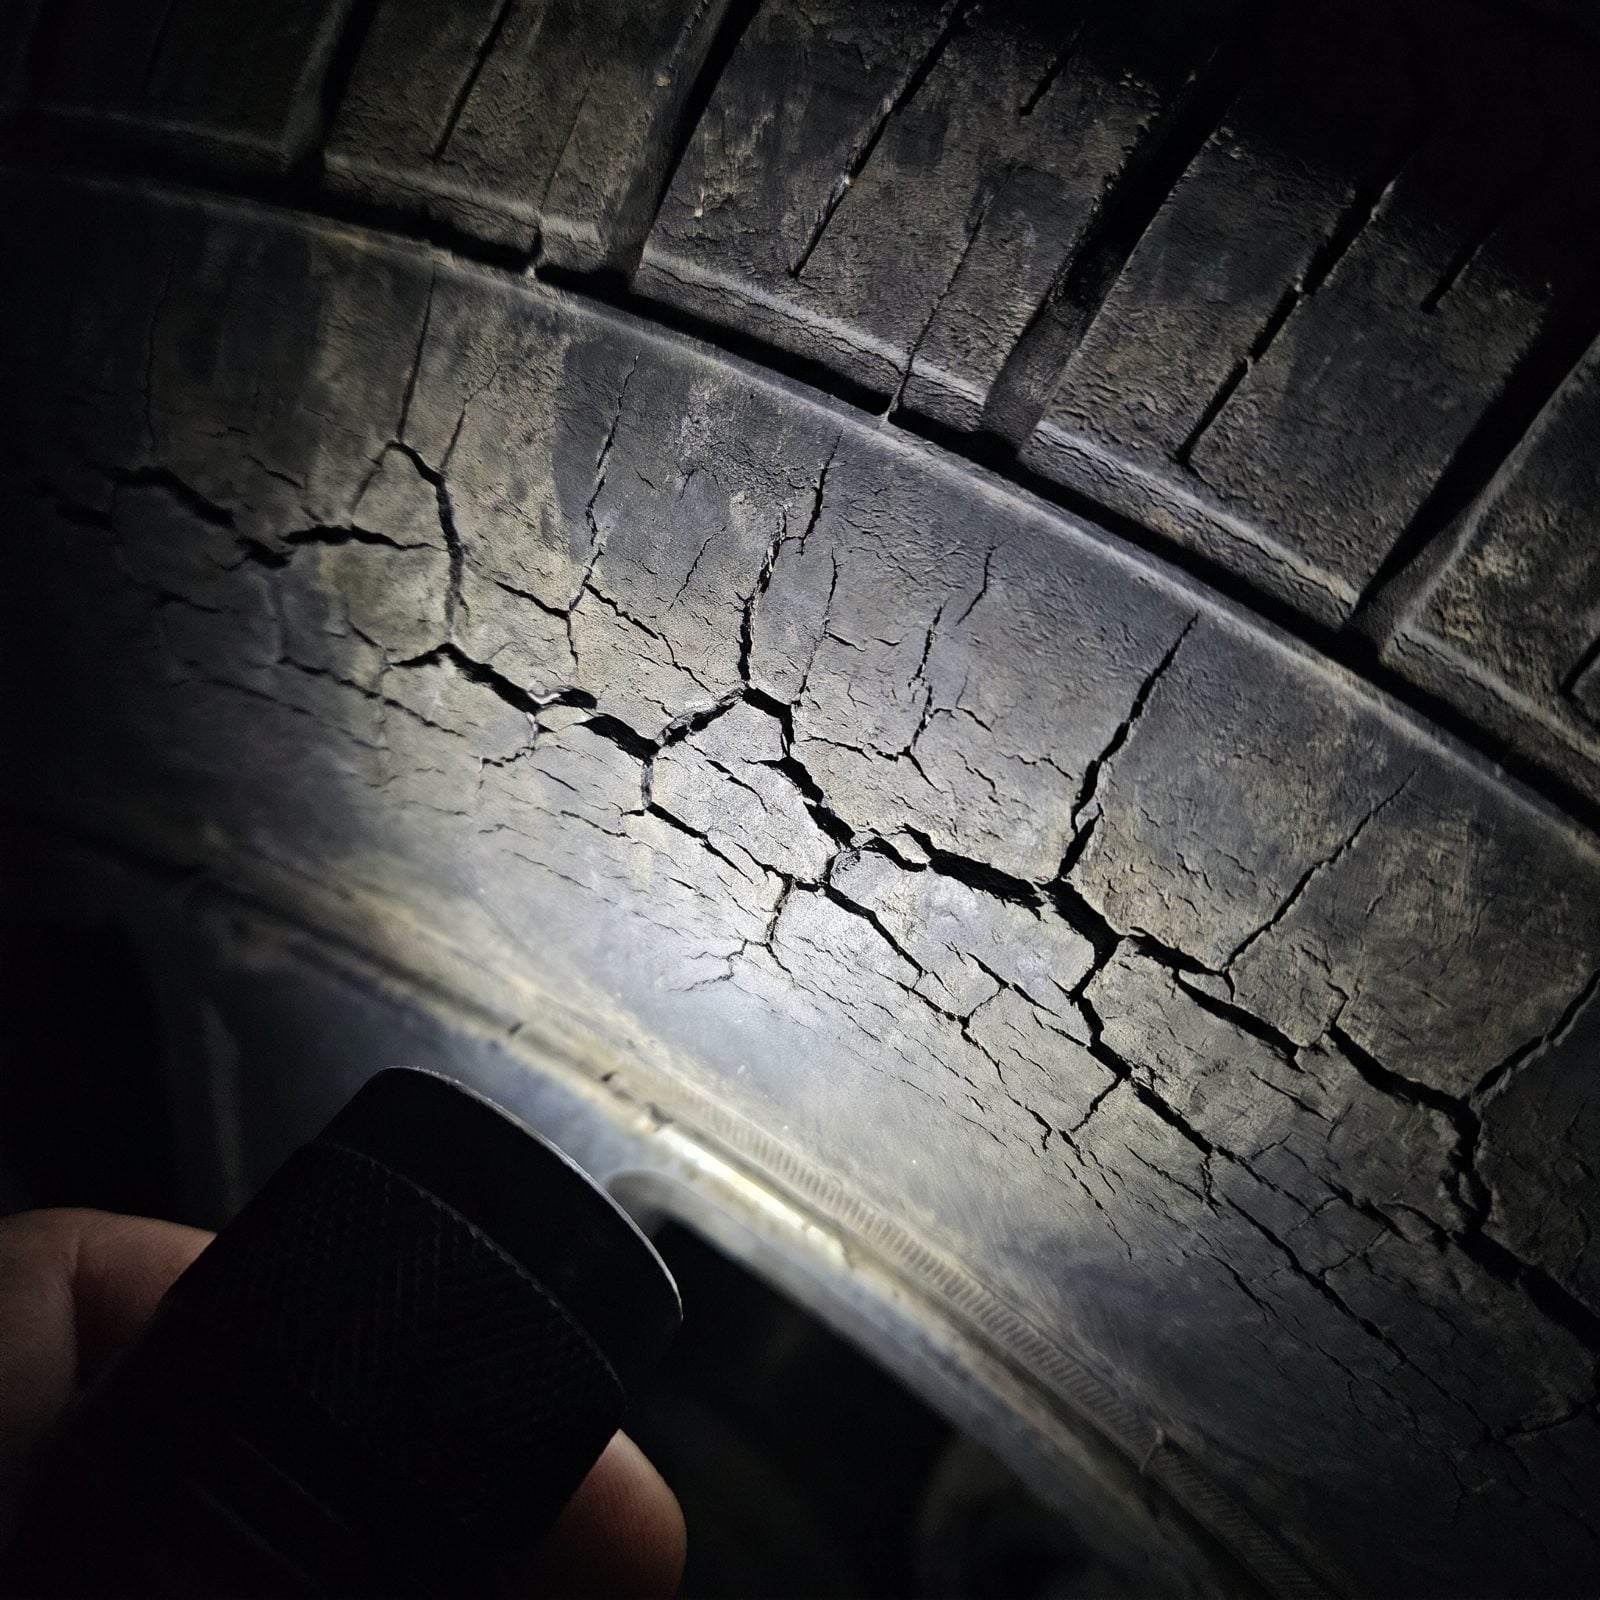
Run a flashlight along the sidewall at a low angle and the cracks jump out. Dry rot shows up as fine crazing, a spiderweb pattern in the rubber that deepens near the shoulder and the bead.
Surface crazing is a warning. Cracks you can slip a fingernail into are a blowout waiting for a hot interstate. And a blown RV tire doesn’t just strand you — it can rip the fender, tear out wiring, and gouge the side of the coach on its way out.
Sun and ozone do more damage to RV tires than the road ever will.
38. Uneven Tread That Points to Alignment Trouble
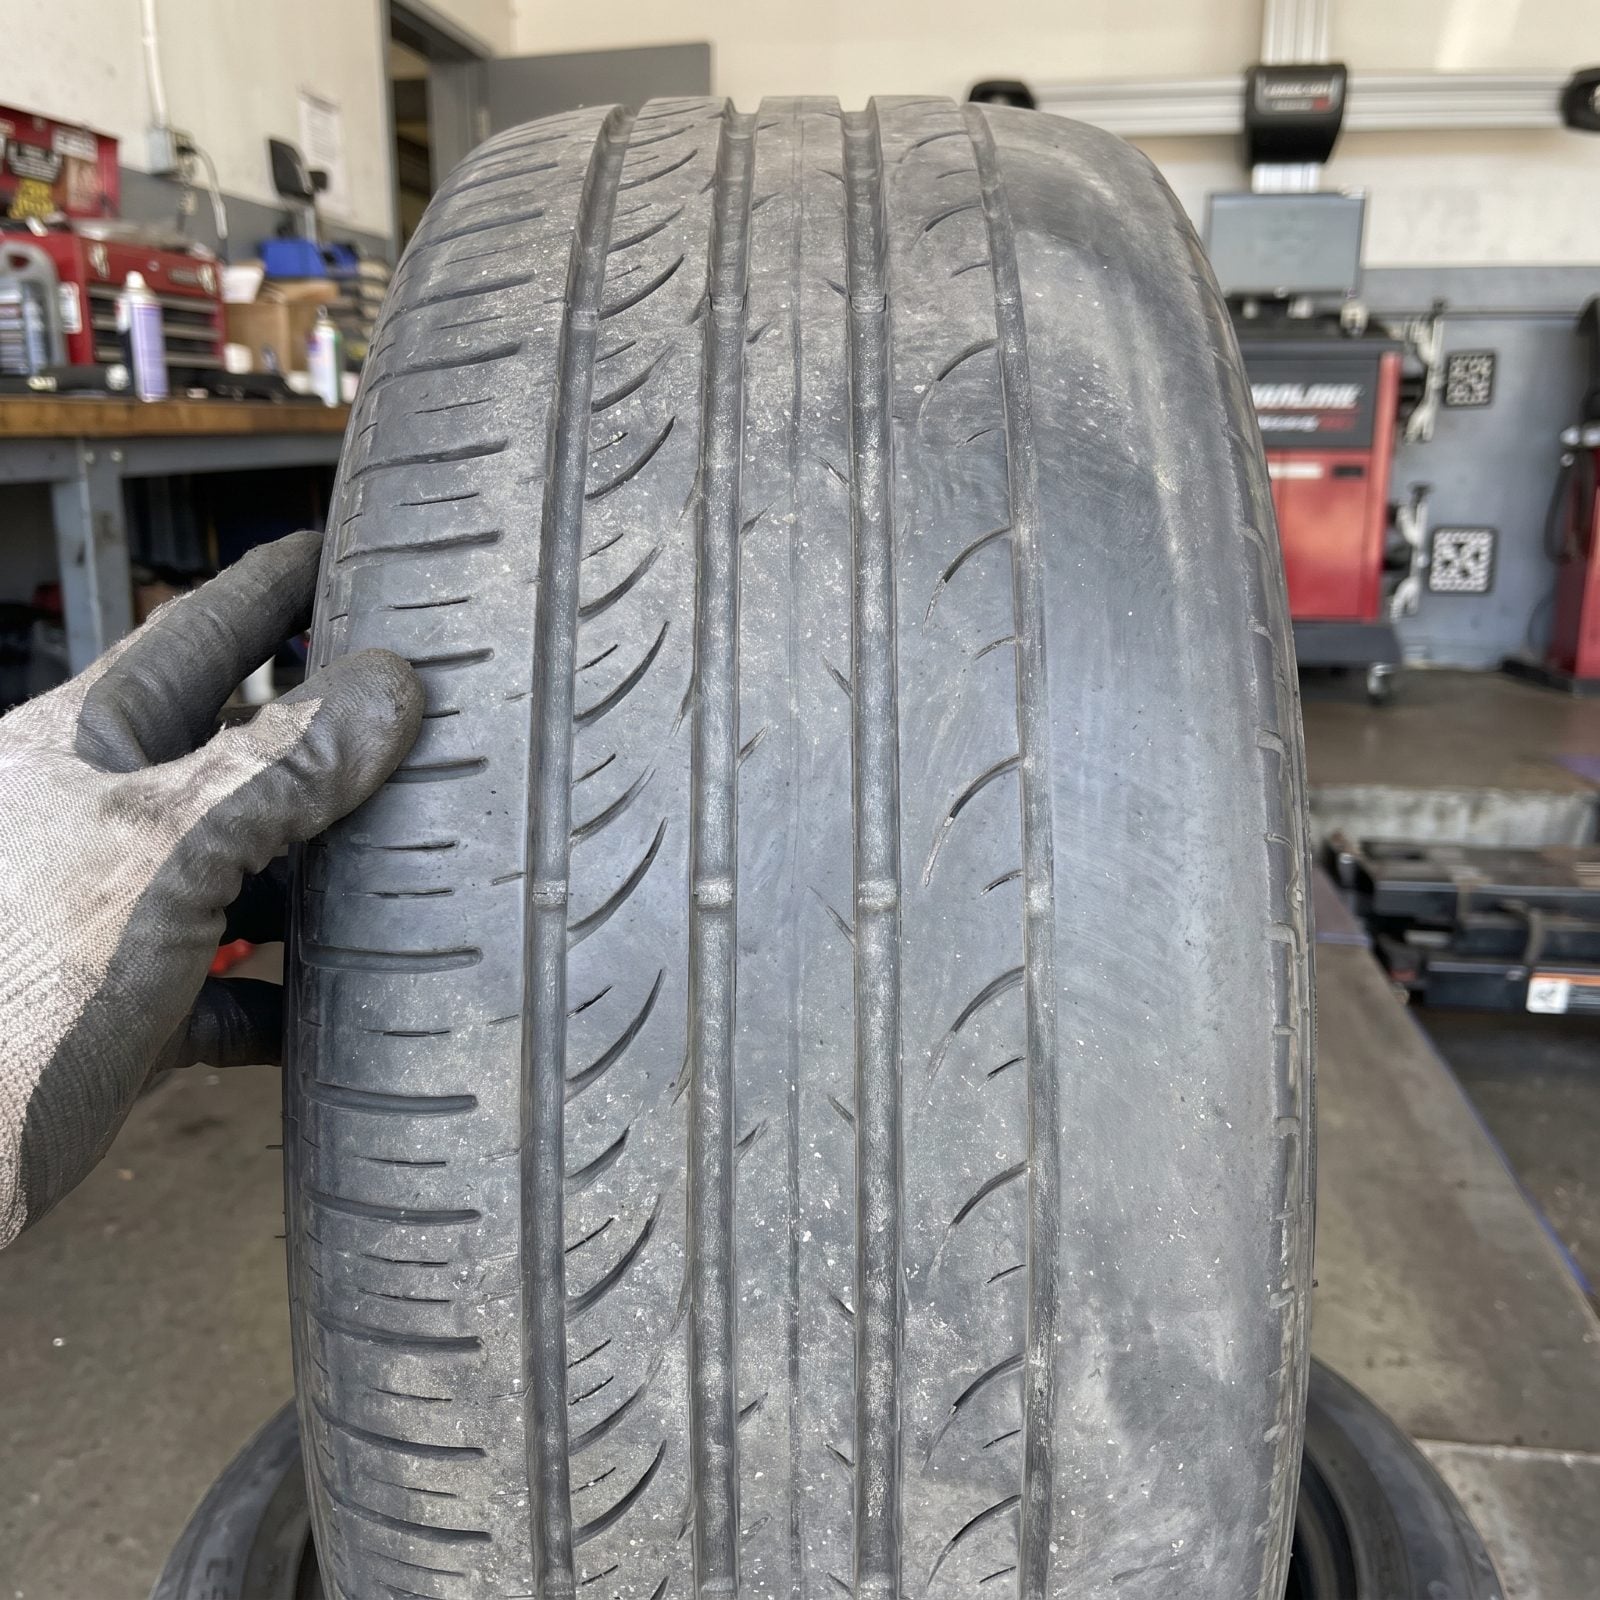
Tread that wears unevenly across the face is the rig complaining about how it rolls down the road. Worn on one edge only usually means alignment is off. A cupped, scalloped pattern can mean worn shocks or bad balance. A strip worn down the center points at chronic overinflation.
Inspectors run a flat palm across the tread and feel for feathering — little ramps you can only detect by hand. The tire itself is just the symptom. The real cost is whatever’s bending the geometry underneath, and on a heavy coach that alignment work isn’t cheap.
37. Tires With the Wrong Load Rating
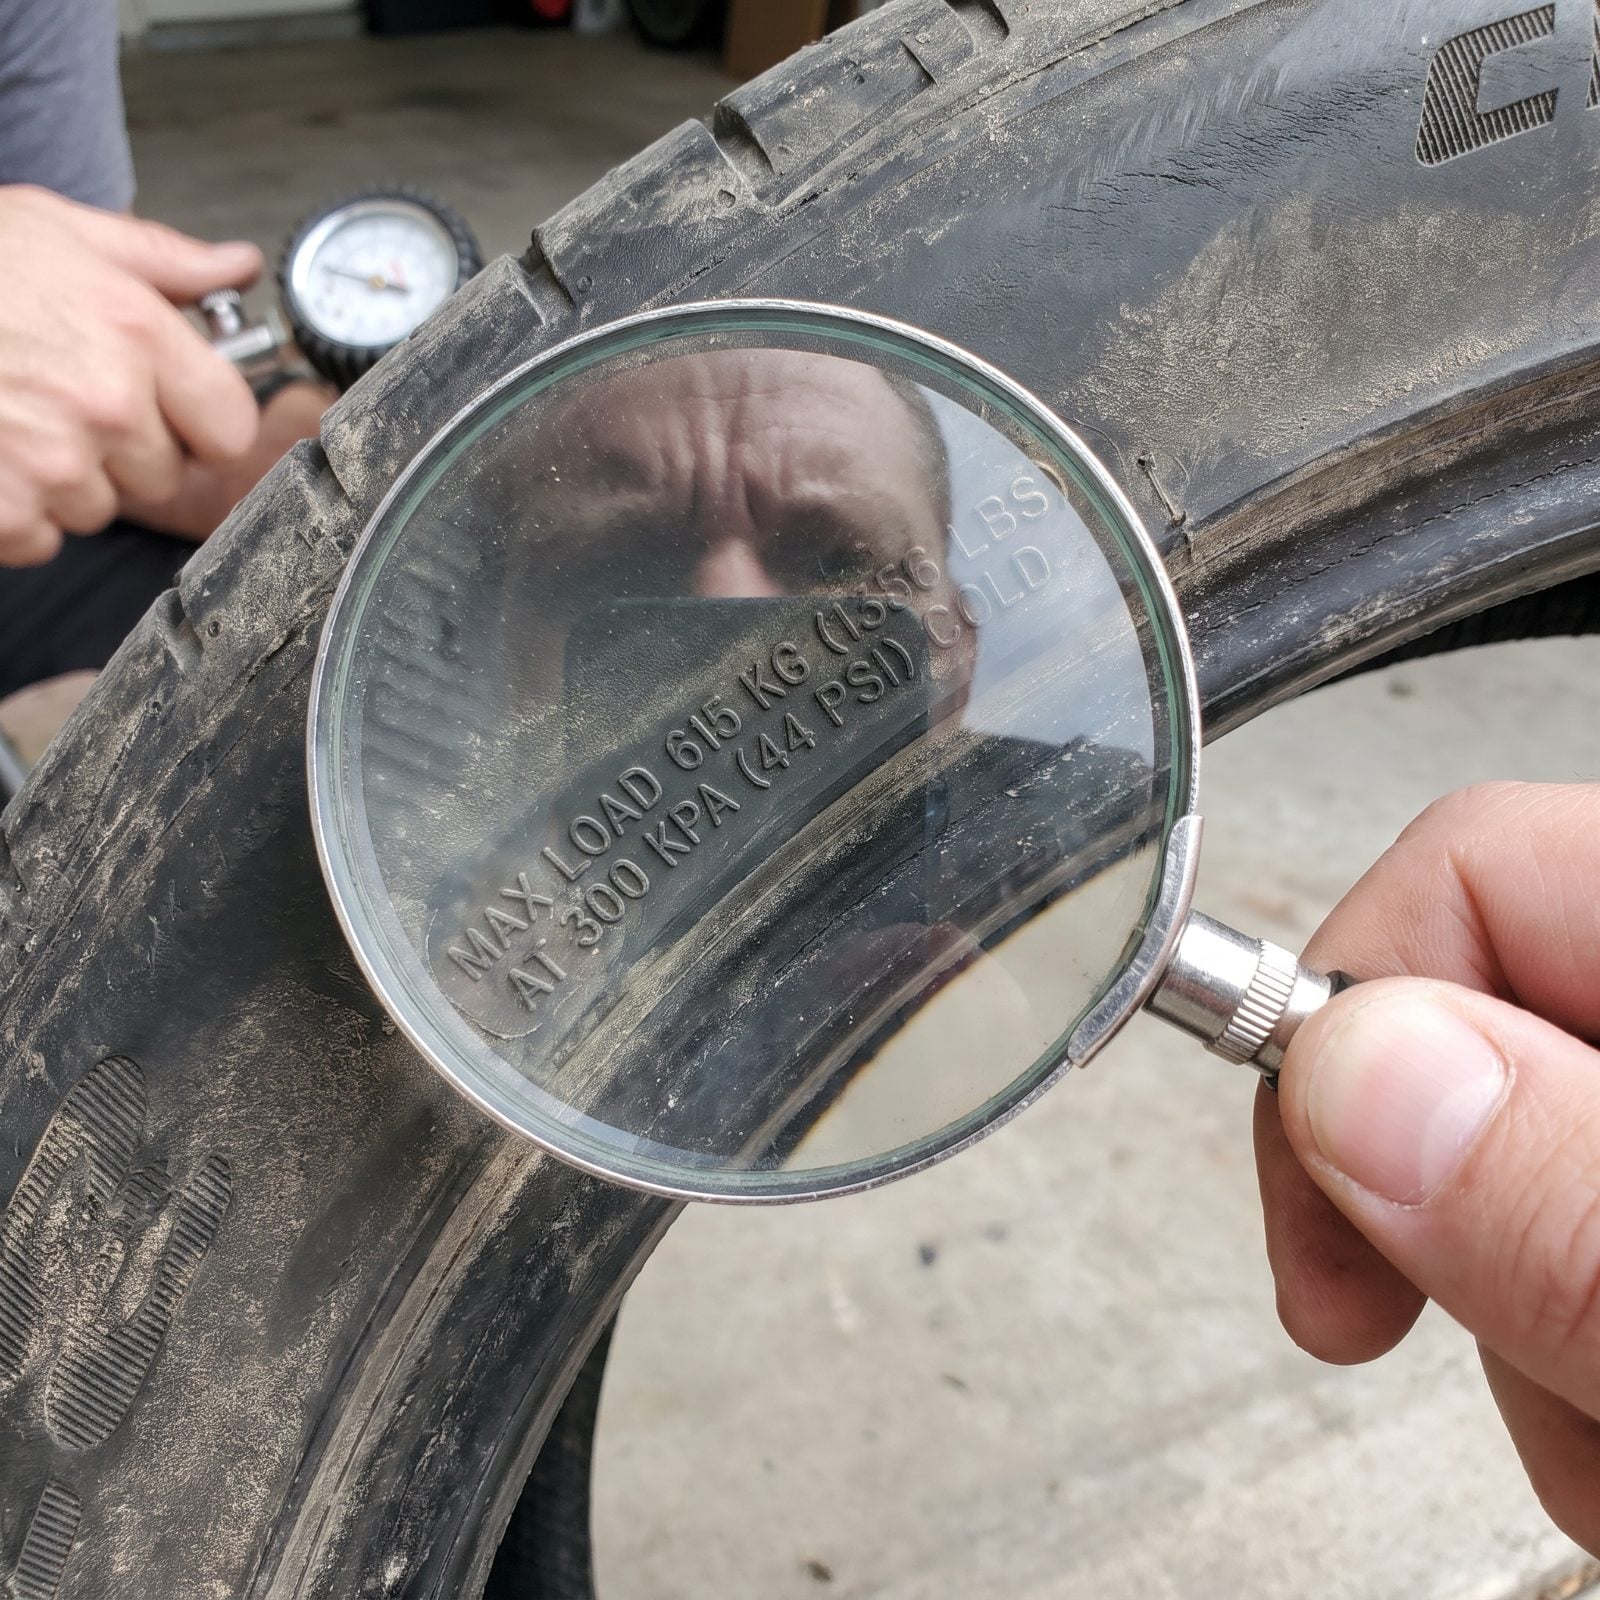
This one hides in plain sight on rigs that have had tires swapped by a previous owner looking to save a buck. Every RV tire carries a load range and a max load rating molded into the sidewall, and the rig needs tires rated to carry its loaded weight plus a margin.
Inspectors read the sidewall and check it against the yellow certification sticker near the door. A tire two load ranges light might look identical to the right one and ride fine empty. Load it up with water, gear, and a full pantry, though, and you’re running past its limit every mile.
36. Rust Trails Around the Lug Nuts
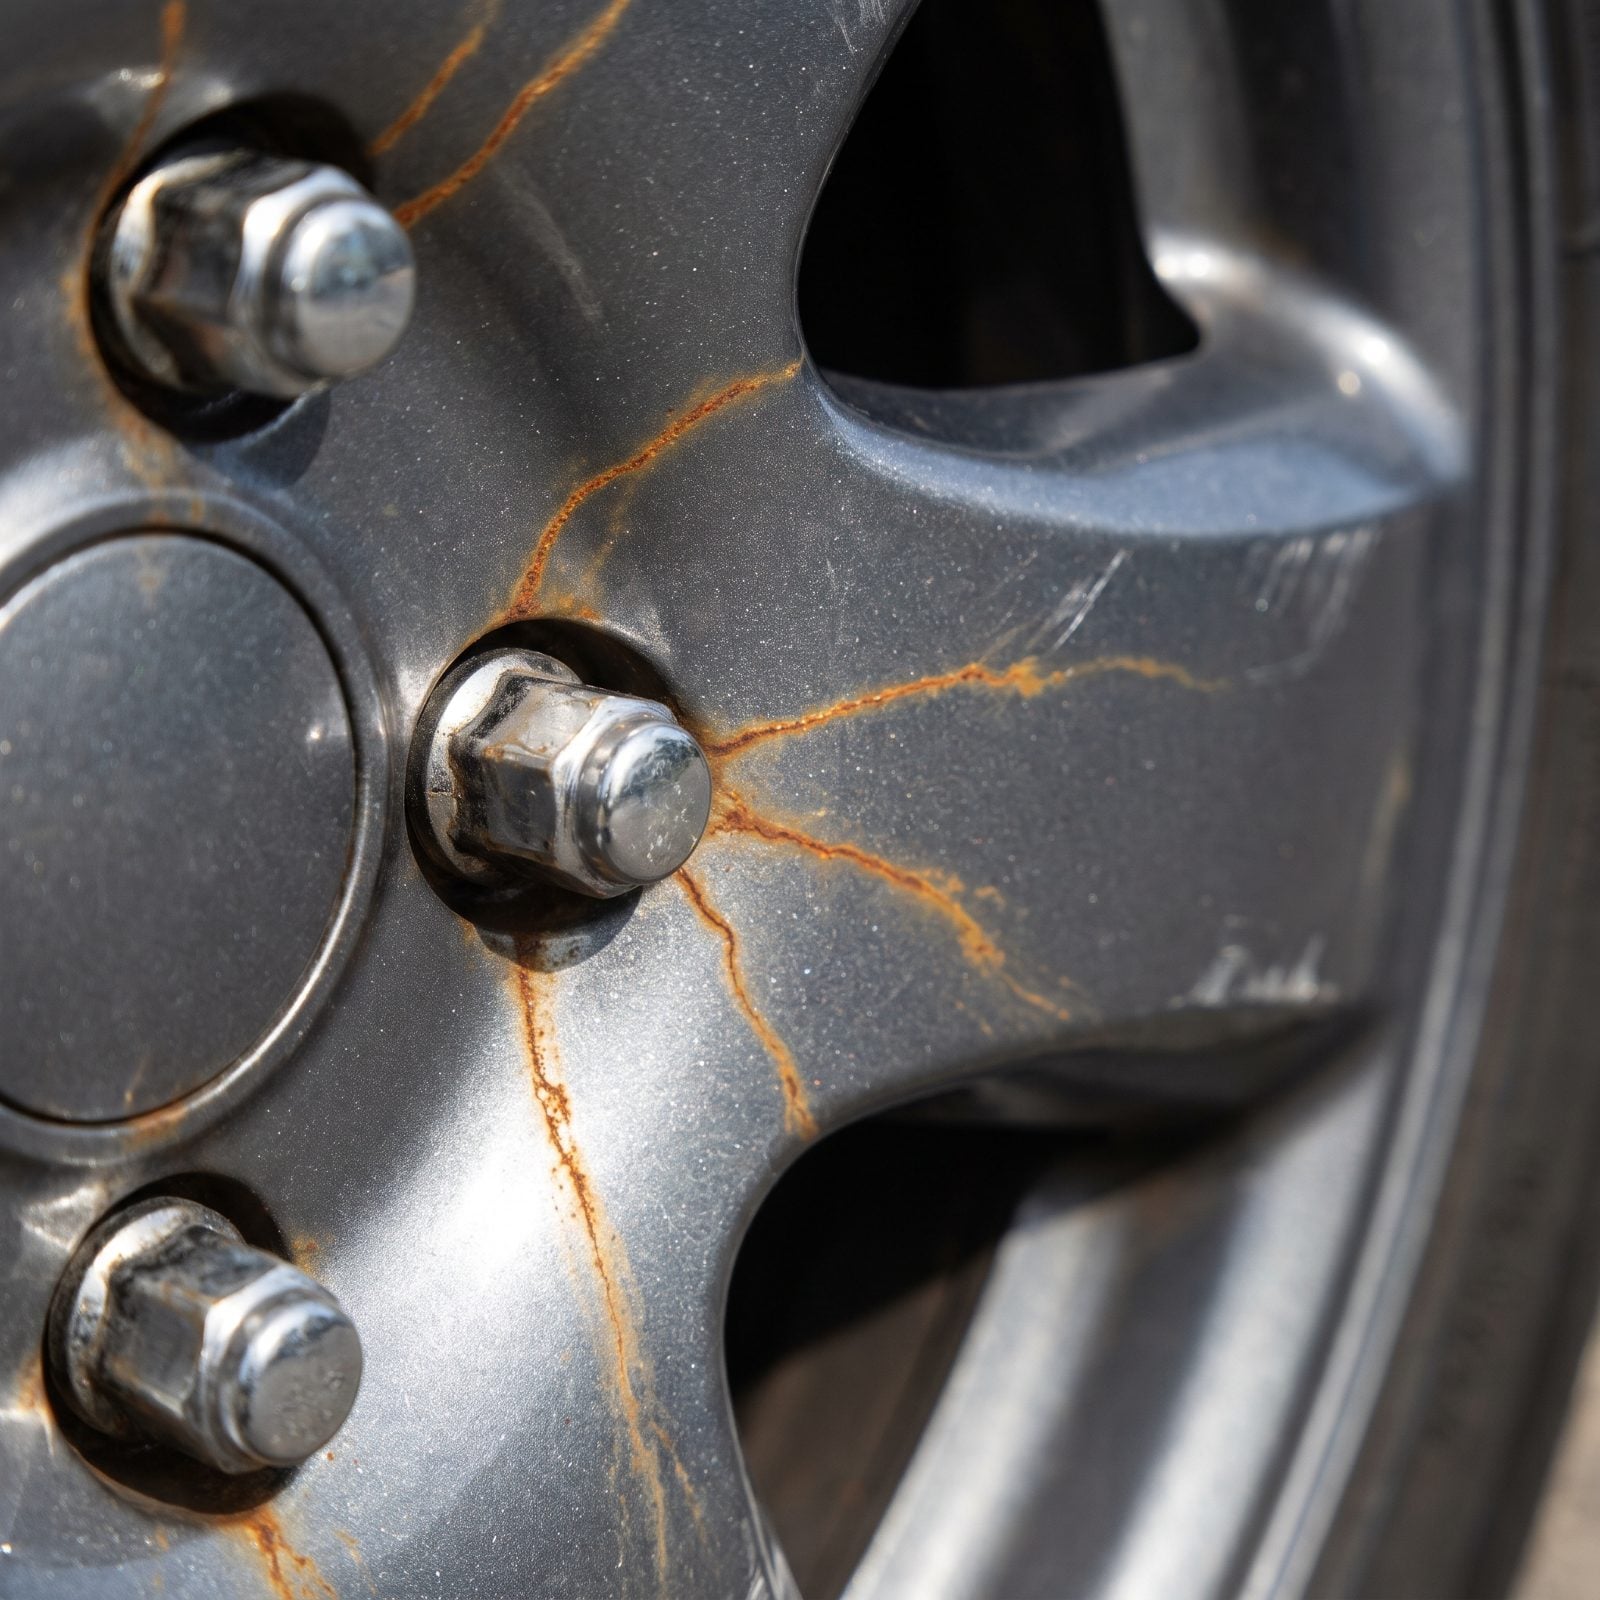
Thin orange streaks fanning out from the lug nuts are a quiet little warning most buyers walk right past. They mean the nuts have been working loose and shifting, grinding against the wheel and shedding rust as they move.
A loose lug nut is a wheel starting to leave. On a heavy motorhome or fifth wheel, that’s the stuff of nightmares. Inspectors read those rust trails as a sign the wheels haven’t been torqued properly, which hints at sloppy service history and makes you wonder what else got skipped.
Teaching fleets what to look for on walkarounds, a trucking compliance consultant notes “When a fastener loosens, the mating surfaces can shift slightly. That movement can create reddish streaks coming out from the nut seat or stud area.”
35. Flattened Leaf Springs and Worn Shackles
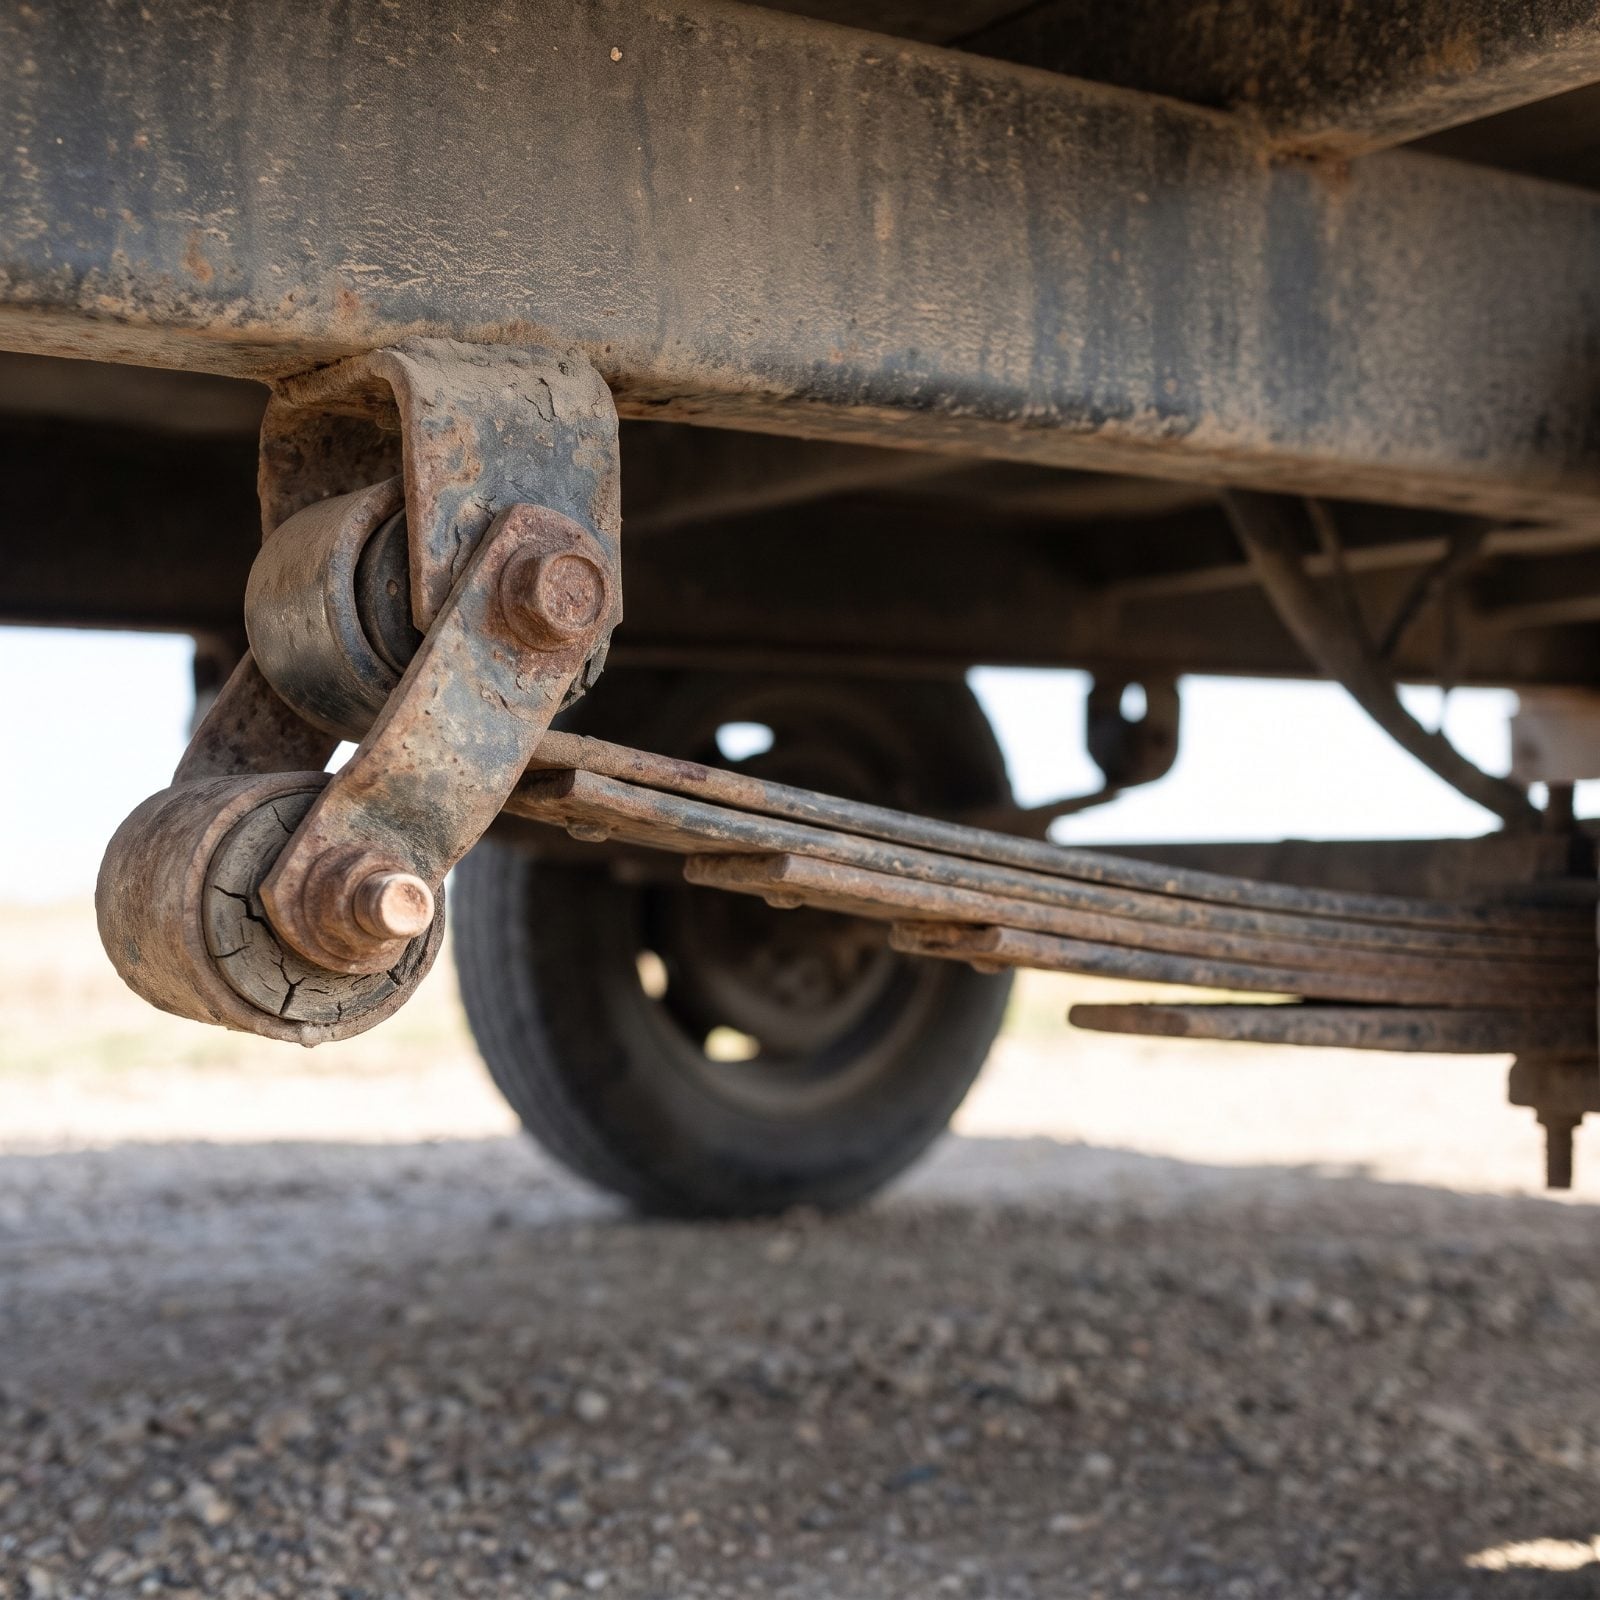
A healthy leaf spring has an arch to it, and that upward curve does all the work, flexing to soak up every pothole between you and the campground. When the arch goes flat, the spring has lost its spring and your axle is riding on whatever’s left.
Inspectors crouch at the wheel and sight sideways down the spring pack. Flat means tired. Then they grab the shackles, those rusty plates bolting the spring eye up to the frame hanger, and check for play. Oval bolt holes and loose bushings mean the whole suspension has slop in it, and on a loaded trailer at highway speed that slop becomes sway you feel in your hands, plus a spring that can let go on a bad day.
34. Fresh Welds or Repairs on the Frame
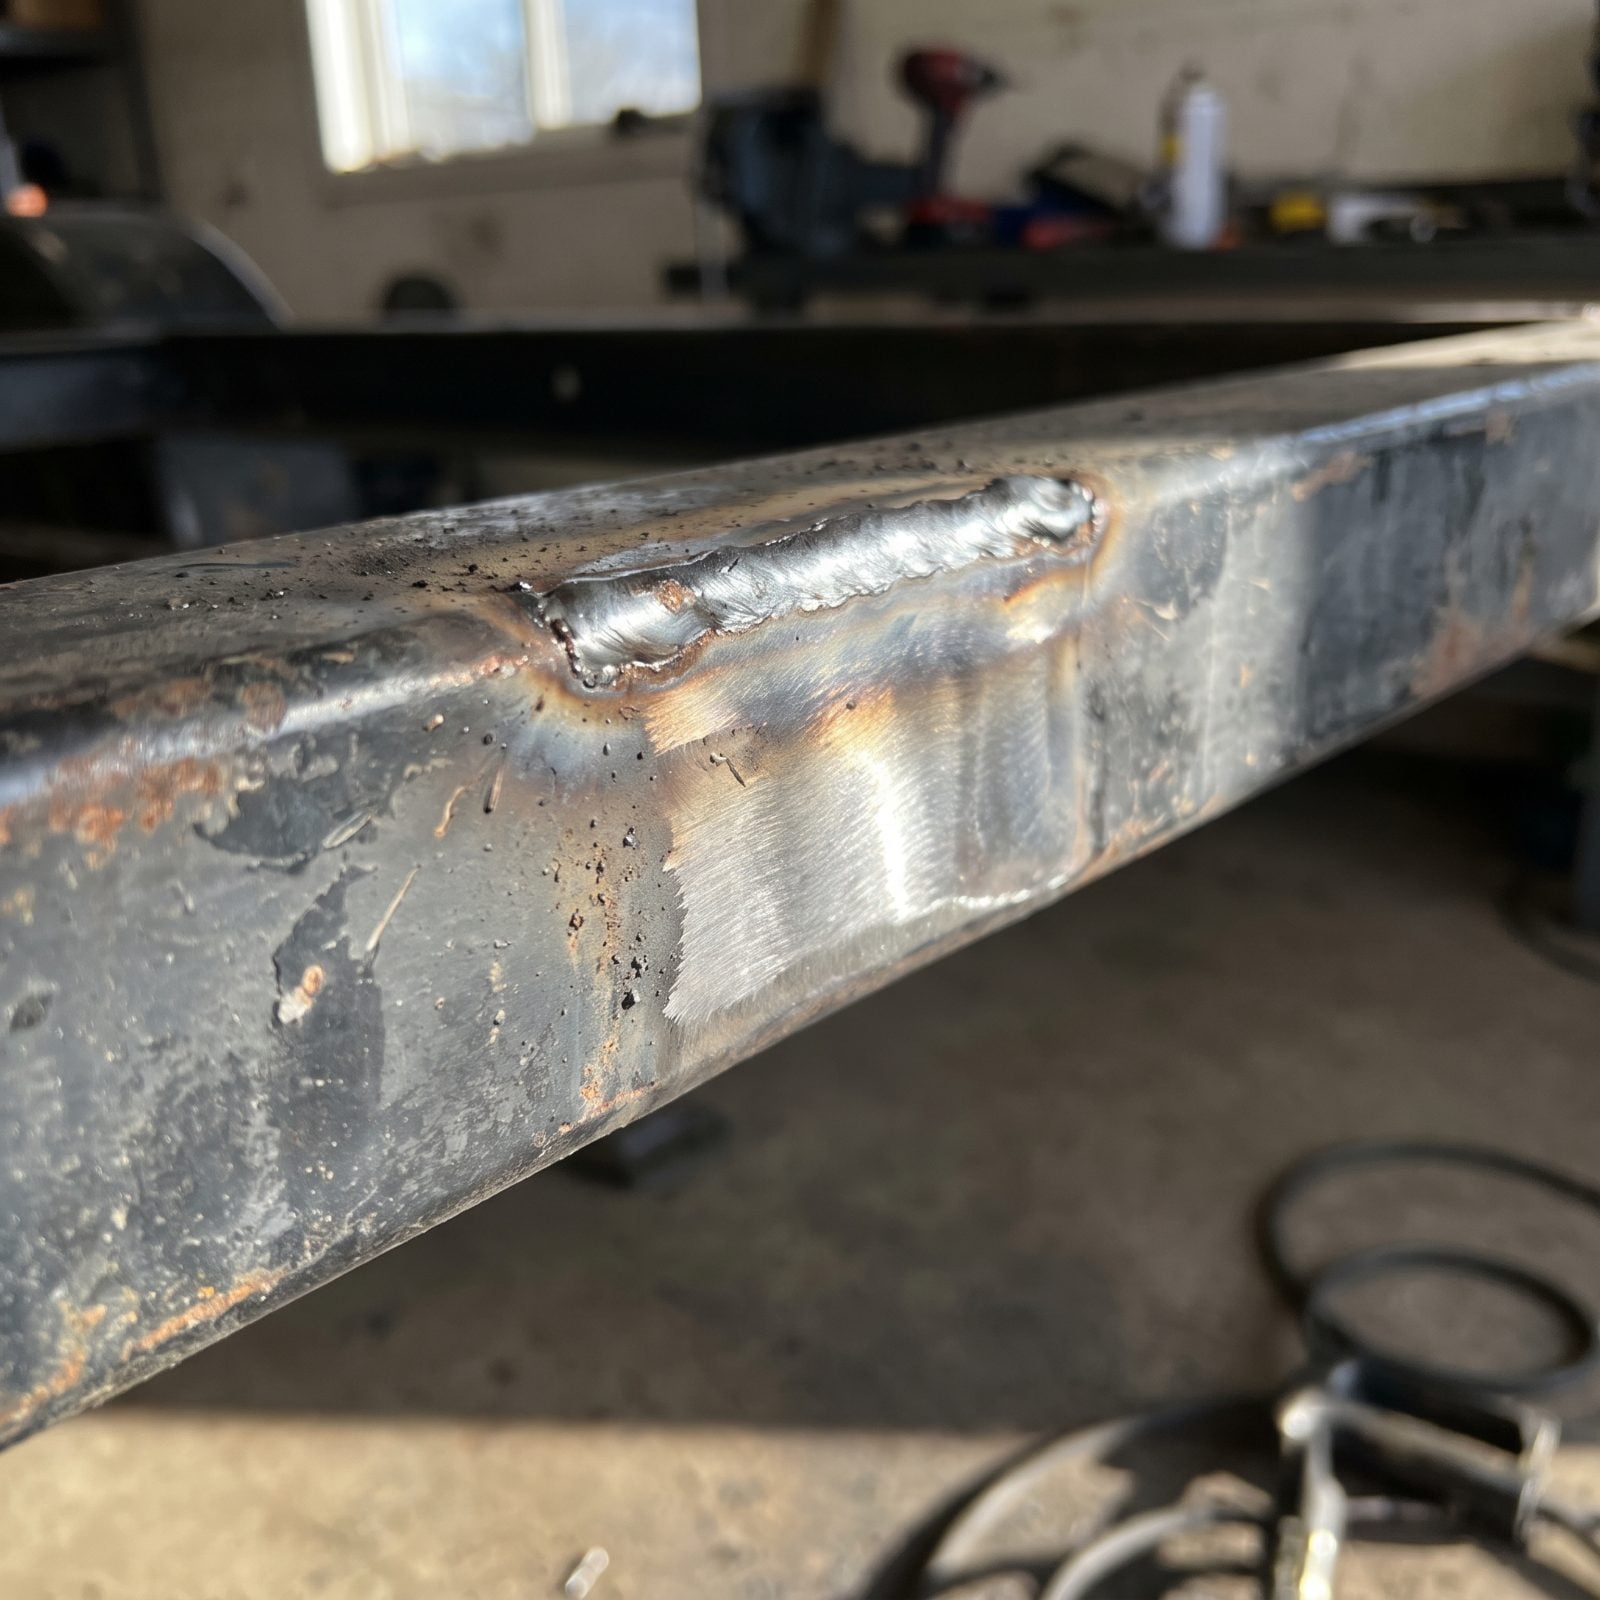
Factory frame welds are painted over and uniform. A bright, bare weld bead that someone added later tells a story the seller might not. Something cracked, bent, or broke, and somebody fixed it.
Not automatically a dealbreaker. A properly repaired frame can be perfectly sound. But a bead slapped on by a guy with a flux-core gun and no engineering behind it is a crack waiting to come back. Inspectors flag fresh metalwork near the axles, the hitch, and anywhere the frame flexes under load, then they ask for paperwork.
No paperwork, no explanation, shiny weld near a stress point? That’s when a good inspector earns the fee. I’d walk before I’d guess.
33. Heavy Scaling Rust Underneath the RV
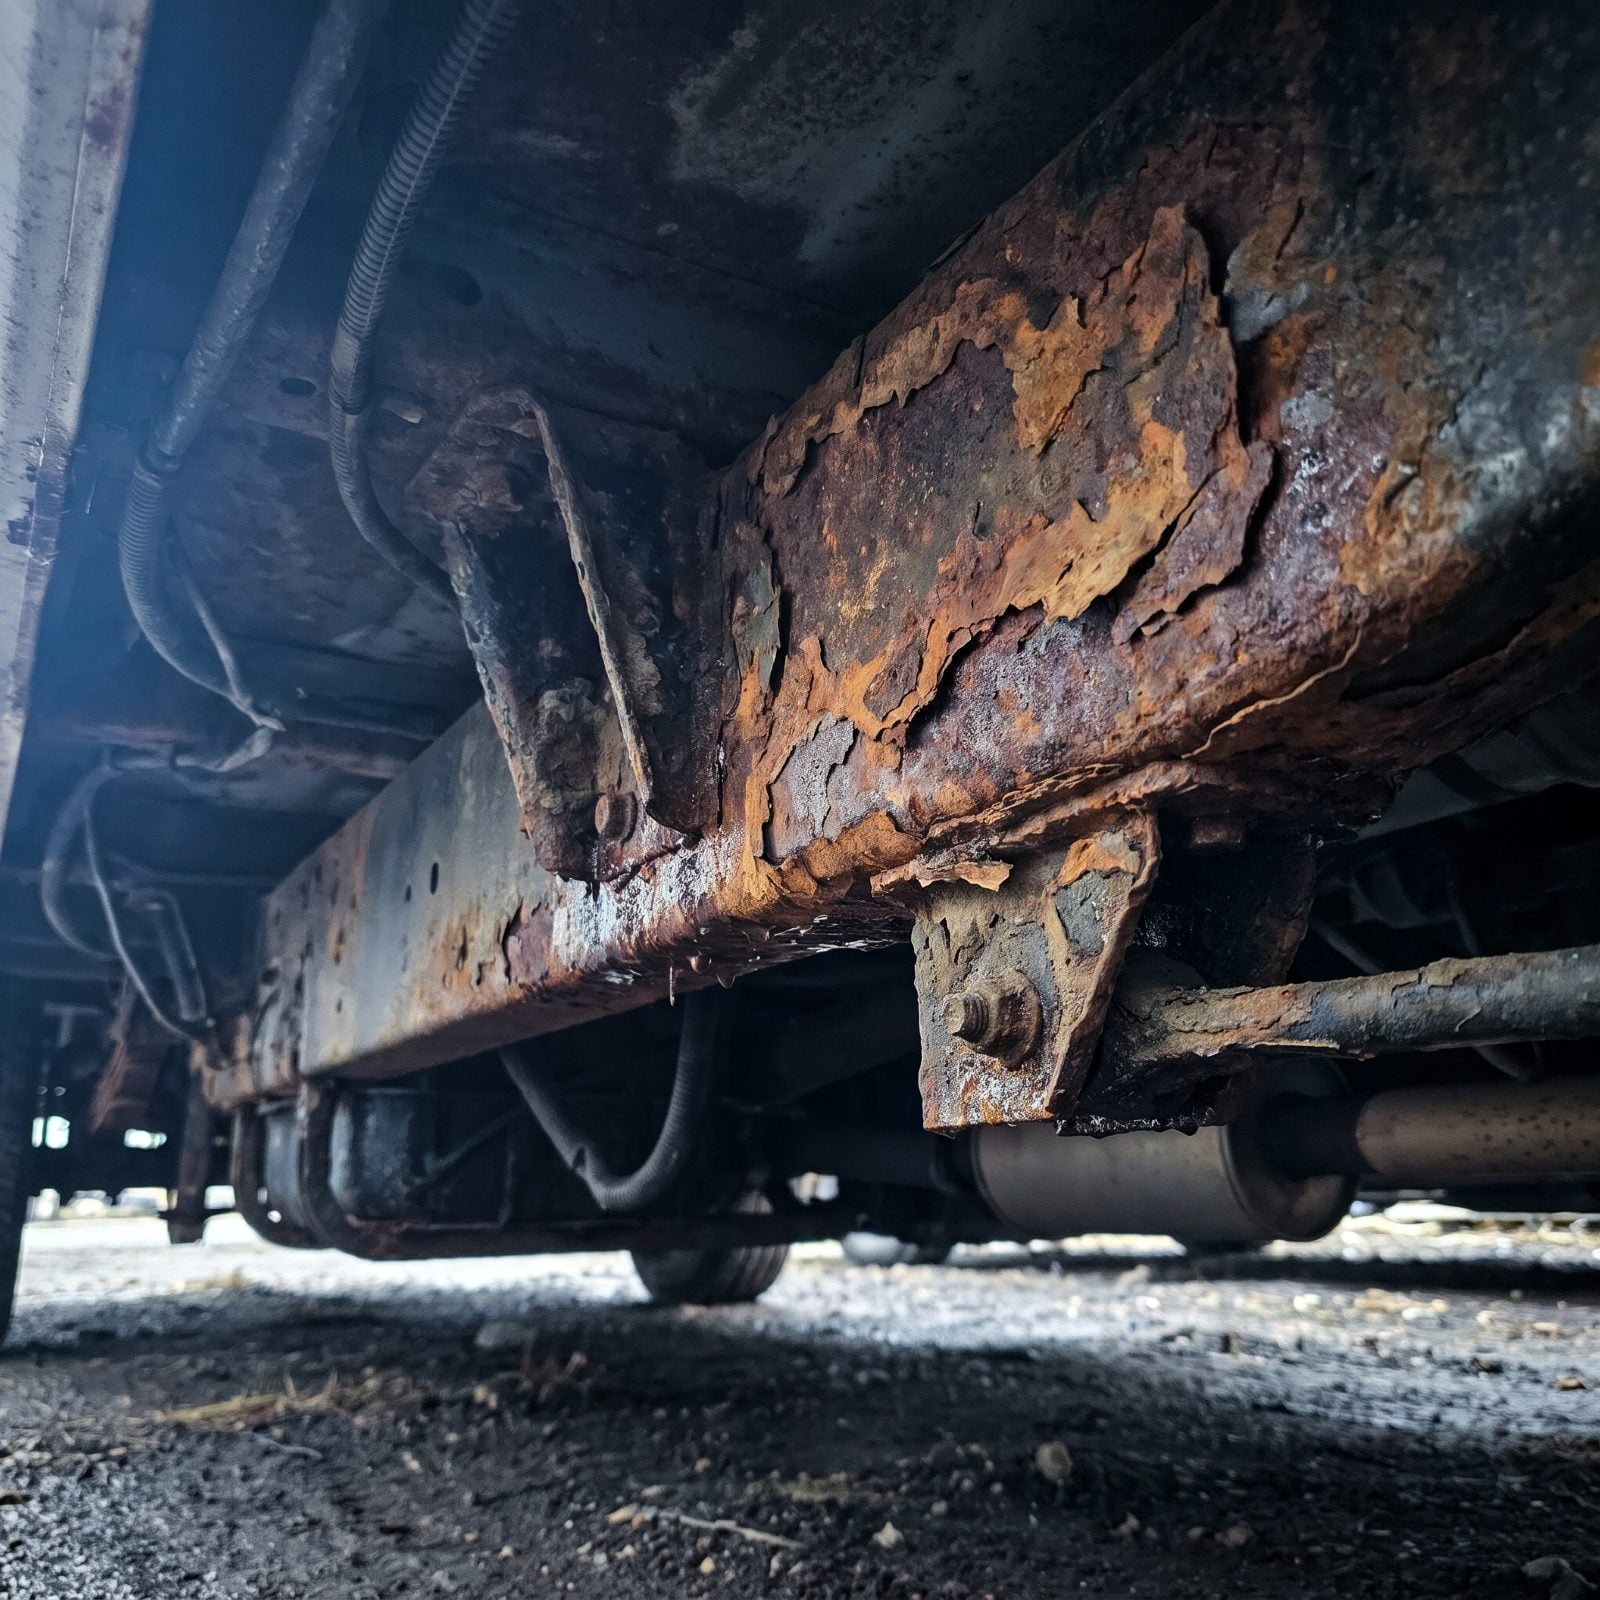
Surface rust is cosmetic. A thin orange film on a frame rail happens to almost every rig that’s seen rain, and it wipes off without a second thought.
Scaling rust is a different animal. When the corrosion flakes off in layers and leaves pitted, thinning metal behind, the frame is quietly shedding material you can’t see. Inspectors run a gloved thumb along the cross-members, and if rust powders off onto the ground or a screwdriver tip sinks in, that steel is done. Rigs that lived near the ocean or spent winters on salted roads are the usual suspects. Salt gets up into the seams and never leaves.
32. Scrapes and Dents From Underbody Impacts
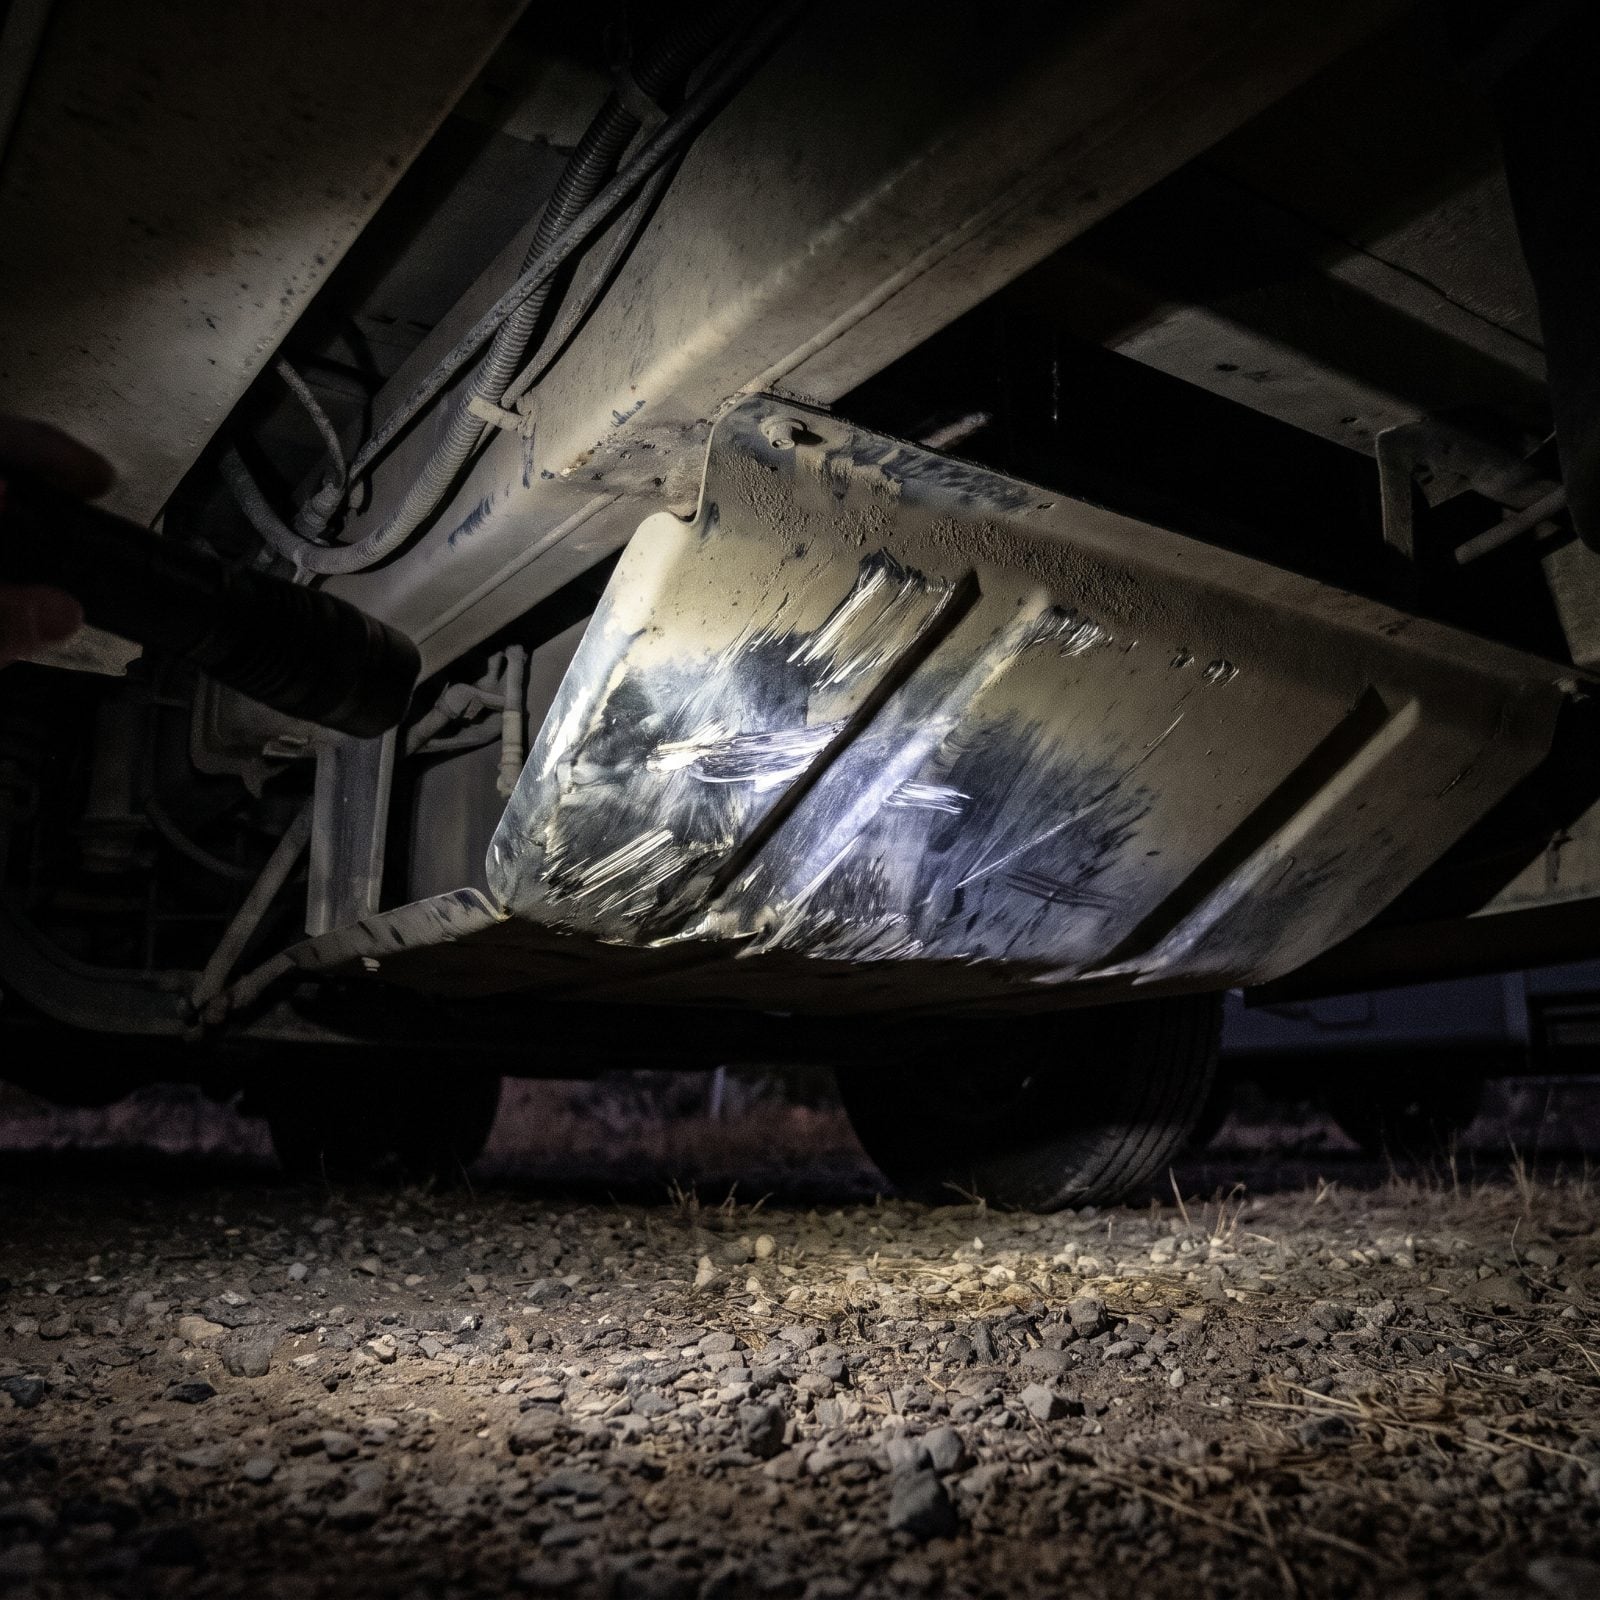
Every RV eventually meets a steep driveway or a speed bump it couldn’t clear. The question is what got hit.
Inspectors read scrape marks like tracks. A gouge on a skid plate is fine, that’s exactly what it’s for. But a crushed exhaust pipe, a cracked holding tank, a bent fuel line, or scrapes across a sewer valve? Now you’re staring at leaks and repairs that climb into real money fast. Long rear overhangs on big motorhomes drag more than people expect, and the damage tends to hide where you’d never think to look.
Shine a light at the lowest-hanging parts and follow the scratches to wherever they stop. That stopping point is usually the thing that took the hit.
31. A Sagging, Torn or Poorly Patched Underbelly Cover
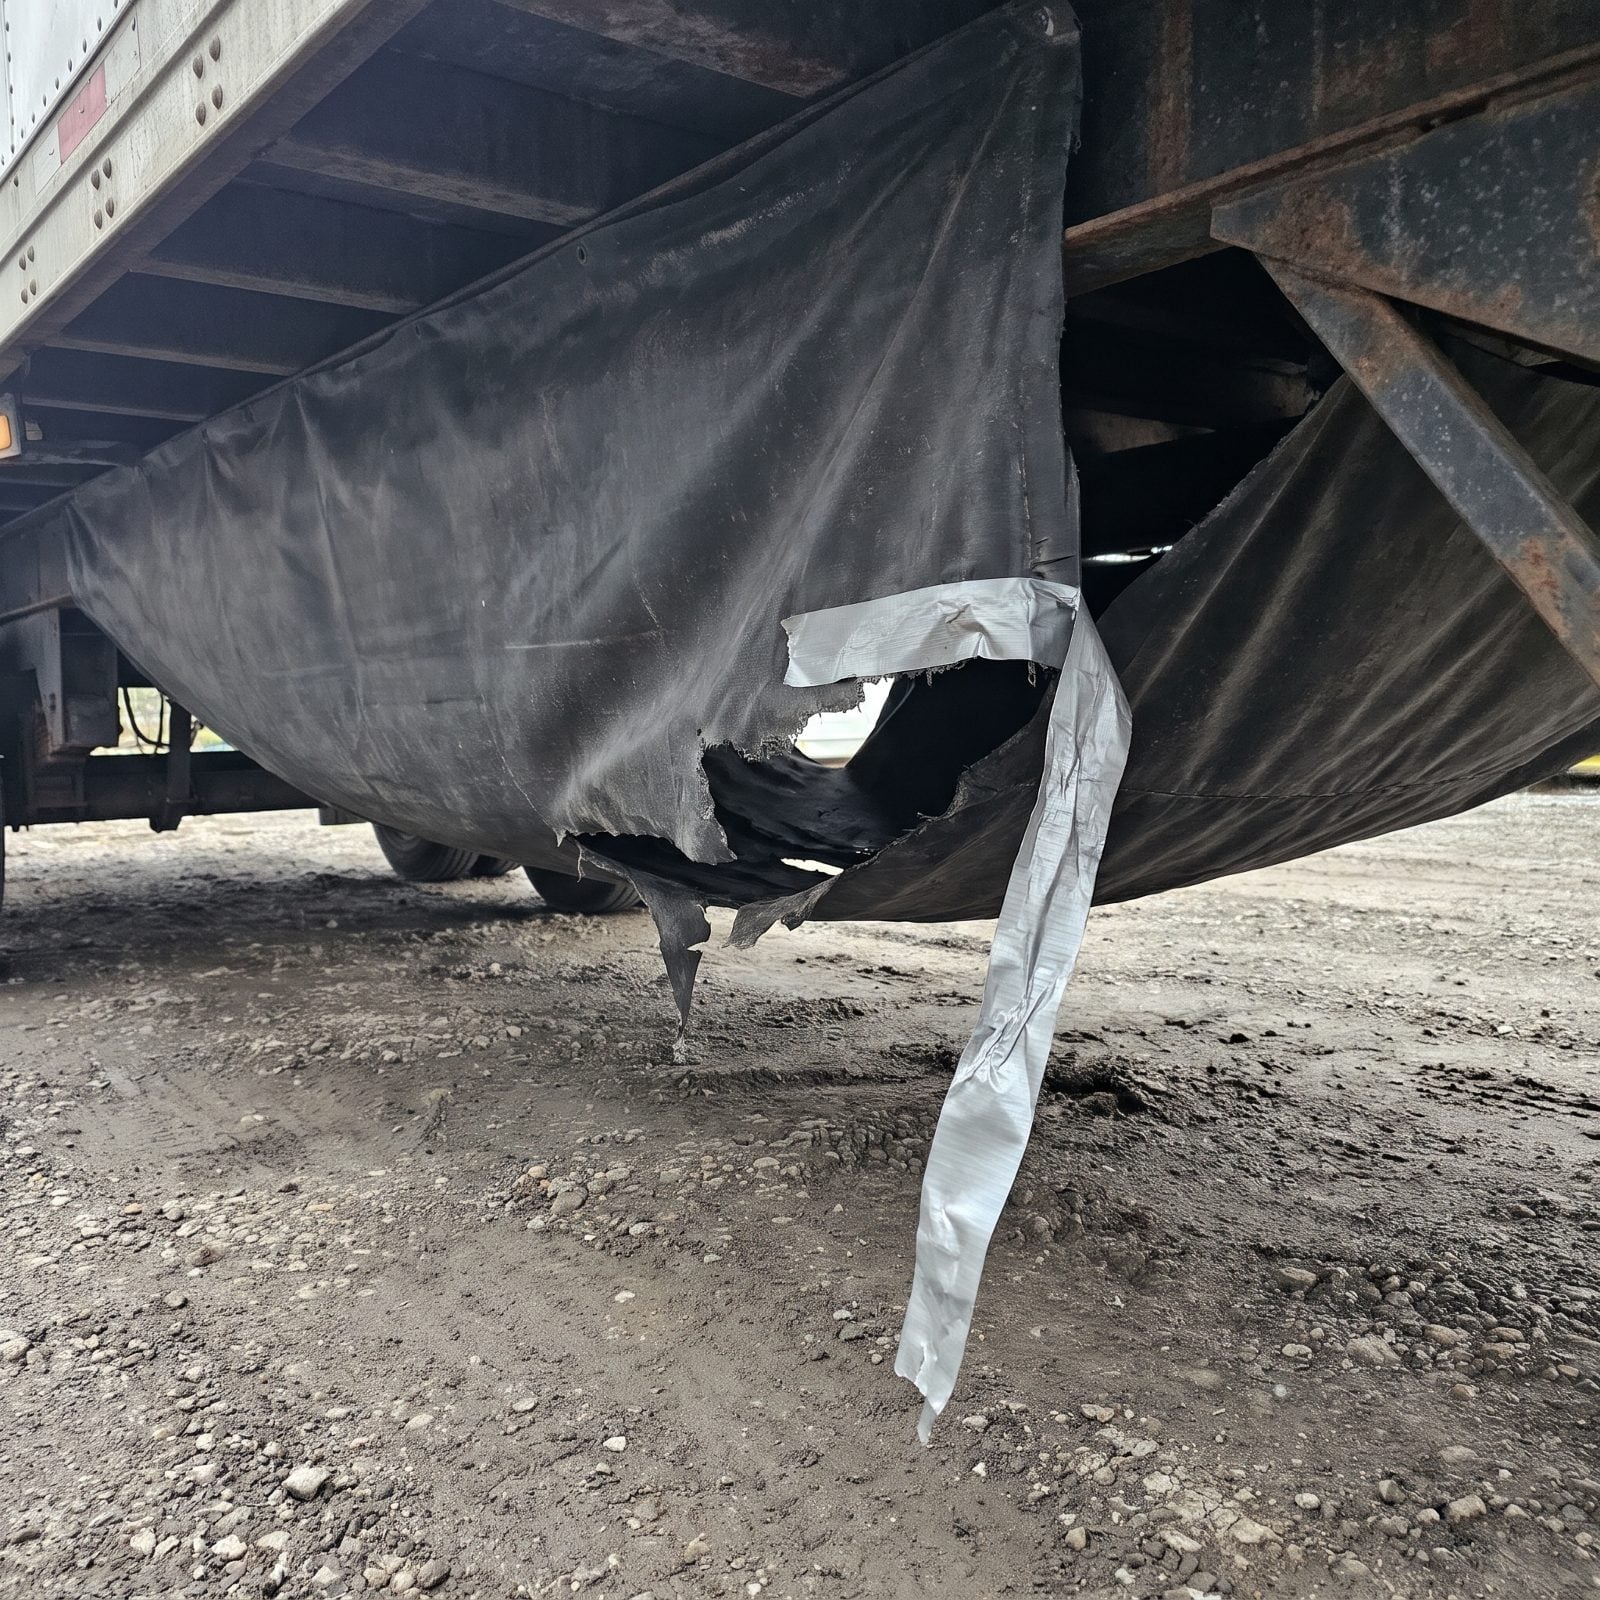
That black plastic sheet under your trailer isn’t just for tidiness. The underbelly cover keeps road spray, rodents, and cold air away from your tanks, plumbing, and insulation, so when it sags, something above it got heavy or wet.
A belly that droops into a pouch usually means water is pooling where water never should, often from a slow plumbing leak you haven’t spotted inside yet. Torn panels taped over or patched with screwed-on scraps tell inspectors the owner reacted to a problem instead of chasing the cause. Mice love those gaps. So does rot.
I once found a sagging belly hiding a cracked fresh-water line that had been dripping all season. The patch job was neat. The damage underneath was anything but.
30. Bent or Twisted Stabilizer Jacks
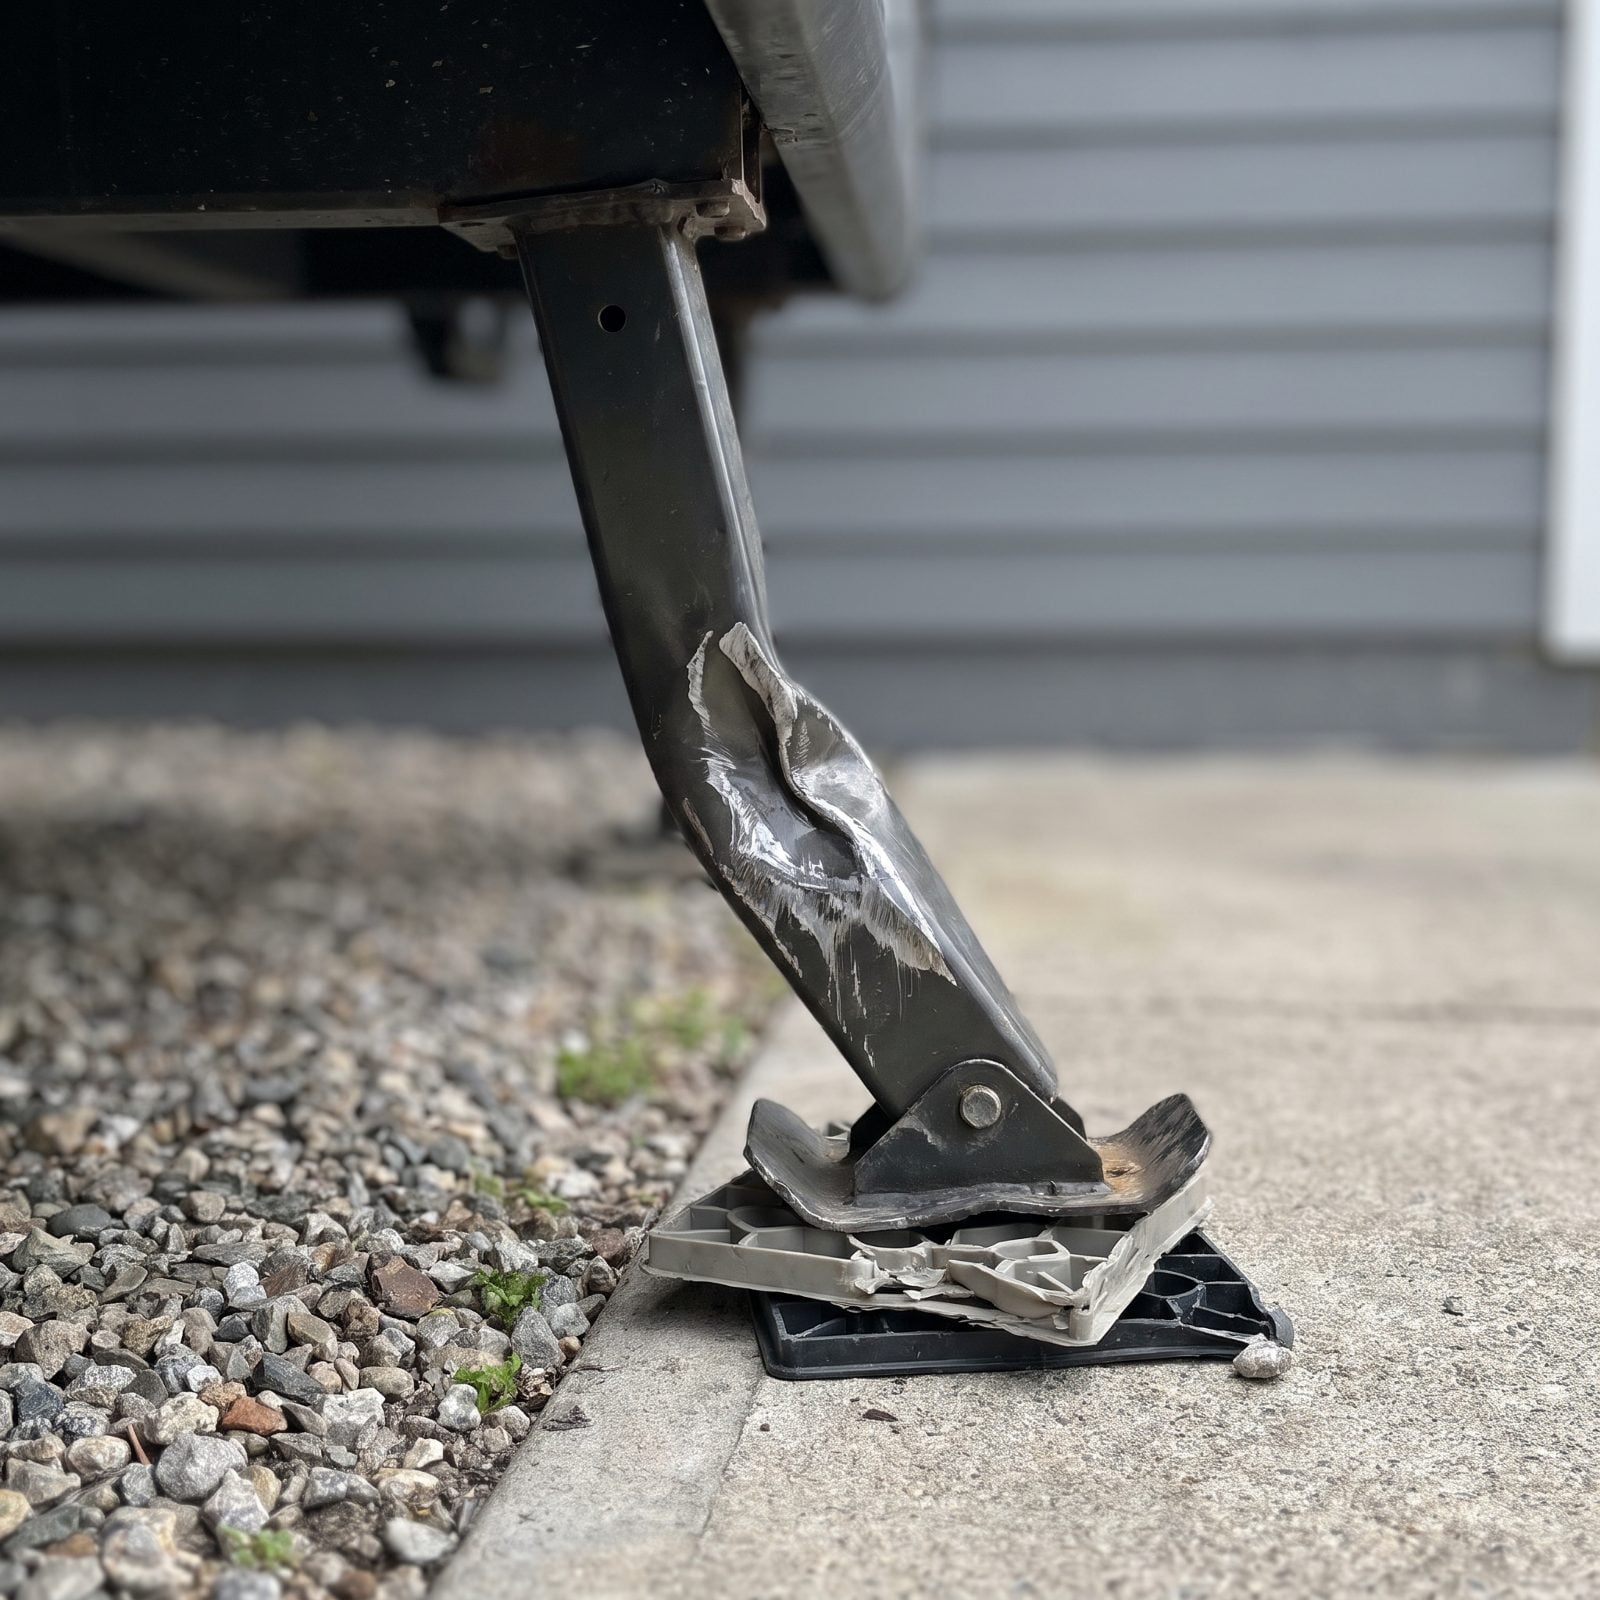
Stabilizer jacks have one job: steady the rig once it’s parked and level. They are not meant to lift it, and people forget that constantly.
A bent or twisted scissor jack is the fingerprint of somebody who cranked a stabilizer trying to level the whole trailer, or drove off with the jacks still down. Inspectors look for arms that don’t sit square and footpads that tilt. By themselves, bent stabilizers are a cheap fix. As a clue, though, they point to an owner who never read the manual, which makes you wonder what else got abused.
29. Hydraulic Leveling Jacks With Oily Rams
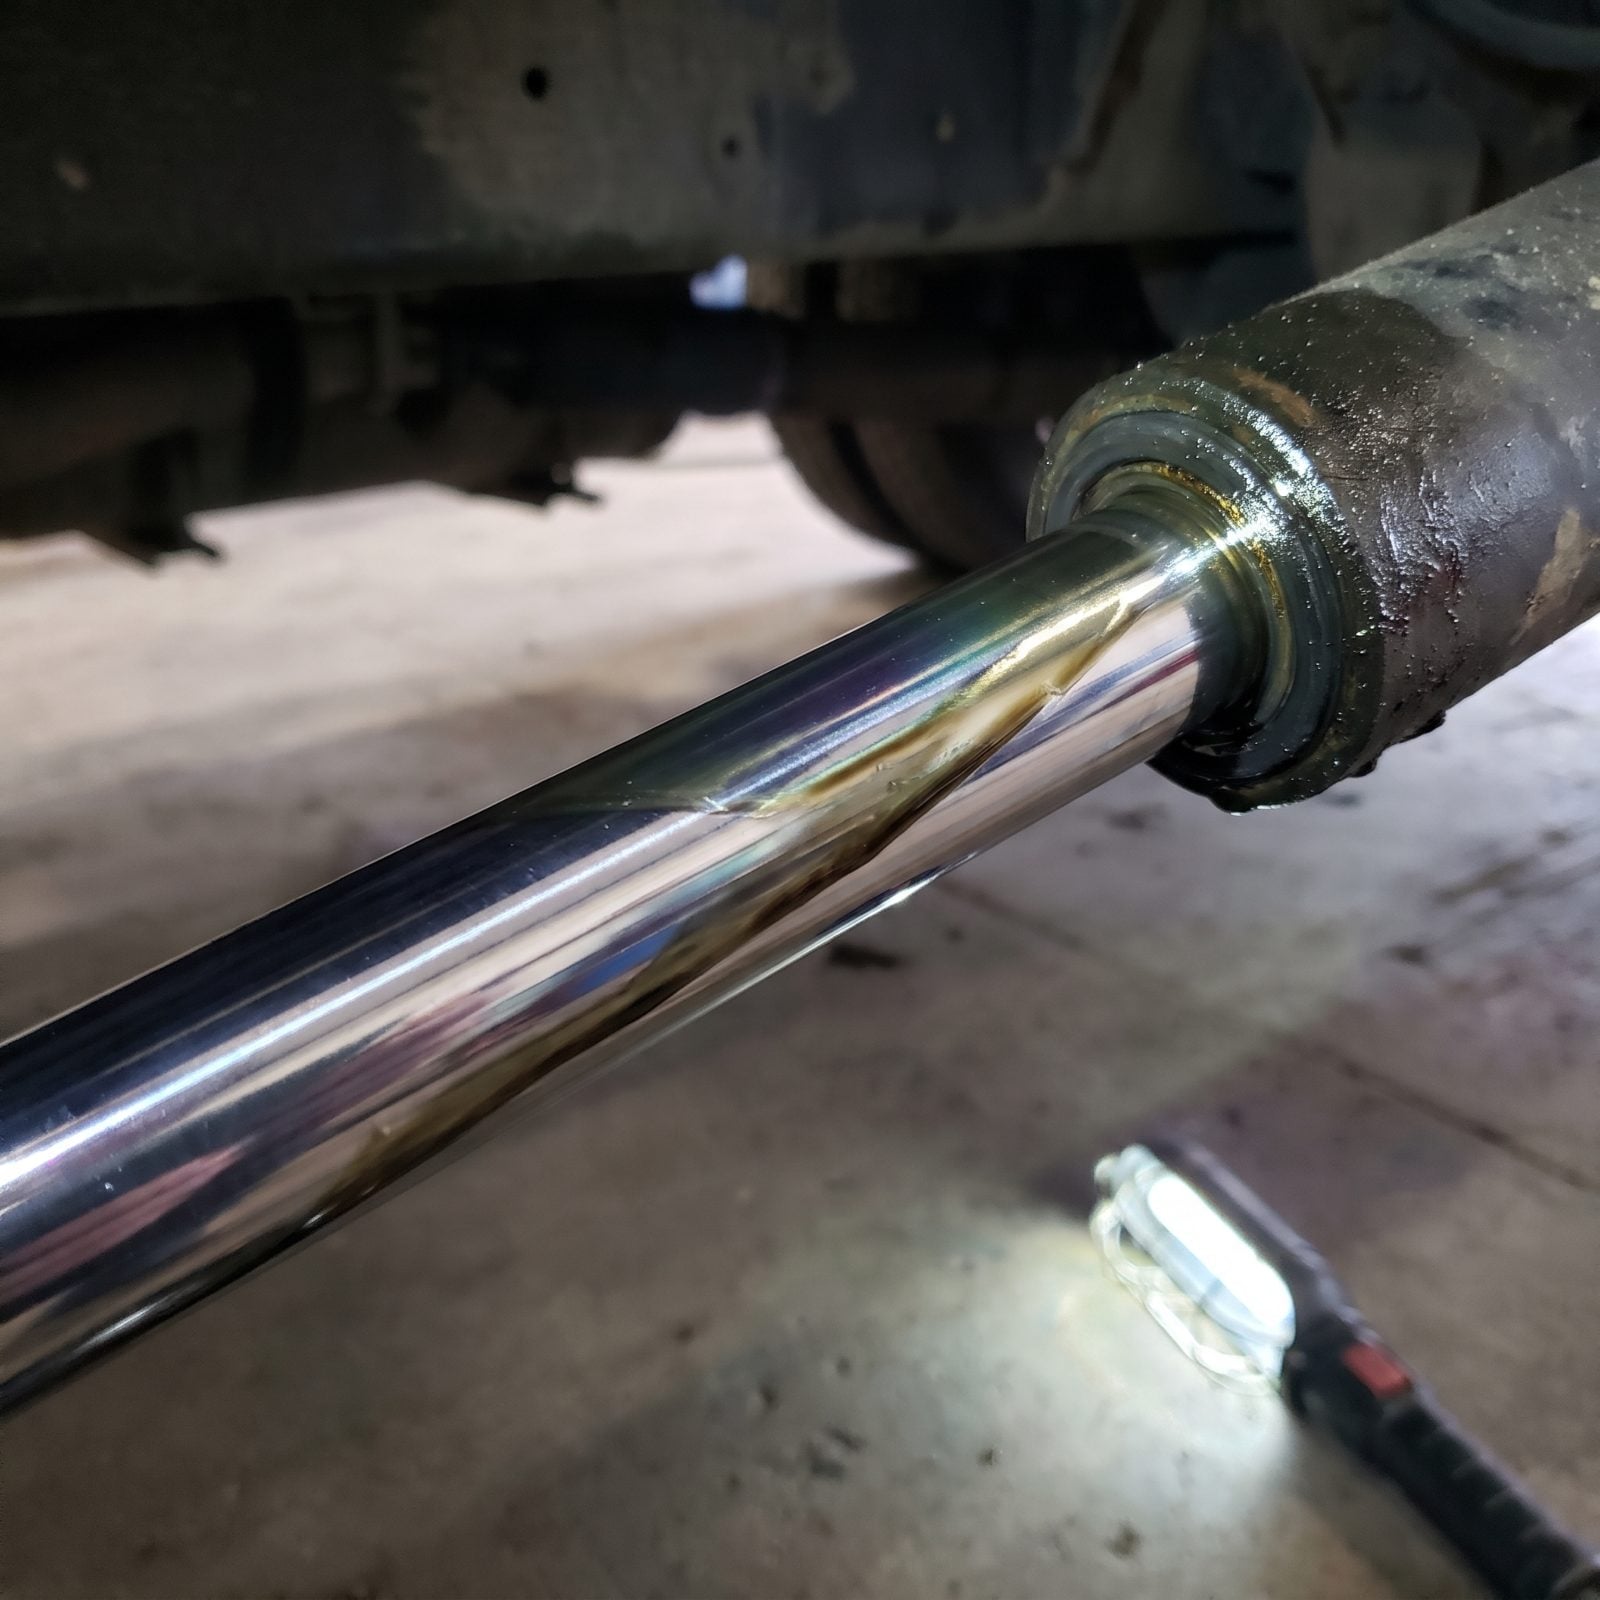
Those shiny chrome shafts on hydraulic jacks, the rams, should look clean and dry when extended. A thin film of oil clinging to them, or a drip pooling on the footpad, means a seal is giving up.
And inspectors care a lot about why. A jack that slowly bleeds down overnight can let the rig settle while you sleep, and a system low on fluid can flat refuse to retract when it’s time to leave. Picture breaking camp, hitting the button, and one jack stays planted in the dirt. Now you’re stuck, calling for service from a campground with no cell signal.
28. Excessive Wear Inside the Hitch Coupler
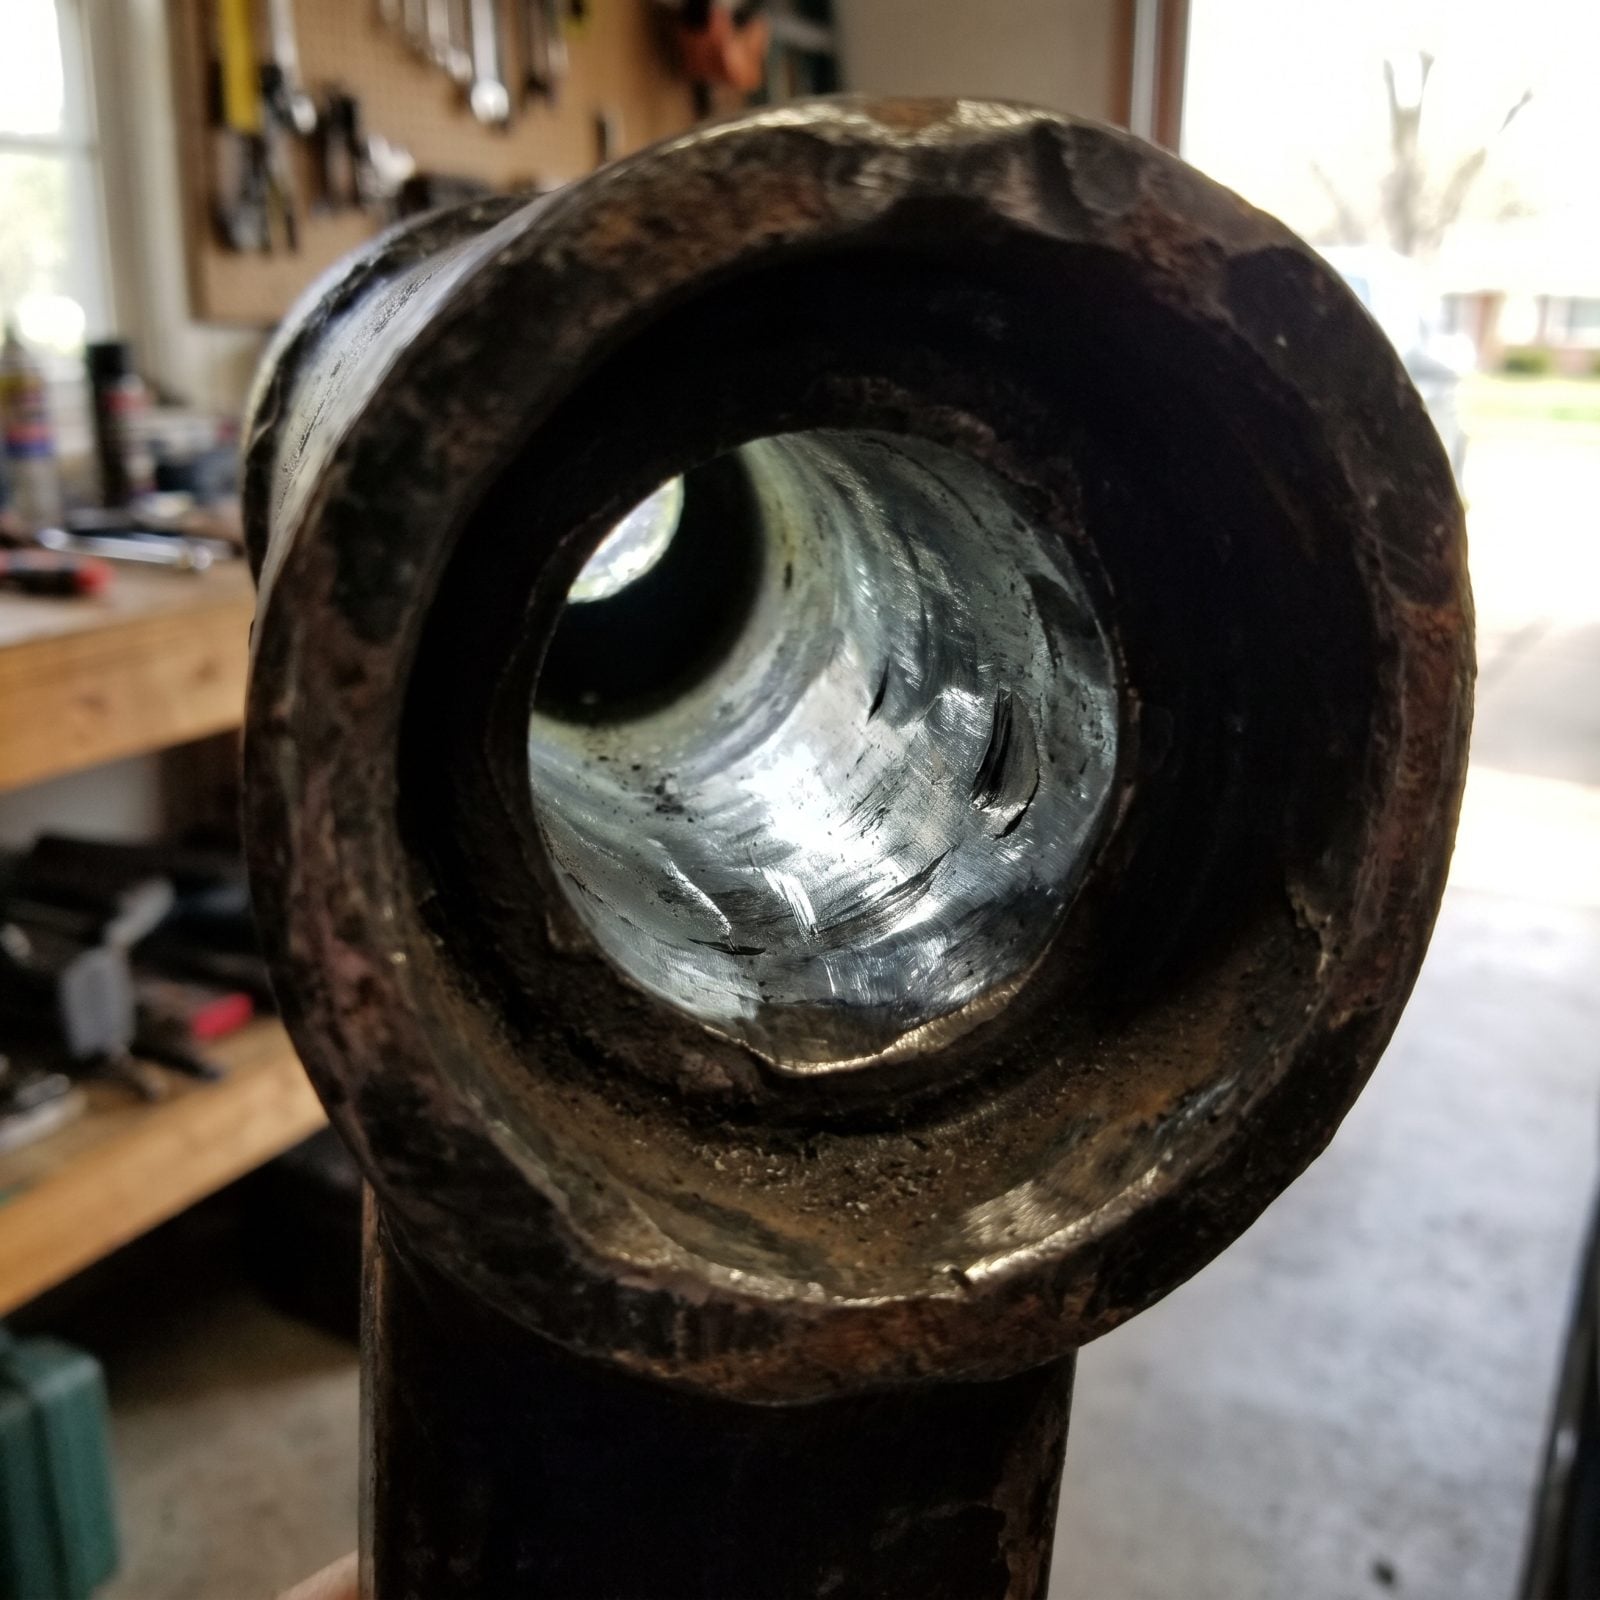
This is a bushing housing, the open-ended steel tube that holds a pivot bushing and bolt in the suspension. It’s a key link keeping the axle located under the trailer, so inspectors treat it with real respect.
They pull the bushing and bolt and sight straight through the bore. Fresh scoring around the inside walls, deep gouges, or a bore that’s worn oversize all mean years of play have worn it loose. A sloppy housing clunks over every bump, and in the worst case it can let the suspension shift out of line.
27. A Fifth-Wheel Pin Box With Stress Cracks
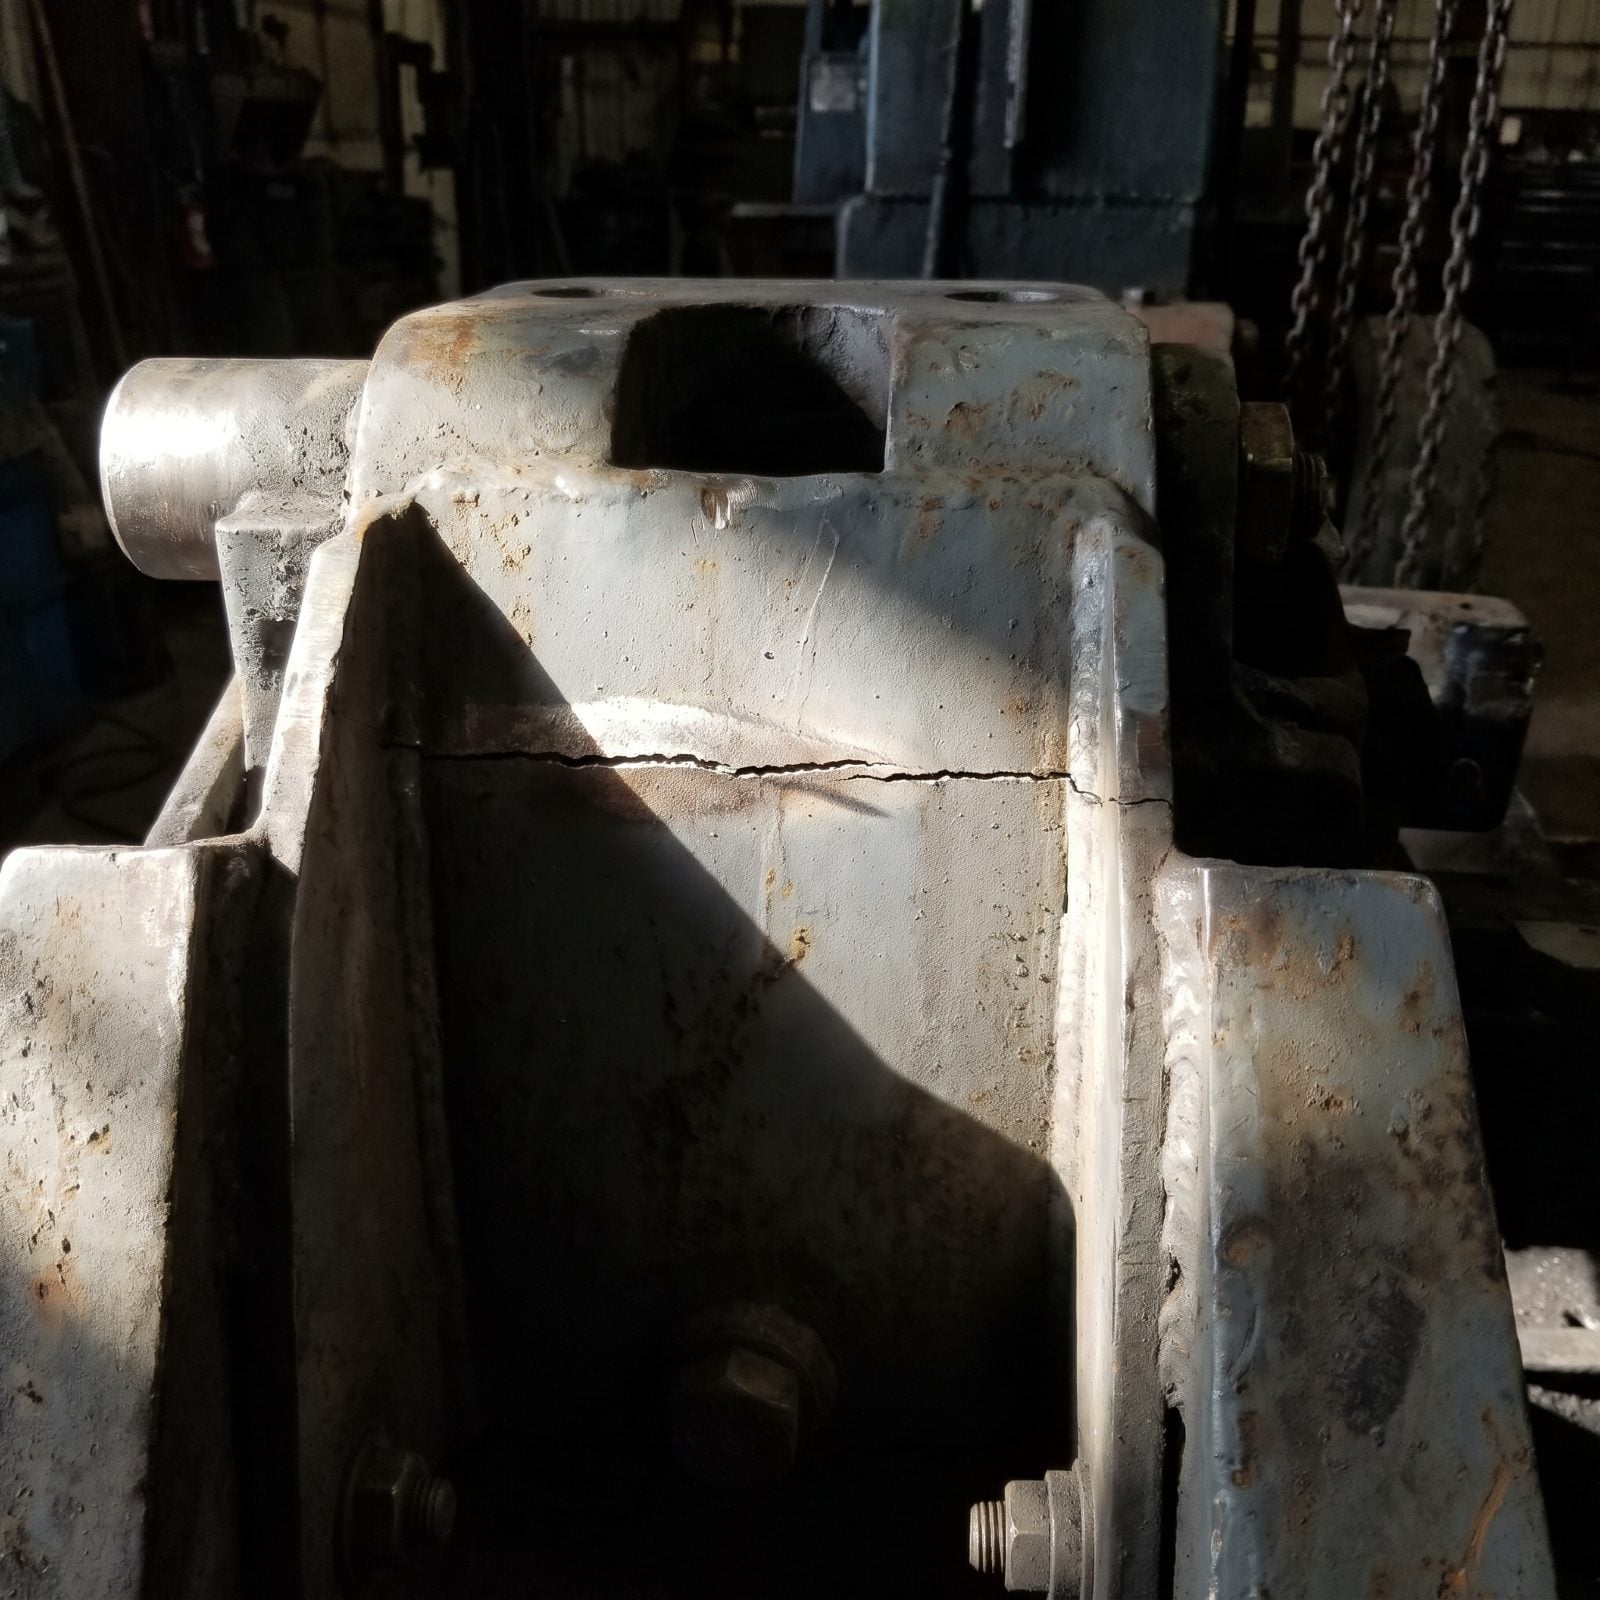
On a fifth-wheel, the pin box is everything. It’s the heavy steel bracket carrying the kingpin, the part that locks into the hitch in your truck bed and bears the whole tongue weight, often several thousand pounds.
Inspectors go over this assembly with a light, hunting hairline cracks around bolt holes and weld seams. Rust weeping from a thin dark line gives it away: the metal has cracked and water is finding the gap. When a pin box fails it fails all at once, usually while you’re towing, with the trailer bucking hard behind you.
This is the one component where I don’t care how good the price is. A cracked pin box is a hard stop until it’s engineered and fixed right. Walk around it, shine your light, and if you see a crack, believe it.
26. A Missing or Frayed Breakaway Cable
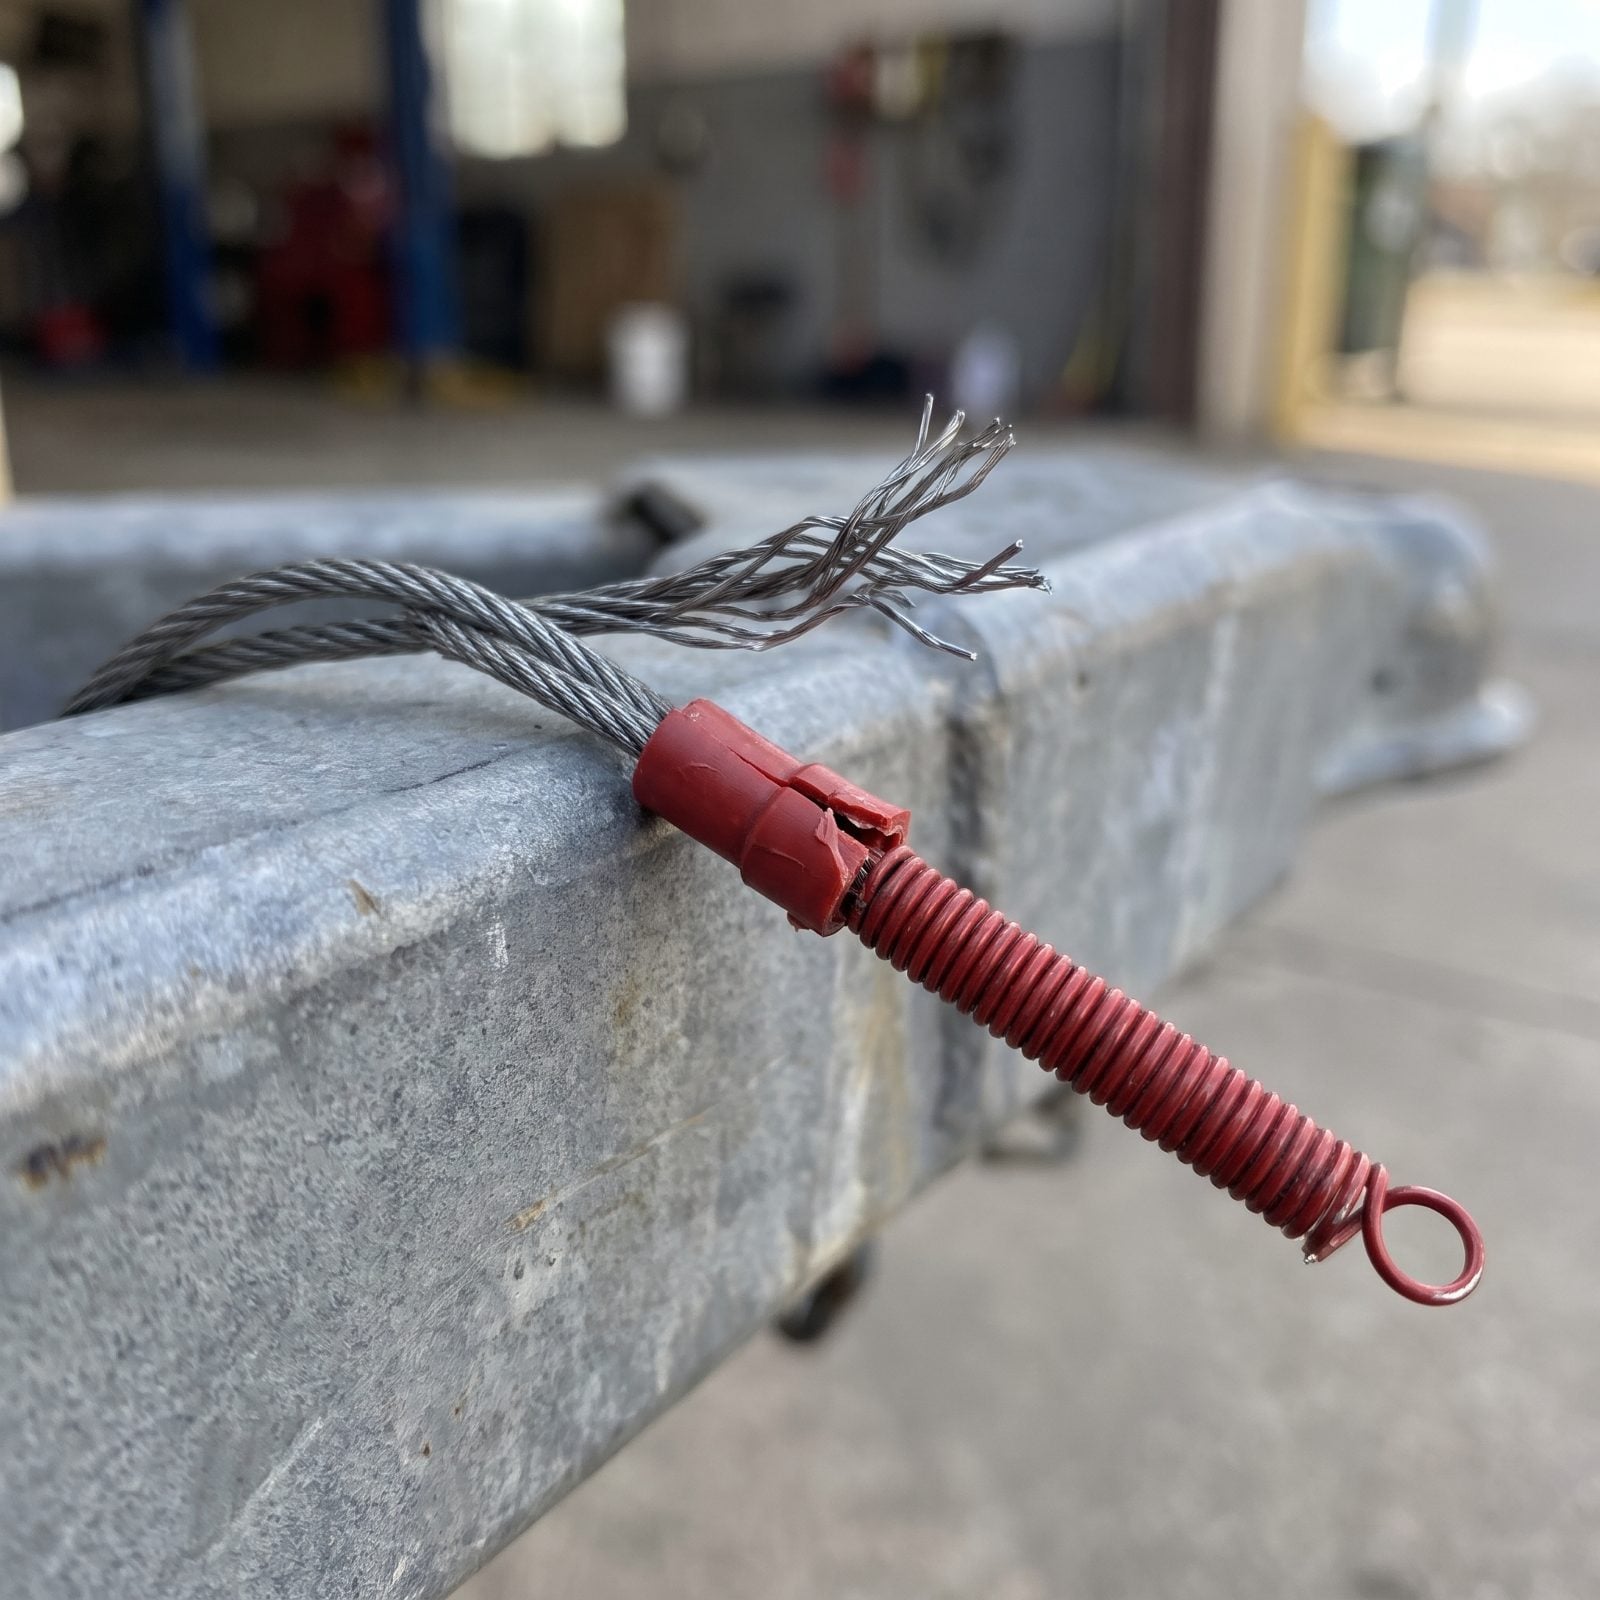
That thin cable with the red pin does one job. If the trailer separates from the truck, it yanks a pin and slams the trailer brakes on, and without it a loose trailer becomes somebody’s worst afternoon.
Inspectors look for fraying, corrosion, or a cable zip-tied to the chains instead of the tow vehicle itself. That last one is the sneaky mistake. Attach it to something that leaves with the trailer and it never pulls — it just goes along for the ride.
Test the switch too, because a frozen one is as useless as a missing one. The whole assembly costs less than a tank of gas to replace, which makes a neglected one all the more telling.
25. A Cracked Seven-Pin Plug or Spliced Trailer Wiring
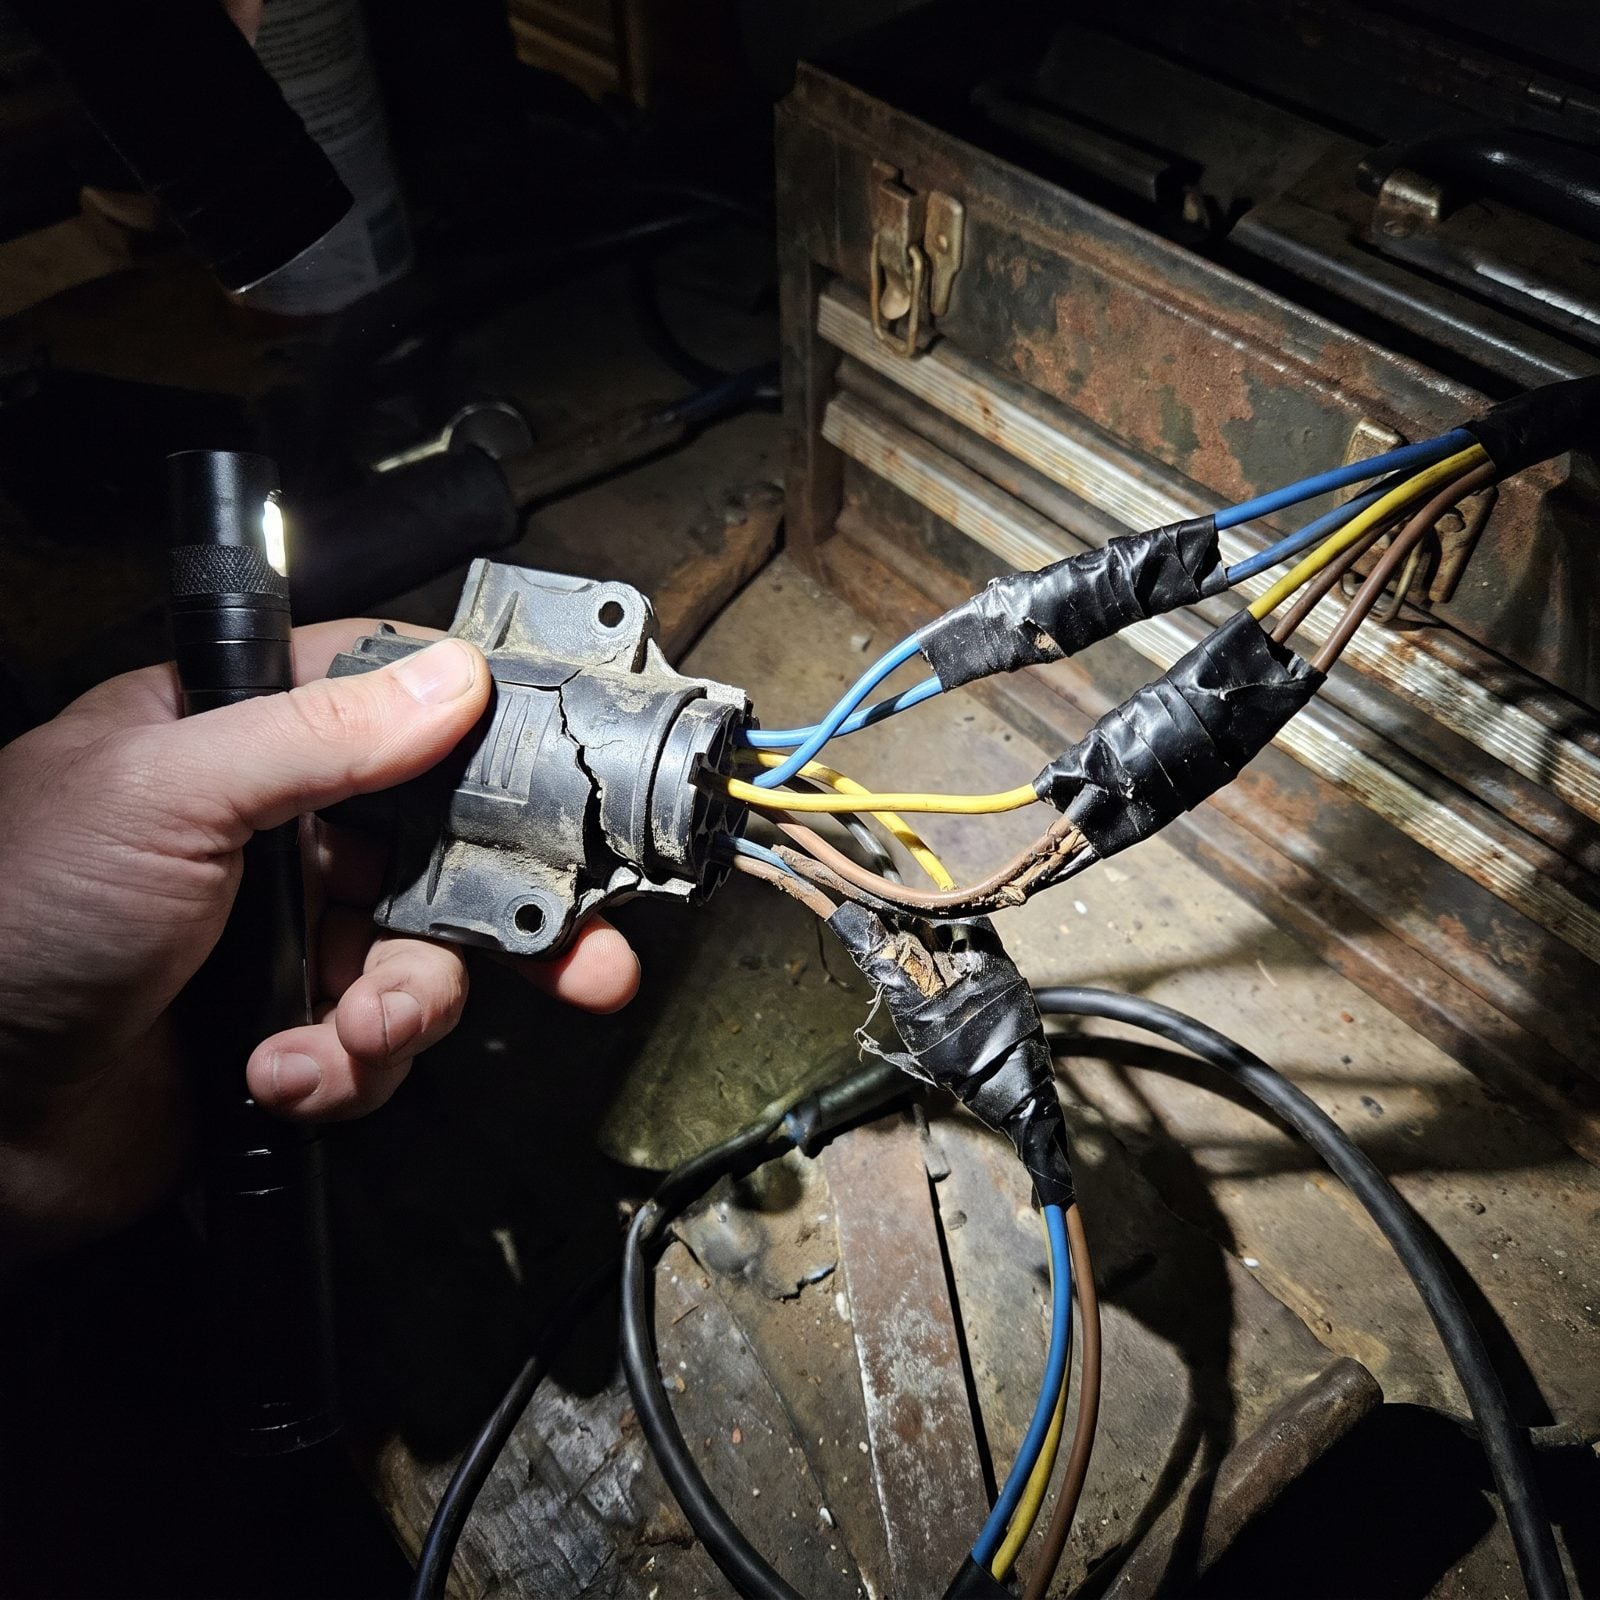
Follow the wires and you’ll learn the trailer’s whole electrical story. The seven-pin plug carries brakes, turn signals, running lights, and often charge power. A cracked housing or crusted green pins means moisture has been getting in, and corroded pins mean dim or dead lights at the worst moment.
Spliced wiring is the bigger tell. Butt connectors wrapped in household tape, mismatched wire colors, a repair that someone clearly did at a campsite with whatever was in the junk drawer — it usually points to a chafed harness rubbing on the frame.
Wiggle the plug. If the lights flicker, the problem is live and waiting for you on a dark two-lane.
24. Expired Propane Cylinders and Cracked Hoses
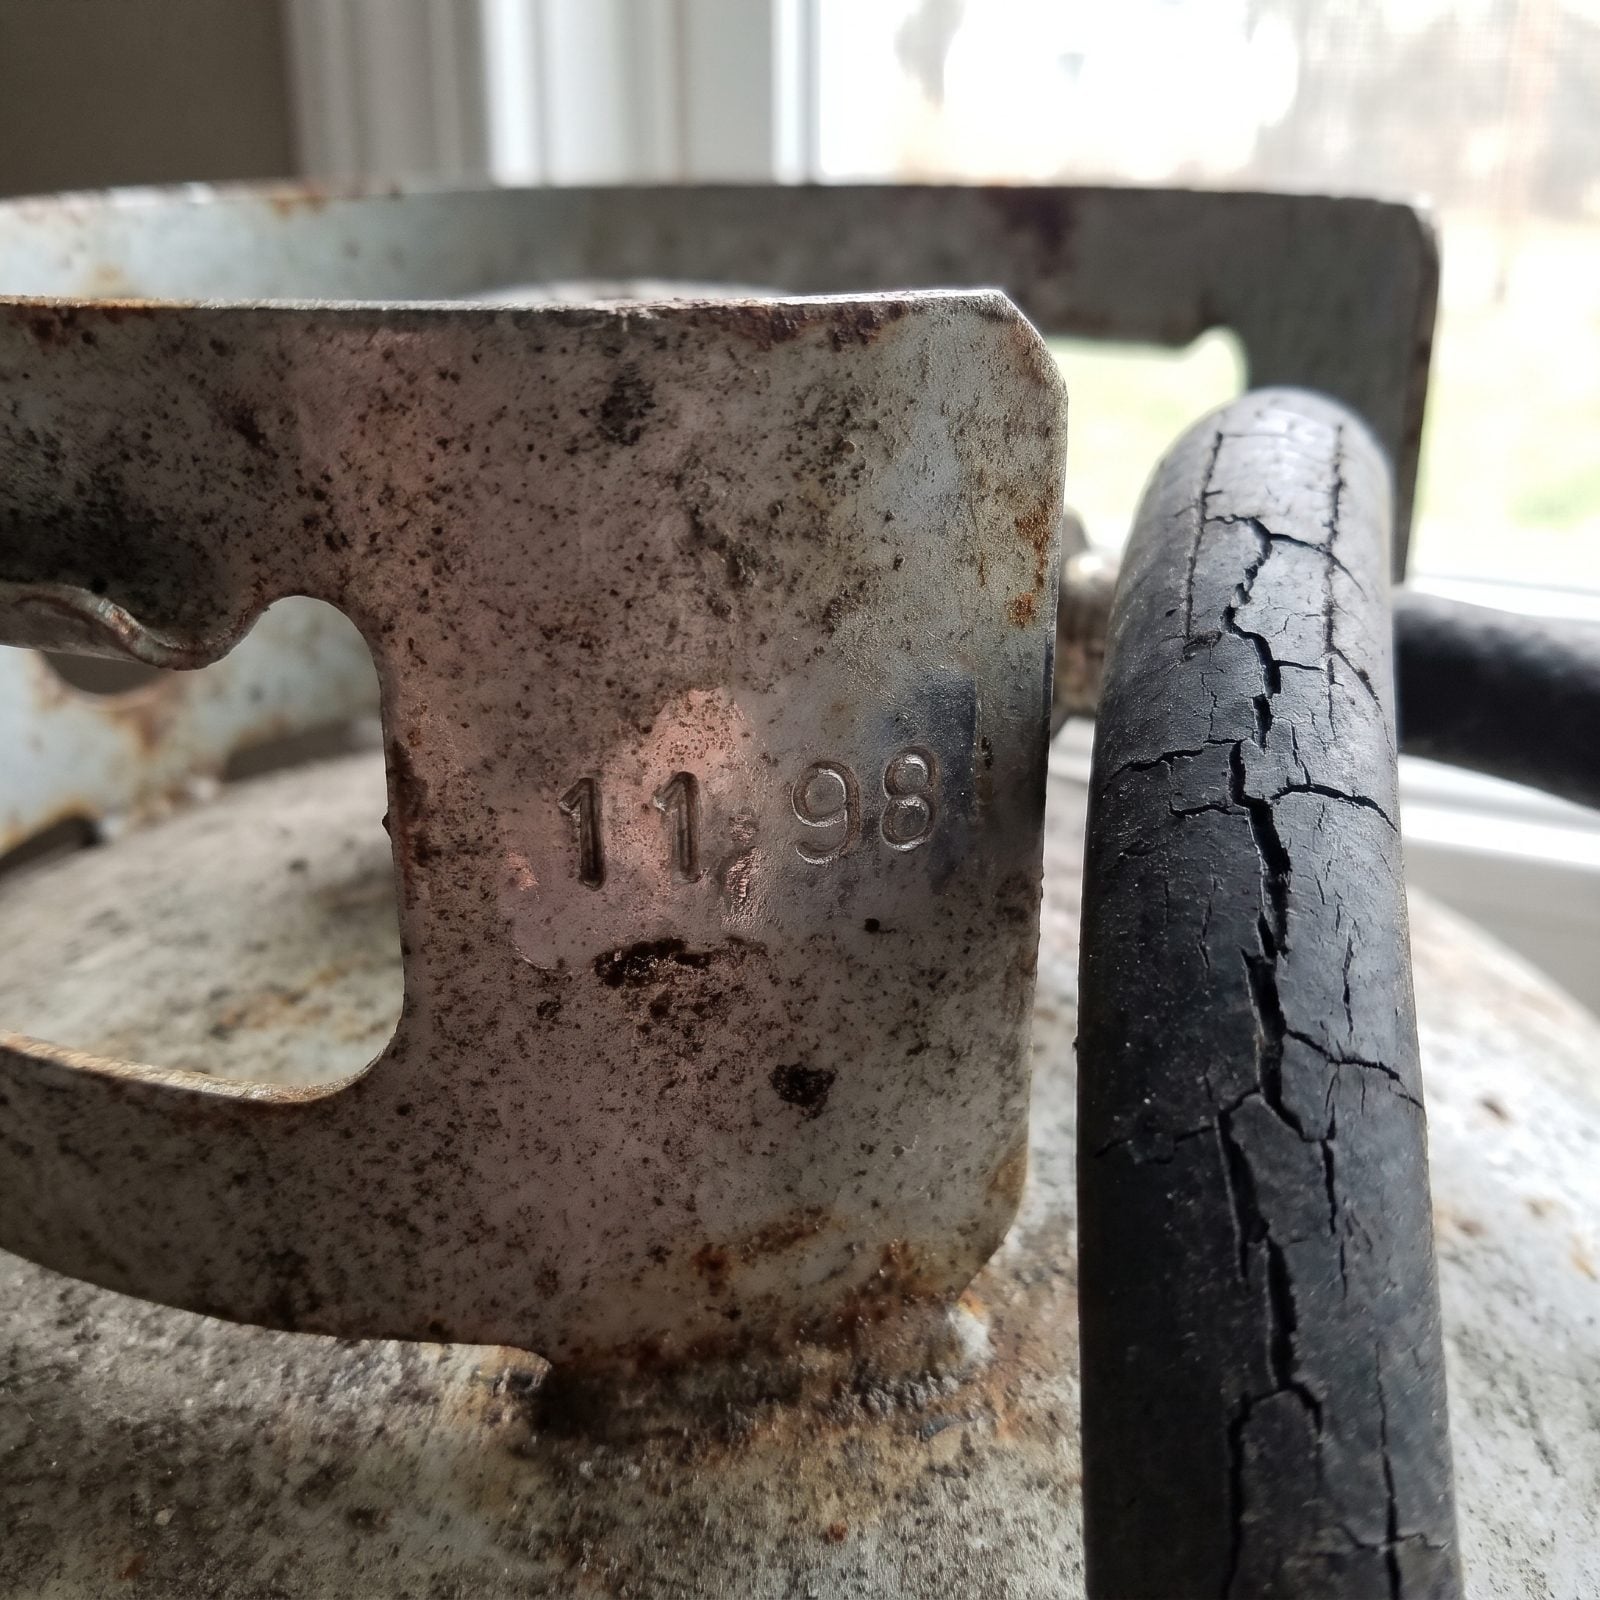
Propane tanks don’t last forever. In the U.S. a DOT cylinder needs recertification about twelve years after manufacture and then every few years after that, and the stamped date sits right there on the collar. An expired tank won’t get filled at a reputable shop, so a full one with an old date was likely topped off somewhere that didn’t check.
The hoses matter more than the tank anyway. Look for dry cracking, bulges, and splits near the fittings. Rubber hardens with sun and age, and a cracked propane line is not a wait-and-see item.
Spidery cracks along the hose are the tell. If they’re there, assume the valve and regulator deserve the same scrutiny.
After explaining the 12-year recertification rule for trailer cylinders, an RV safety educator warns “Don’t be caught by surprise – it is illegal to refill a DOT cylinder that is beyond its certification date.”
23. Heat Damage at the Shore-Power Inlet or Cord
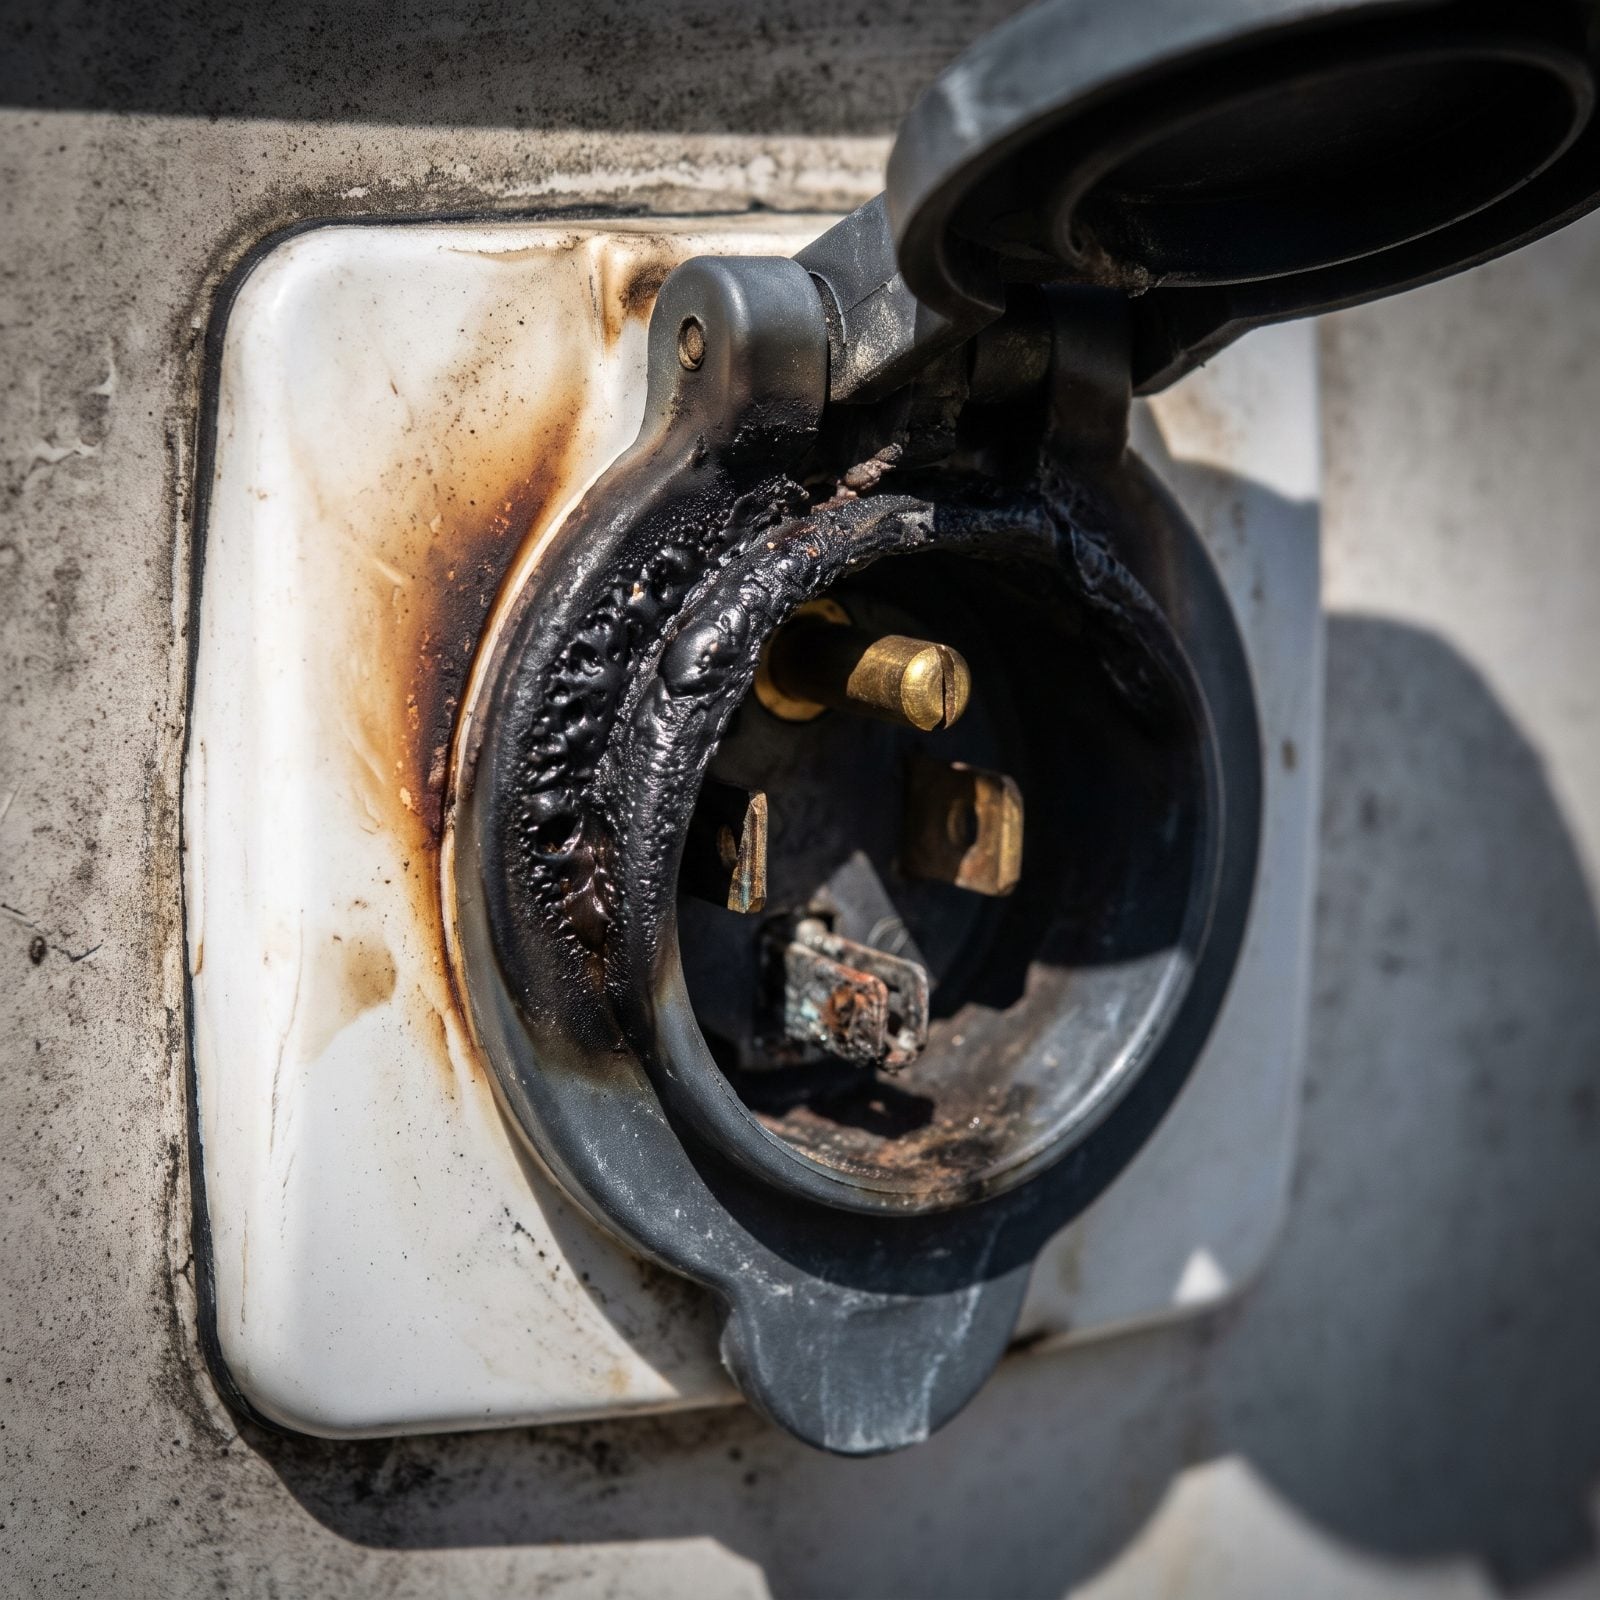
Burnt plastic smells like money leaving your wallet. A shore-power inlet with a browned, melted ring around one prong has been running hot, and heat at a connection means resistance — a loose or arcing contact that only gets worse.
Check both ends: the inlet on the RV and the cord’s plug. Scorching on either side points to a bad connection somewhere in the chain. Sometimes it’s the pedestal at the park, sometimes the inlet itself, sometimes a worn cord end. Melted contacts don’t heal.
This is a fire concern, not a cosmetic one. A discolored inlet is one of the few exterior clues an inspector flags as drop-everything.
22. A Generator Compartment Stained by Fuel or Oil
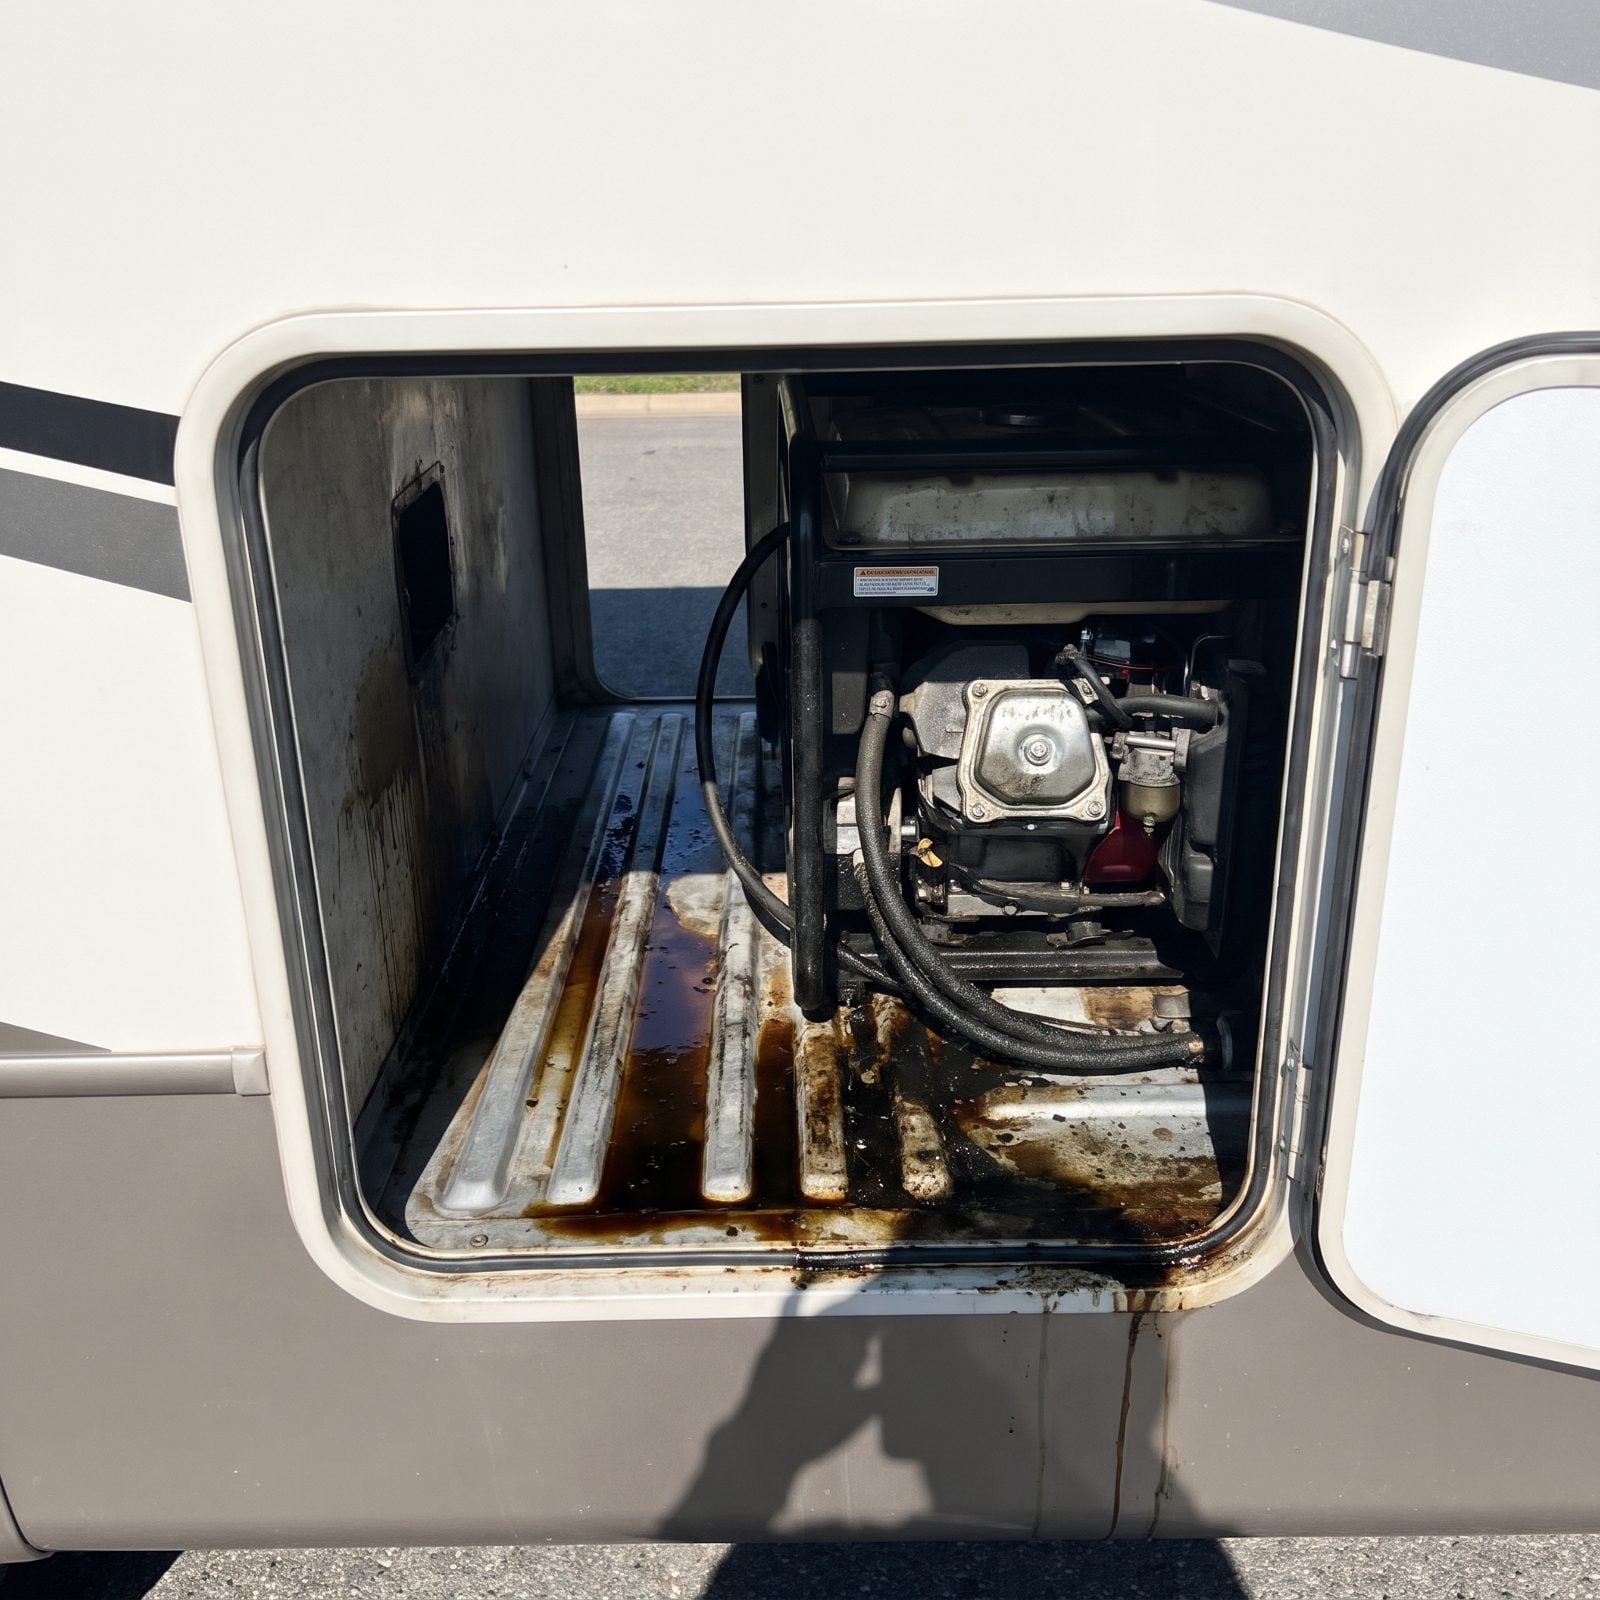
A clean generator bay is a good sign. A stained one is a question you want answered before you buy.
Fresh oil film or a dark fuel puddle under the unit means a leak, and a fuel leak inches from a hot engine inside an enclosed box is exactly the thing you don’t want. Even an old dried stain tells you the generator has had problems and may not have been serviced.
Inspectors also note whether the generator looks like it’s run recently at all. A unit that sat for years with stale fuel gumming the carburetor is a repair bill wearing a disguise. Generators hate sitting more than they hate running.
21. Exhaust Pipes Aimed at Slides or Living Areas
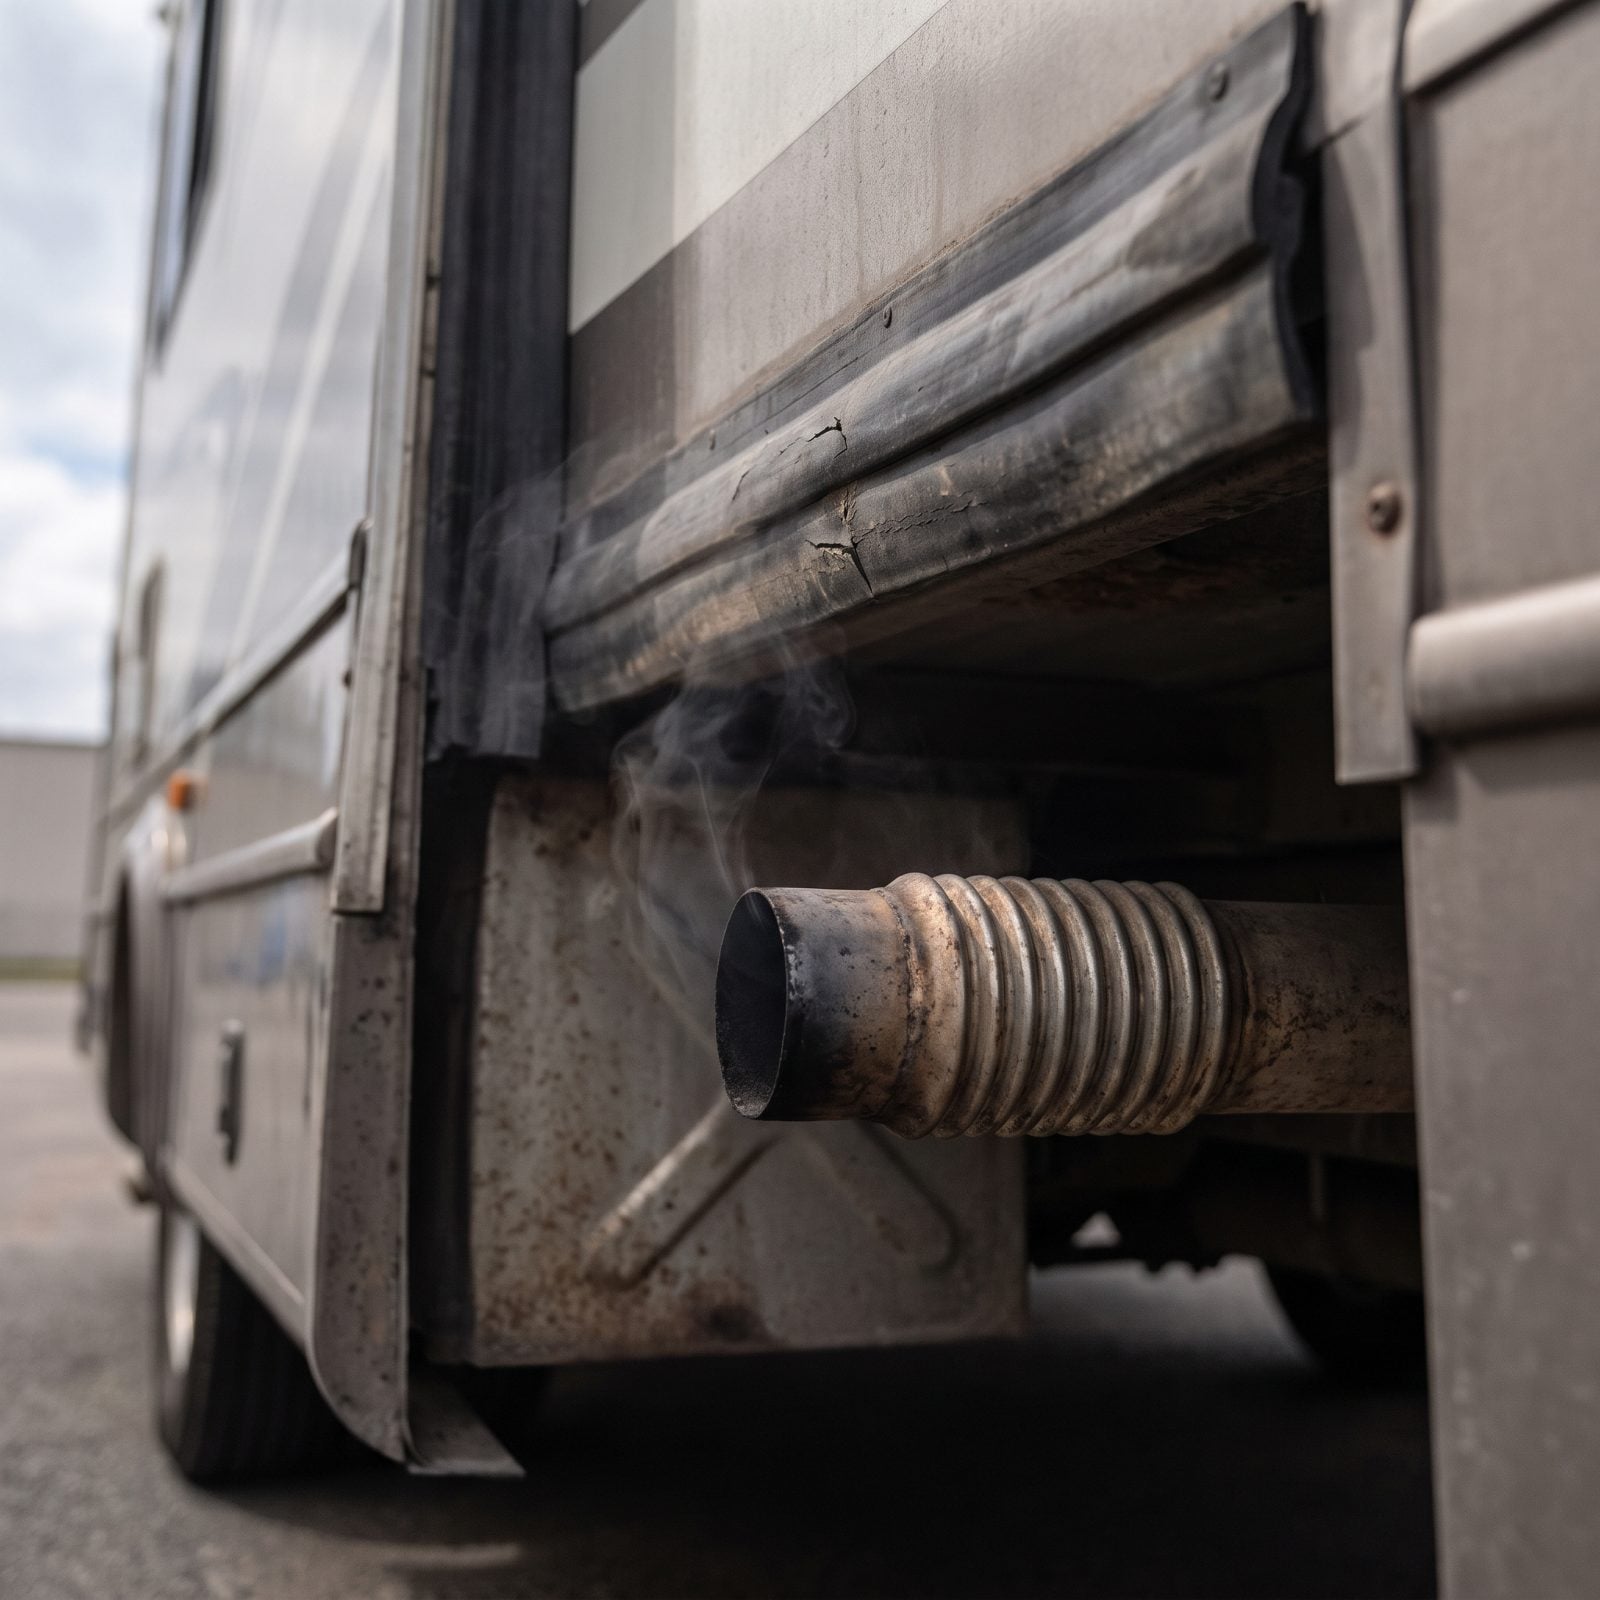
Exhaust should dump away from anywhere people breathe. When a tailpipe aims at a slide-out seal, an open window, or a door, carbon monoxide has a path indoors — and CO is the quiet one that doesn’t announce itself.
The visible clue is soot. Black carbon streaking up a sidewall or staining a slide gasket tells you fumes have been collecting right where the slide tucks in. Sometimes it traces back to an aftermarket exhaust extension that somebody rerouted badly.
Point an inspector at the soot and they’ll trace it back to the source every time. A misaimed exhaust is both a repair and a reason to double-check that the CO detector inside actually works.
20. Fiberglass Delamination That Looks Like Bubbles
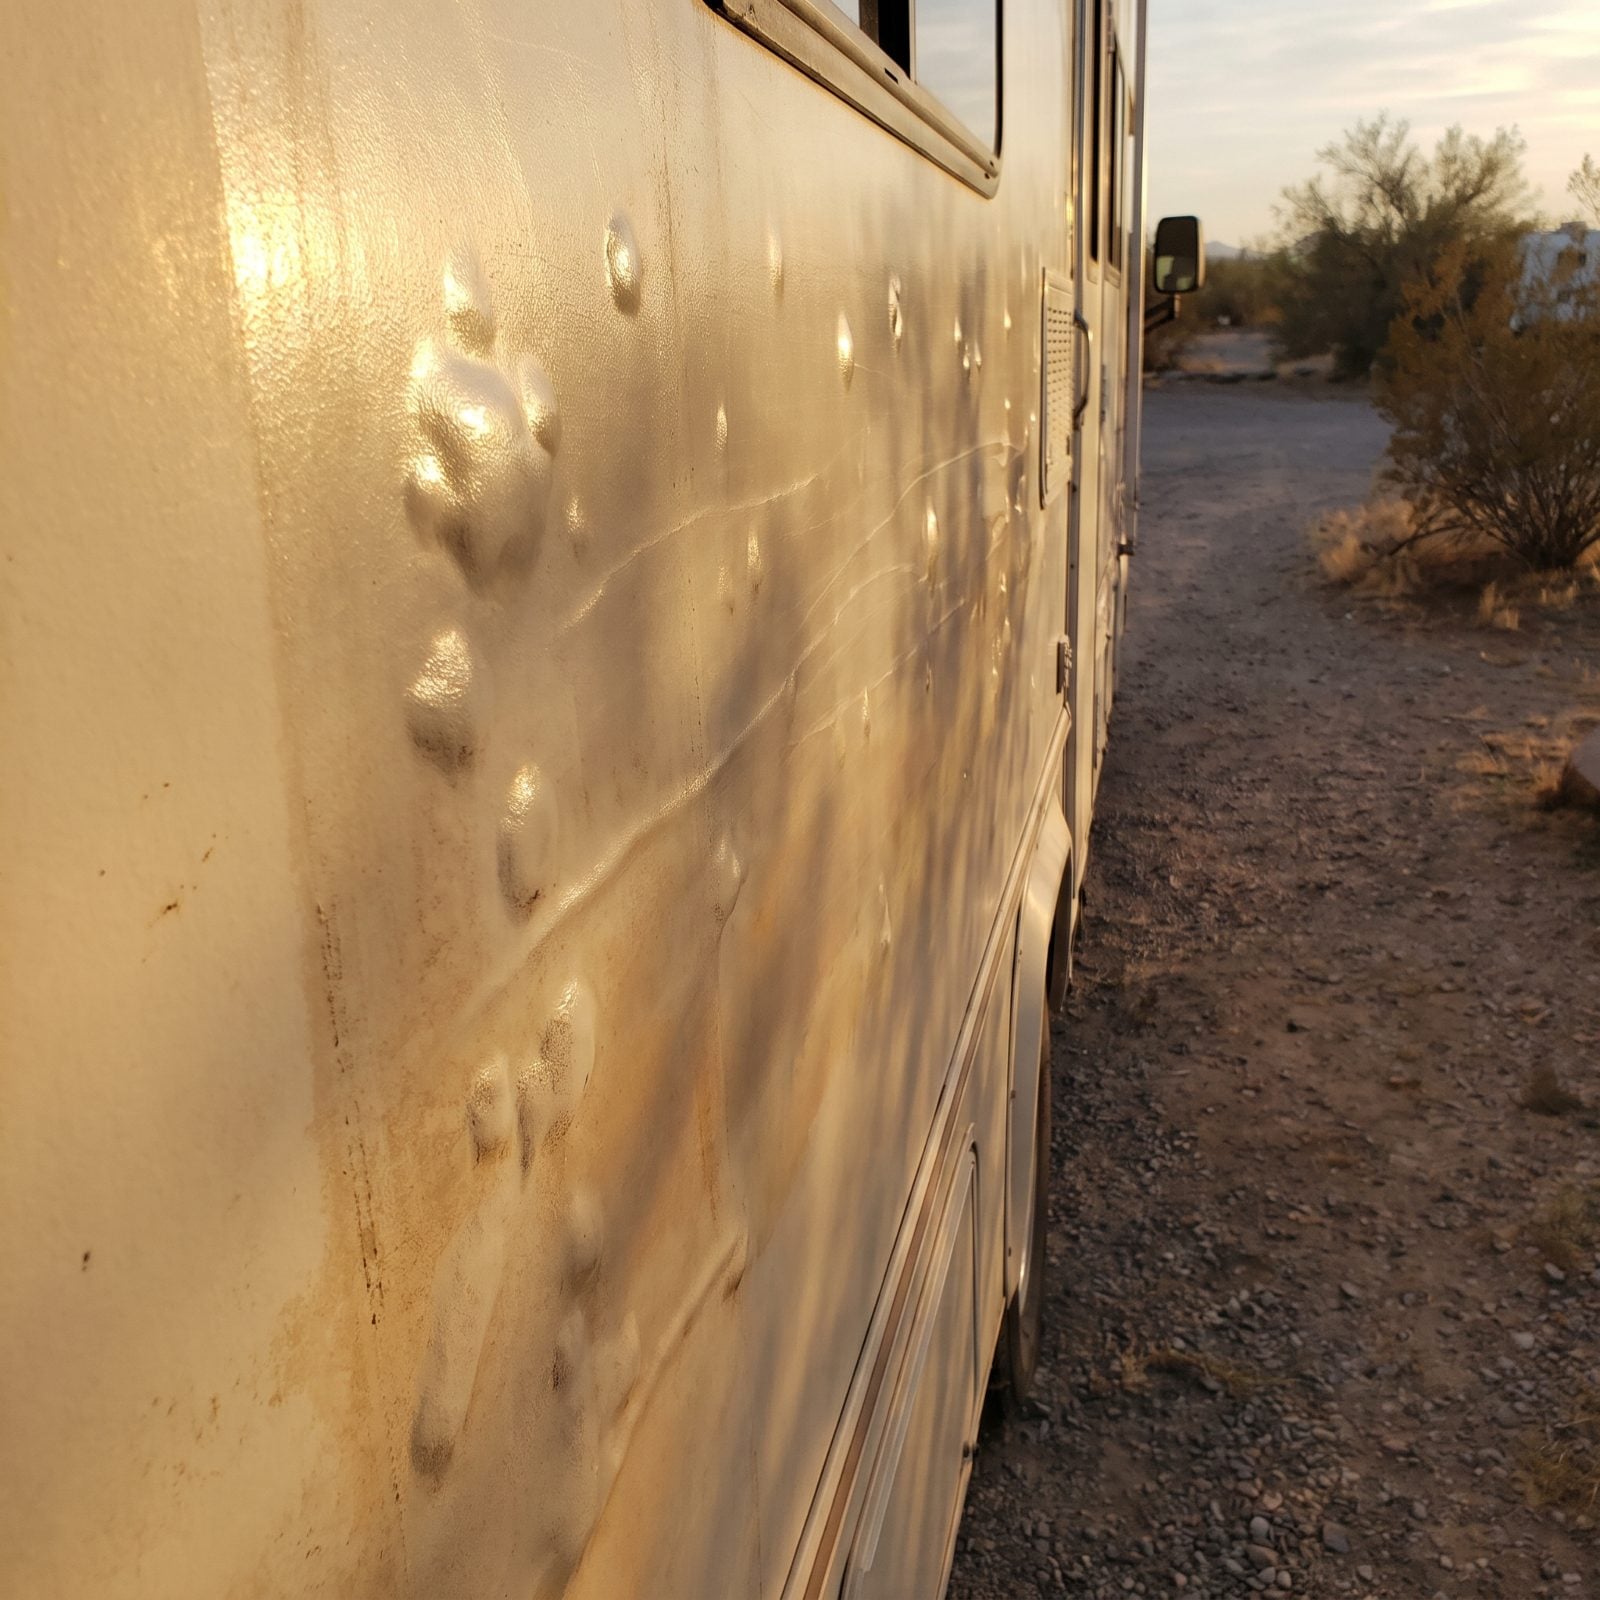
This one only shows itself in the right light. Stand at the corner of the RV and sight down the sidewall with the sun raking across it. A flat, smooth panel is healthy. Bubbles, ripples, and waves mean the fiberglass has separated from the structure underneath.
Delamination is almost always water. A leak gets behind the skin, the adhesive fails, and the layers peel apart like a sandwich left out too long. Press on a bubble and it gives. That soft spot is rot, and rot is the kind of thing you can’t afford to shrug off.
This is the big-ticket fear — a repair that can run into thousands and sometimes totals an older rig. An inspector checks it early because it’s the one that decides whether anything else is worth checking at all. If the walls are coming apart, walk away.
Delamination is the RV telling you water has been living inside it longer than you’ve been looking at it.
19. Cracks Radiating From Window Corners
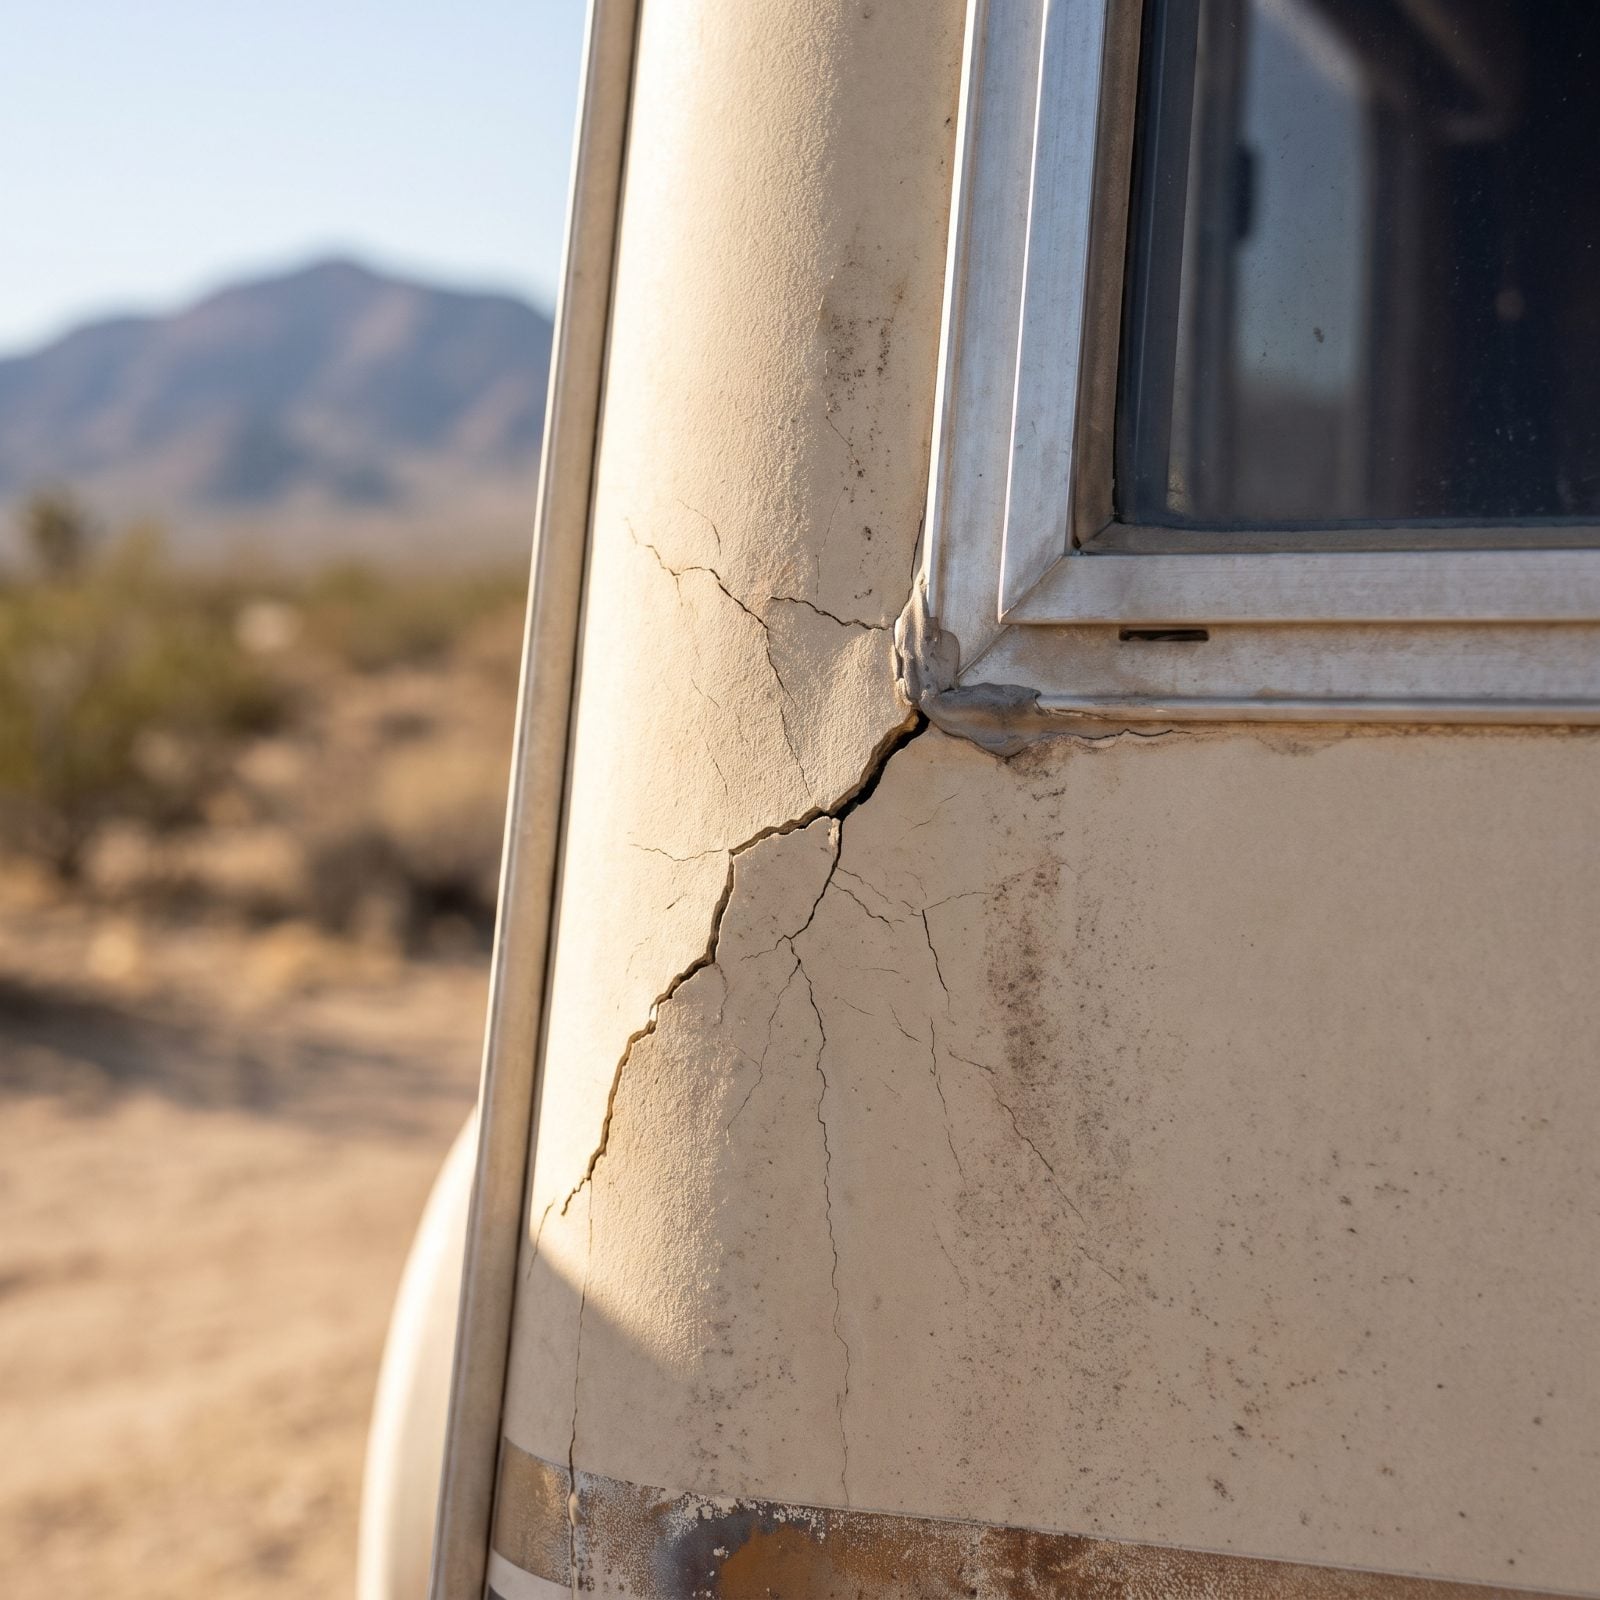
Windows flex. Every time you tow down a washboard road the corners of that frame take the twist, and the wall around them absorbs it — and when the body flexes more than it should, the gelcoat gives up at the weakest point first. That’s the window corner.
A short crack is usually cosmetic. But cracks that fan out in several directions are telling you the structure underneath is working too hard, and inspectors read the pattern, not just the presence. Radiating cracks near a slide or a heavy corner can mean a tired frame — the kind of repair that climbs into the thousands fast.
18. Stress Cracks Around Slide-Out Openings
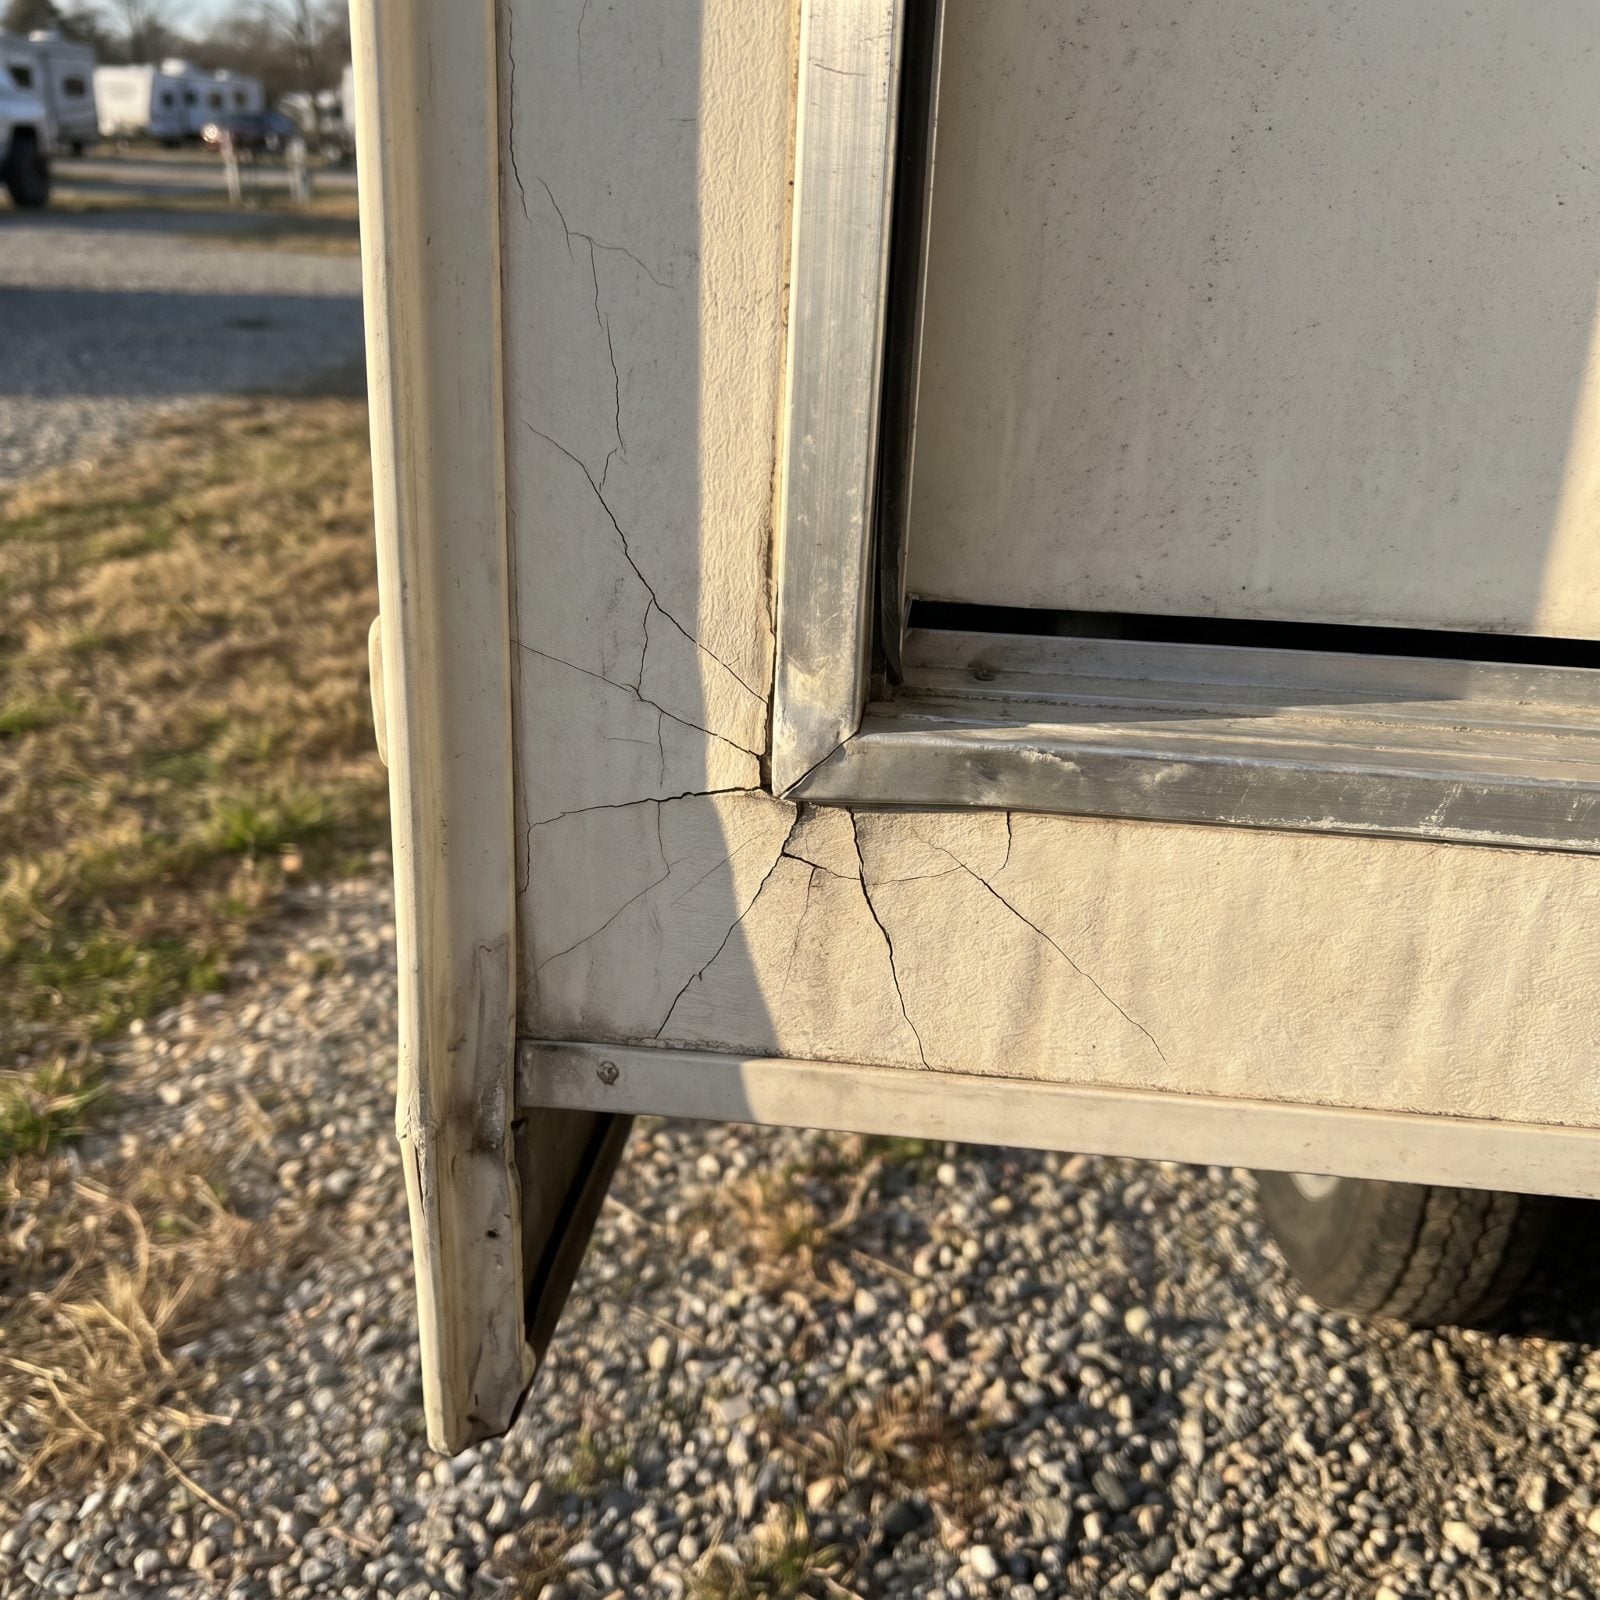
A slide-out is a heavy box that cantilevers out of the side of your rig, and the opening it lives in is the single most stressed cutout on the whole coach. So cracks here carry more weight than cracks anywhere else.
Inspectors watch the upper corners of the opening, because that’s where the slide’s weight tries to pry the frame apart over thousands of cycles. Pair that with a slide that rubs or hesitates on its way out, and you’ve got a structural conversation, not a touch-up. Slide repairs are among the priciest words in RV ownership.
17. Fresh Paint or Mismatched Panels That Suggest Repairs
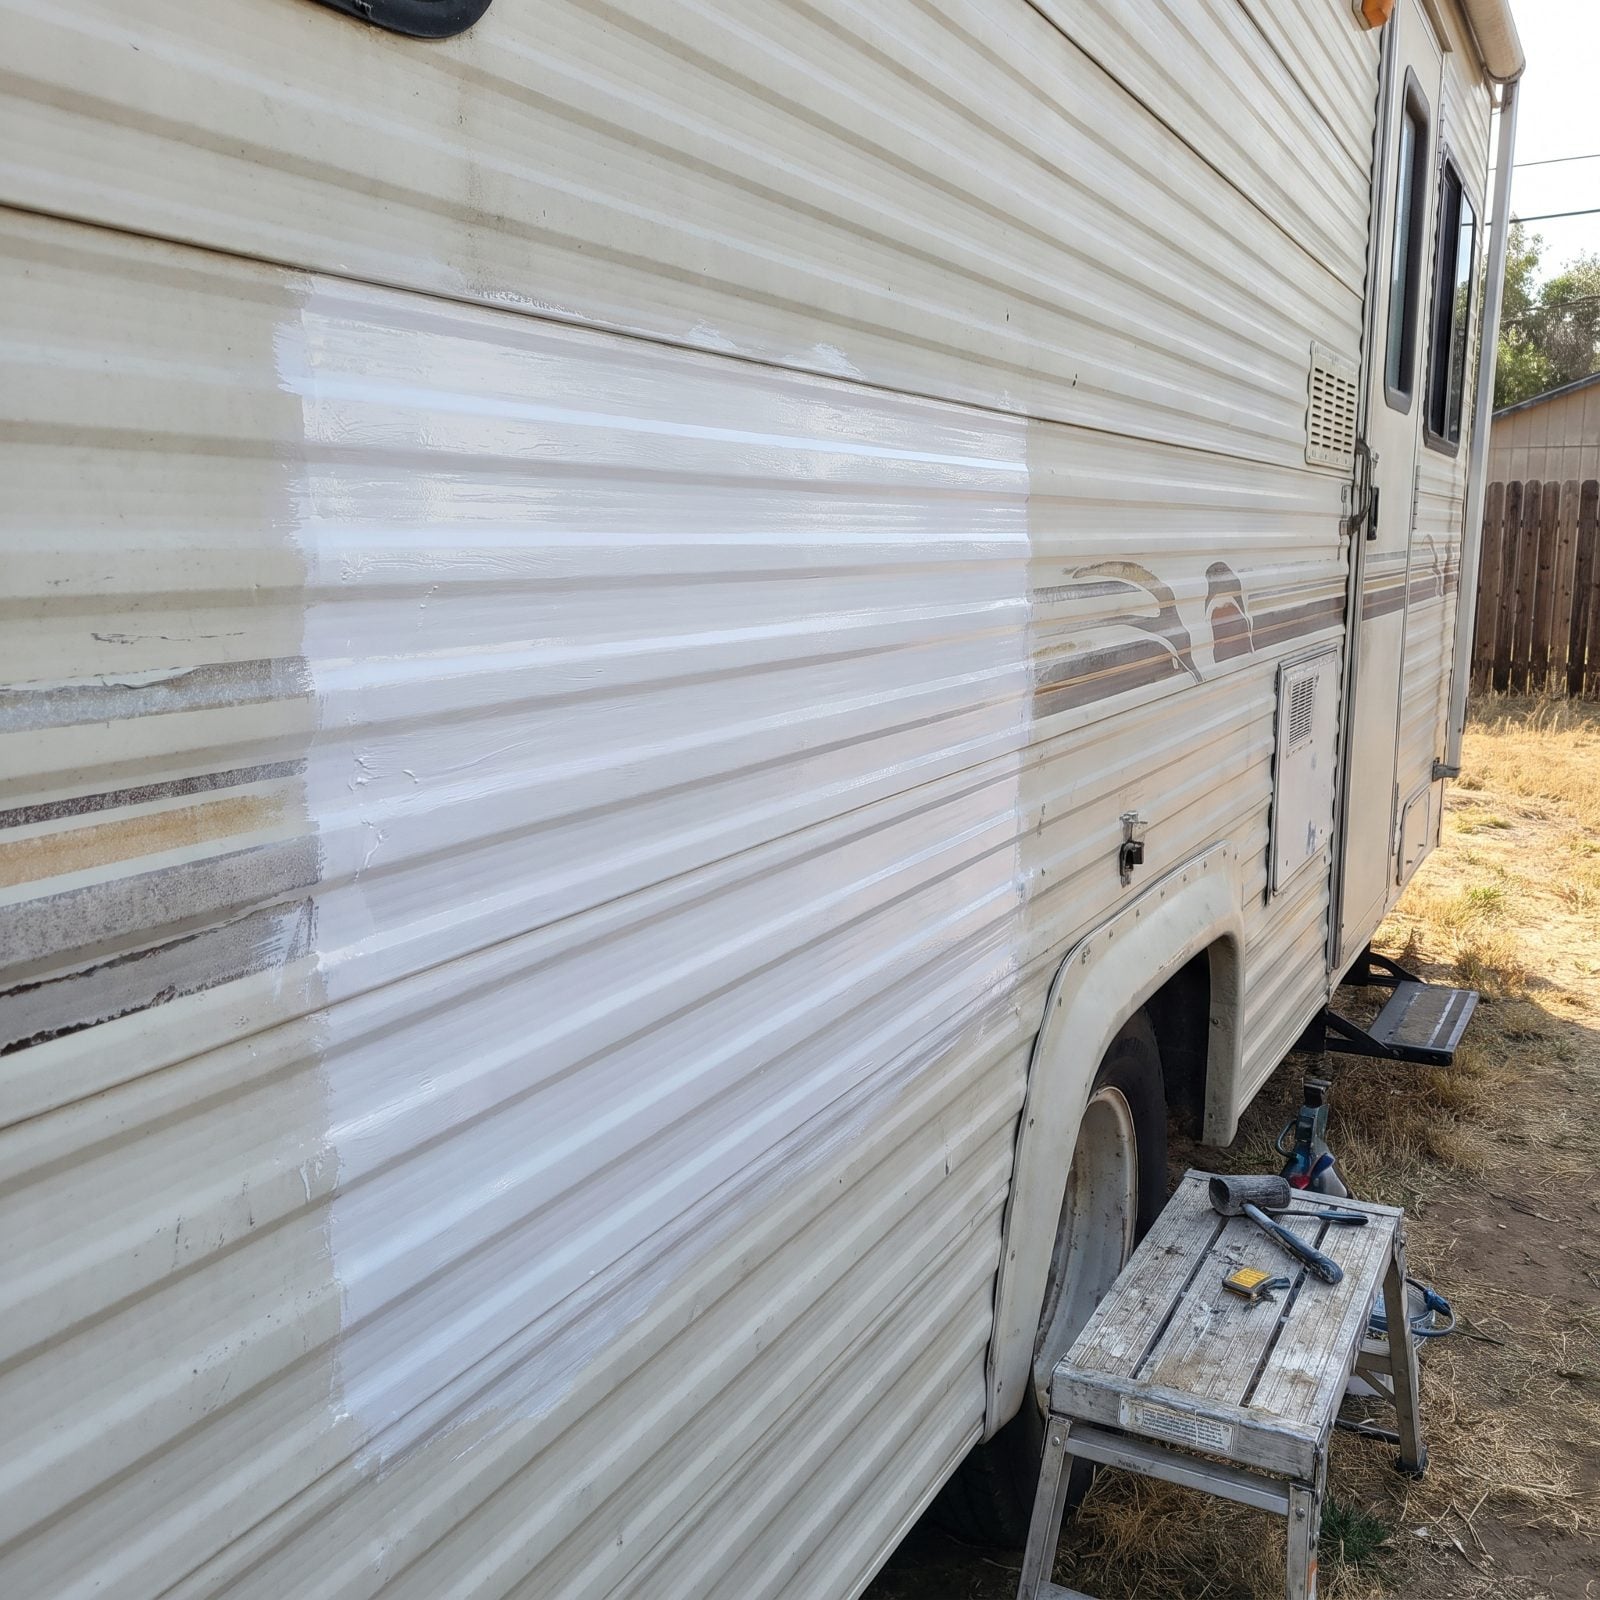
A panel that’s too clean is a confession. On a rig that’s been sitting in the sun for eight years, every surface oxidizes together, so when one panel glows brighter than its neighbors, something happened there.
It isn’t always bad. Somebody may have fixed a scrape and moved on with their life. But fresh paint can also hide a repaired impact, a patched leak, or body filler doing the job the structure used to do. Inspectors sight down the body in low light, where mismatched sheen and orange-peel texture give the game away. Ask what the paint is covering. A straight answer tells you plenty.
16. Sealant Smeared Over an Unrepaired Problem
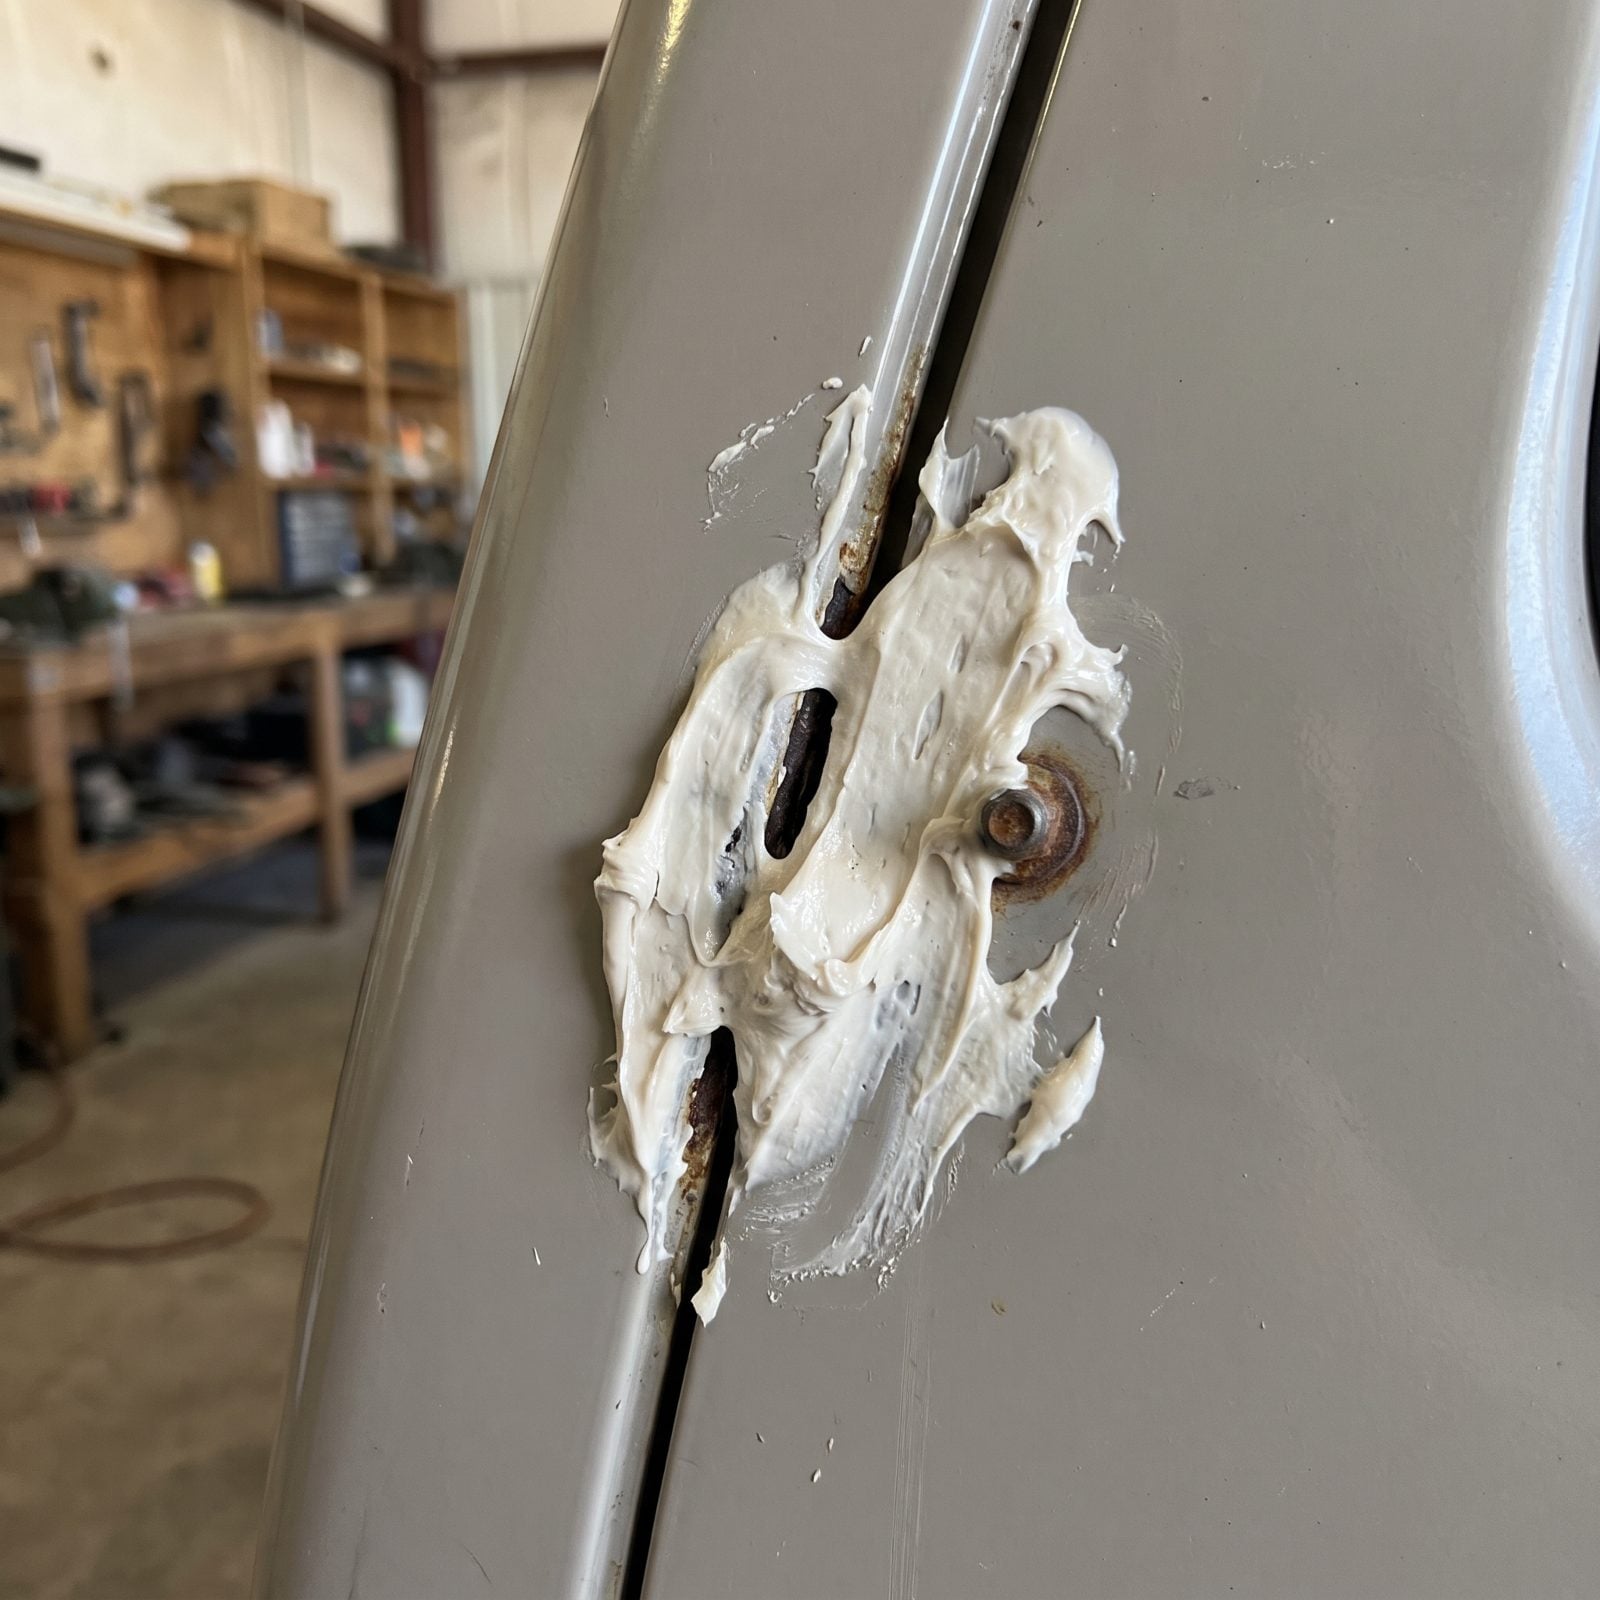
There’s a difference between resealing a seam and hiding one. A proper reseal means the old failed material came off first. A smear means someone grabbed a tube and buried the problem.
Thick, lumpy beads of fresh caulk piled over cracked old sealant are a red flag — water doesn’t care how much caulk is on top if it’s finding a path underneath. Inspectors peel back the edge gently to see whether the new material actually bonded or just floated over the failure. Smeared sealant usually means a leak the seller didn’t want to deal with, and leaks don’t wait politely for the next owner.
15. Shrunken or Cracked Window Seals
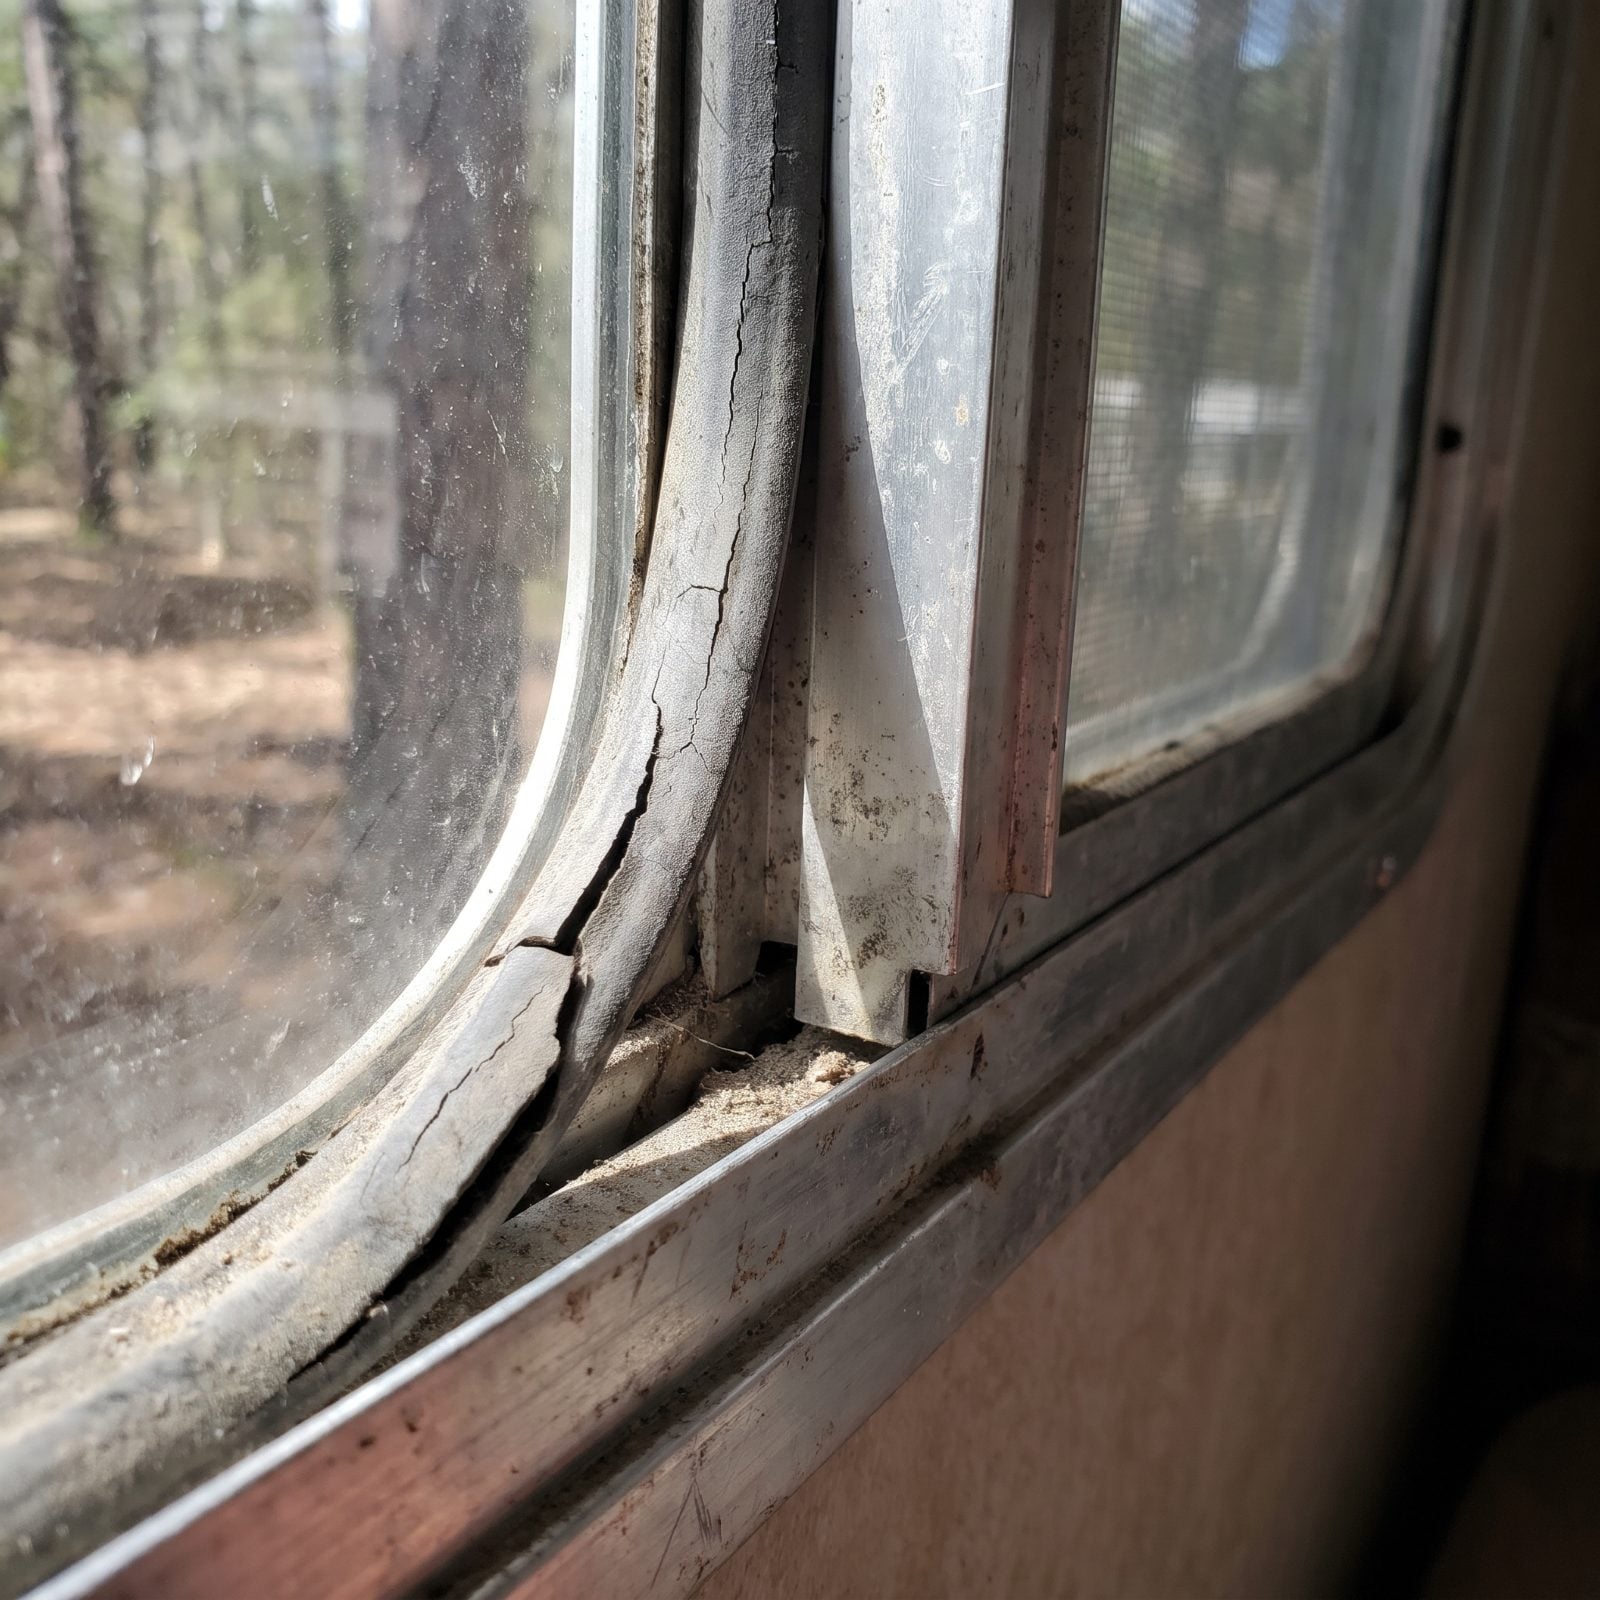
Rubber window gaskets are the first things the weather kills. Years of sun and rain bake the flexibility right out of the rubber until they shrink, harden, and split like a dried-out riverbed.
A seal cracking away from the glass is a doorway. Water sneaks in behind the gasket and quietly pools in the aluminum frame and the wall beneath, where nobody can see it. A gasket costs little. What hides behind a failed one can cost a window. Inspectors check whether the rubber still holds or crumbles at a touch, and whether the frame and wall beneath show water damage, because perished seals rarely travel alone.
14. Dark Streaks Below Roof Seams and Windows
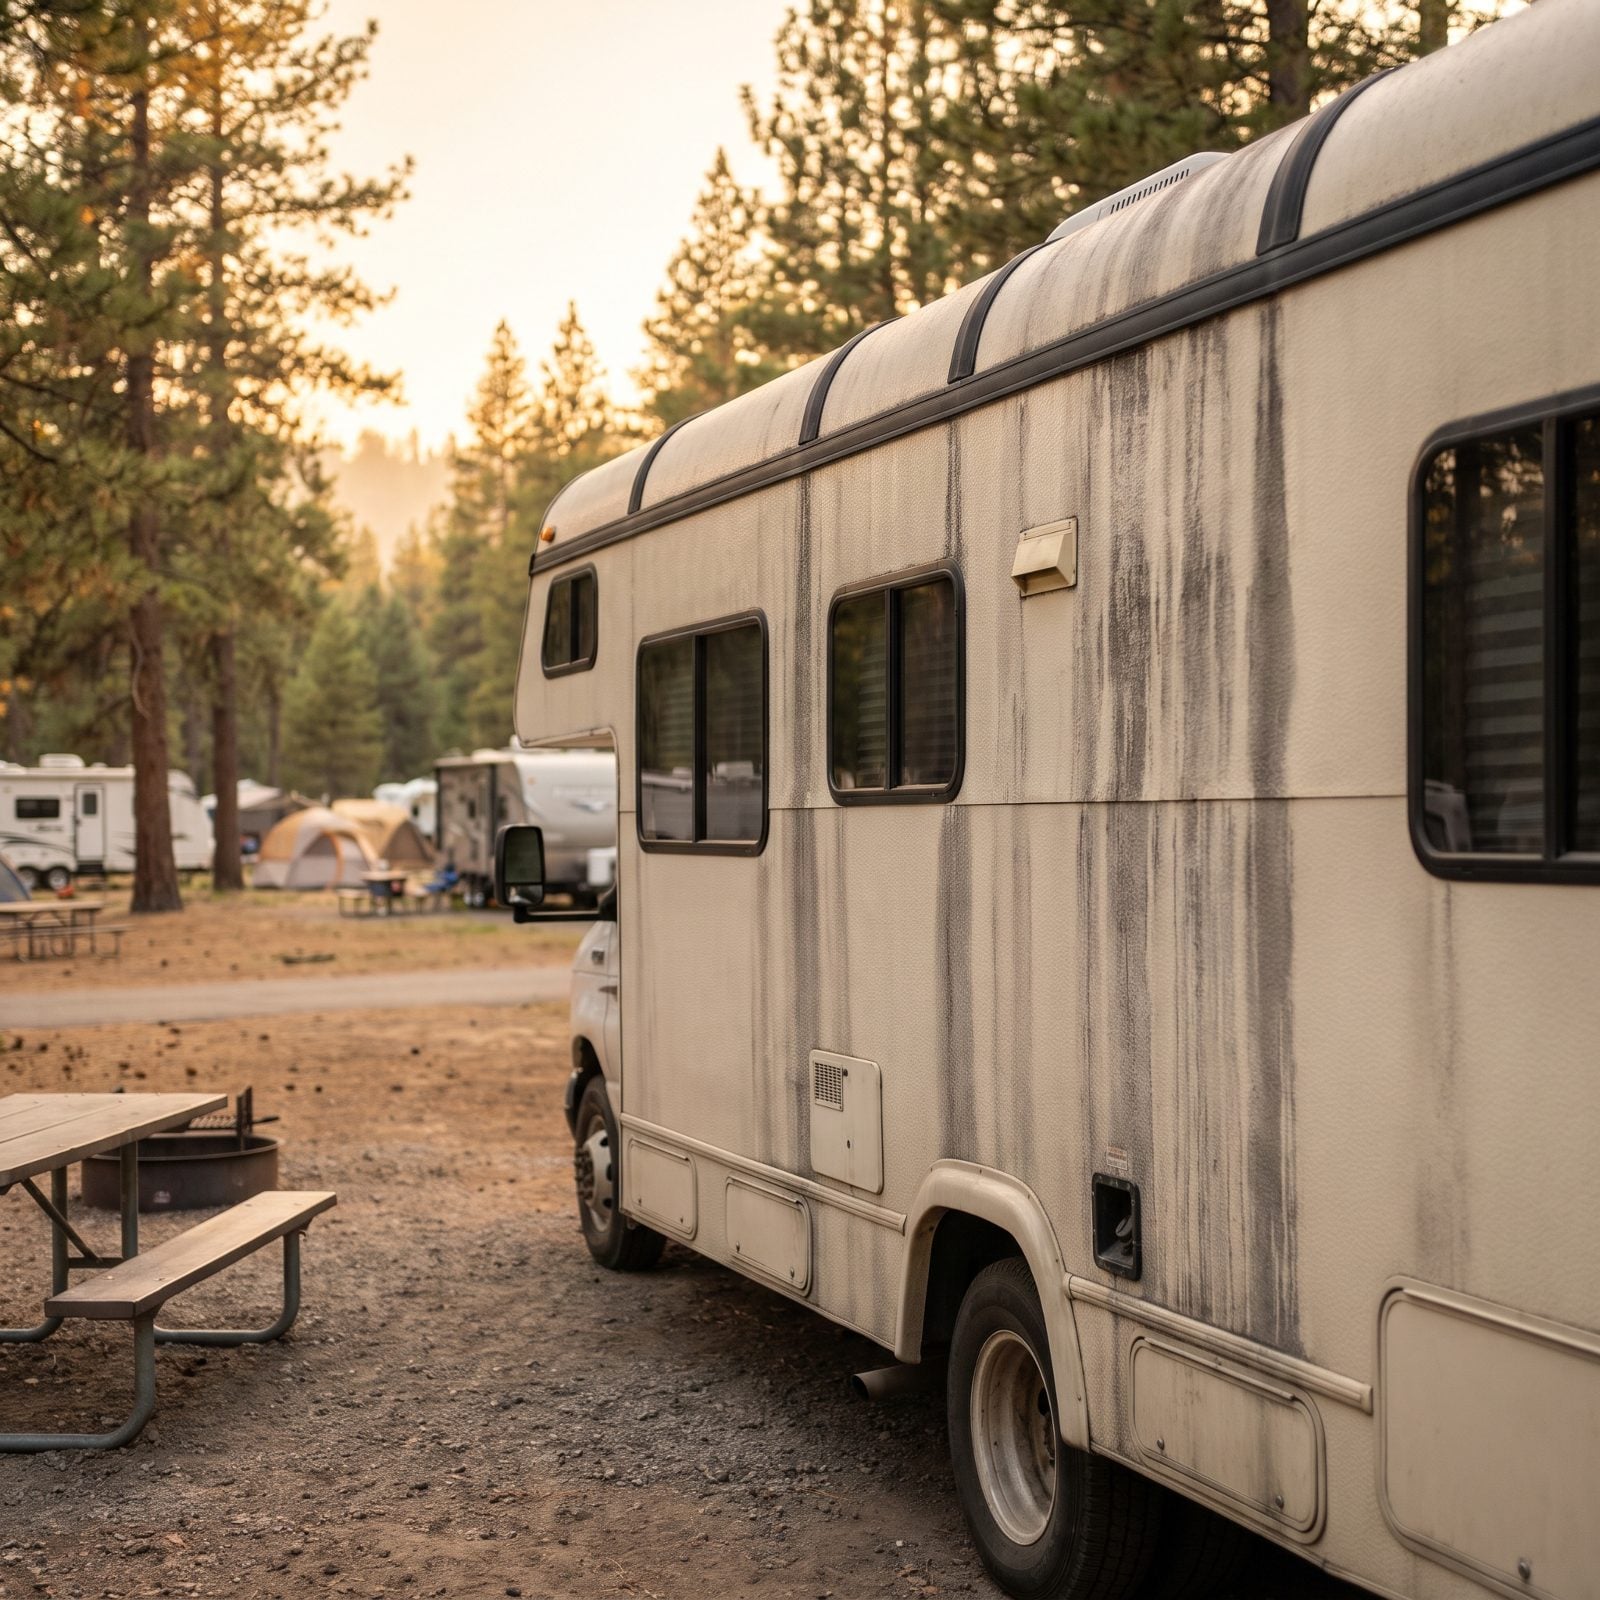
Everyone’s seen the grey streaks running down the side of an RV at a campground. Most of it is harmless gutter runoff and oxidized caulk. But some streaks are directional, and that’s where it gets interesting.
Streaks that start clean and defined from a specific seam, window corner, or roof fitting are water telling you where it’s been getting in. Inspectors trace them upward to the source. General grime washes off. A stain that reappears from the same spot after every rain is mapping a leak path for you, free of charge. Read the streaks before you read the brochure.
13. A Rear Wall Beginning to Separate at the Corners
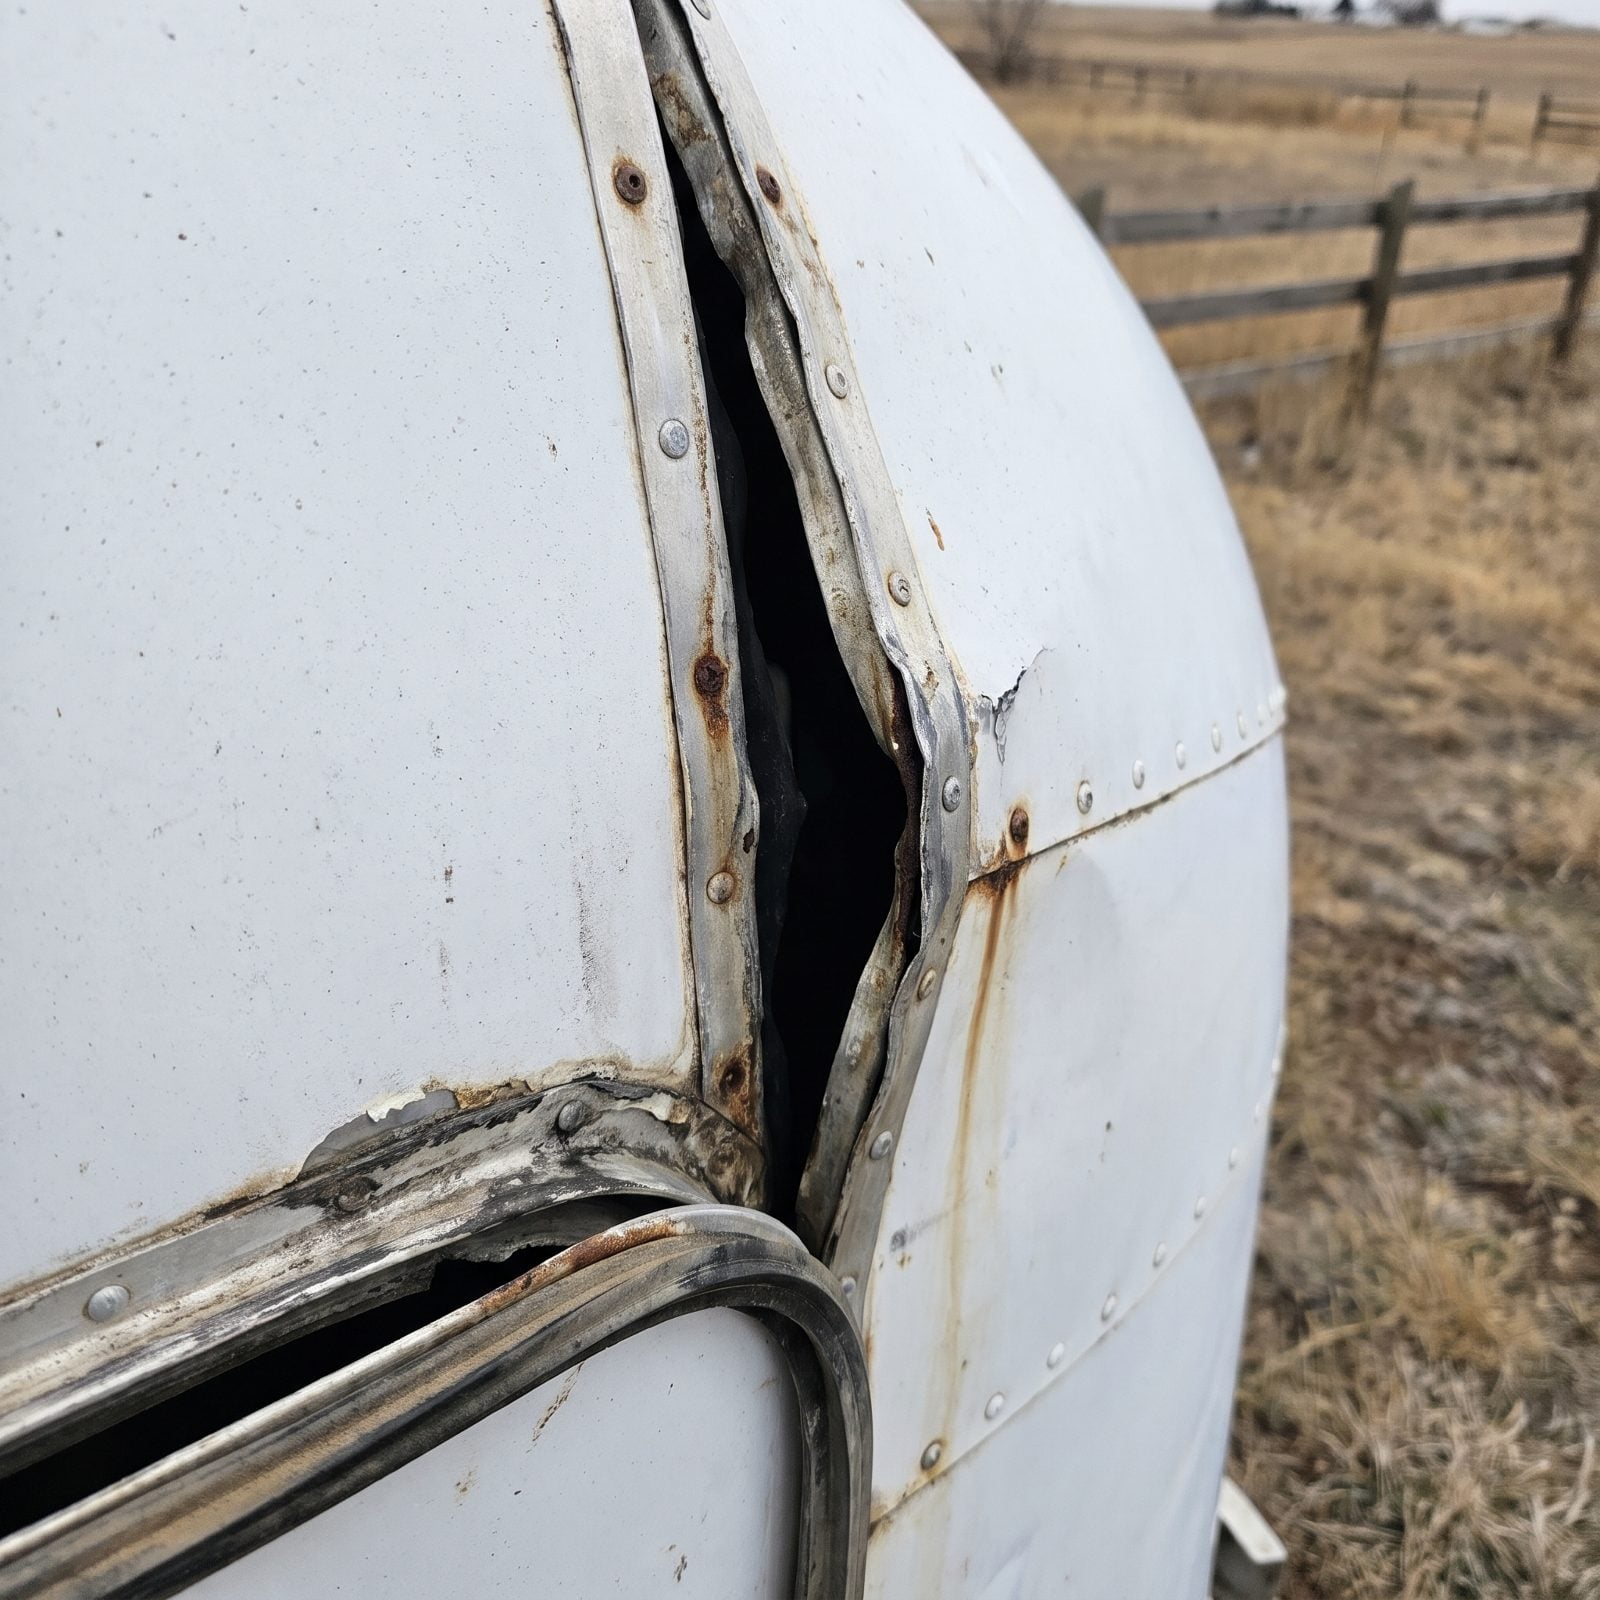
Rear walls carry a hard life. The back of a trailer whips around on every turn and absorbs the worst of the road’s bounce, so it fails at the corners first.
When the rear corner trim lifts or a gap opens along the vertical seam, the wall is starting to pull away from the body — often a heavy rear bedroom or a tired frame doing the pulling. Inspectors look for separation, lifted molding, and rust bleeding from loosened screws. A corner coming apart is structure talking, and it rarely says anything cheap. Walk the whole perimeter before you fall for the floor plan.
12. Gaps Where a Class C Cab Meets the Coach
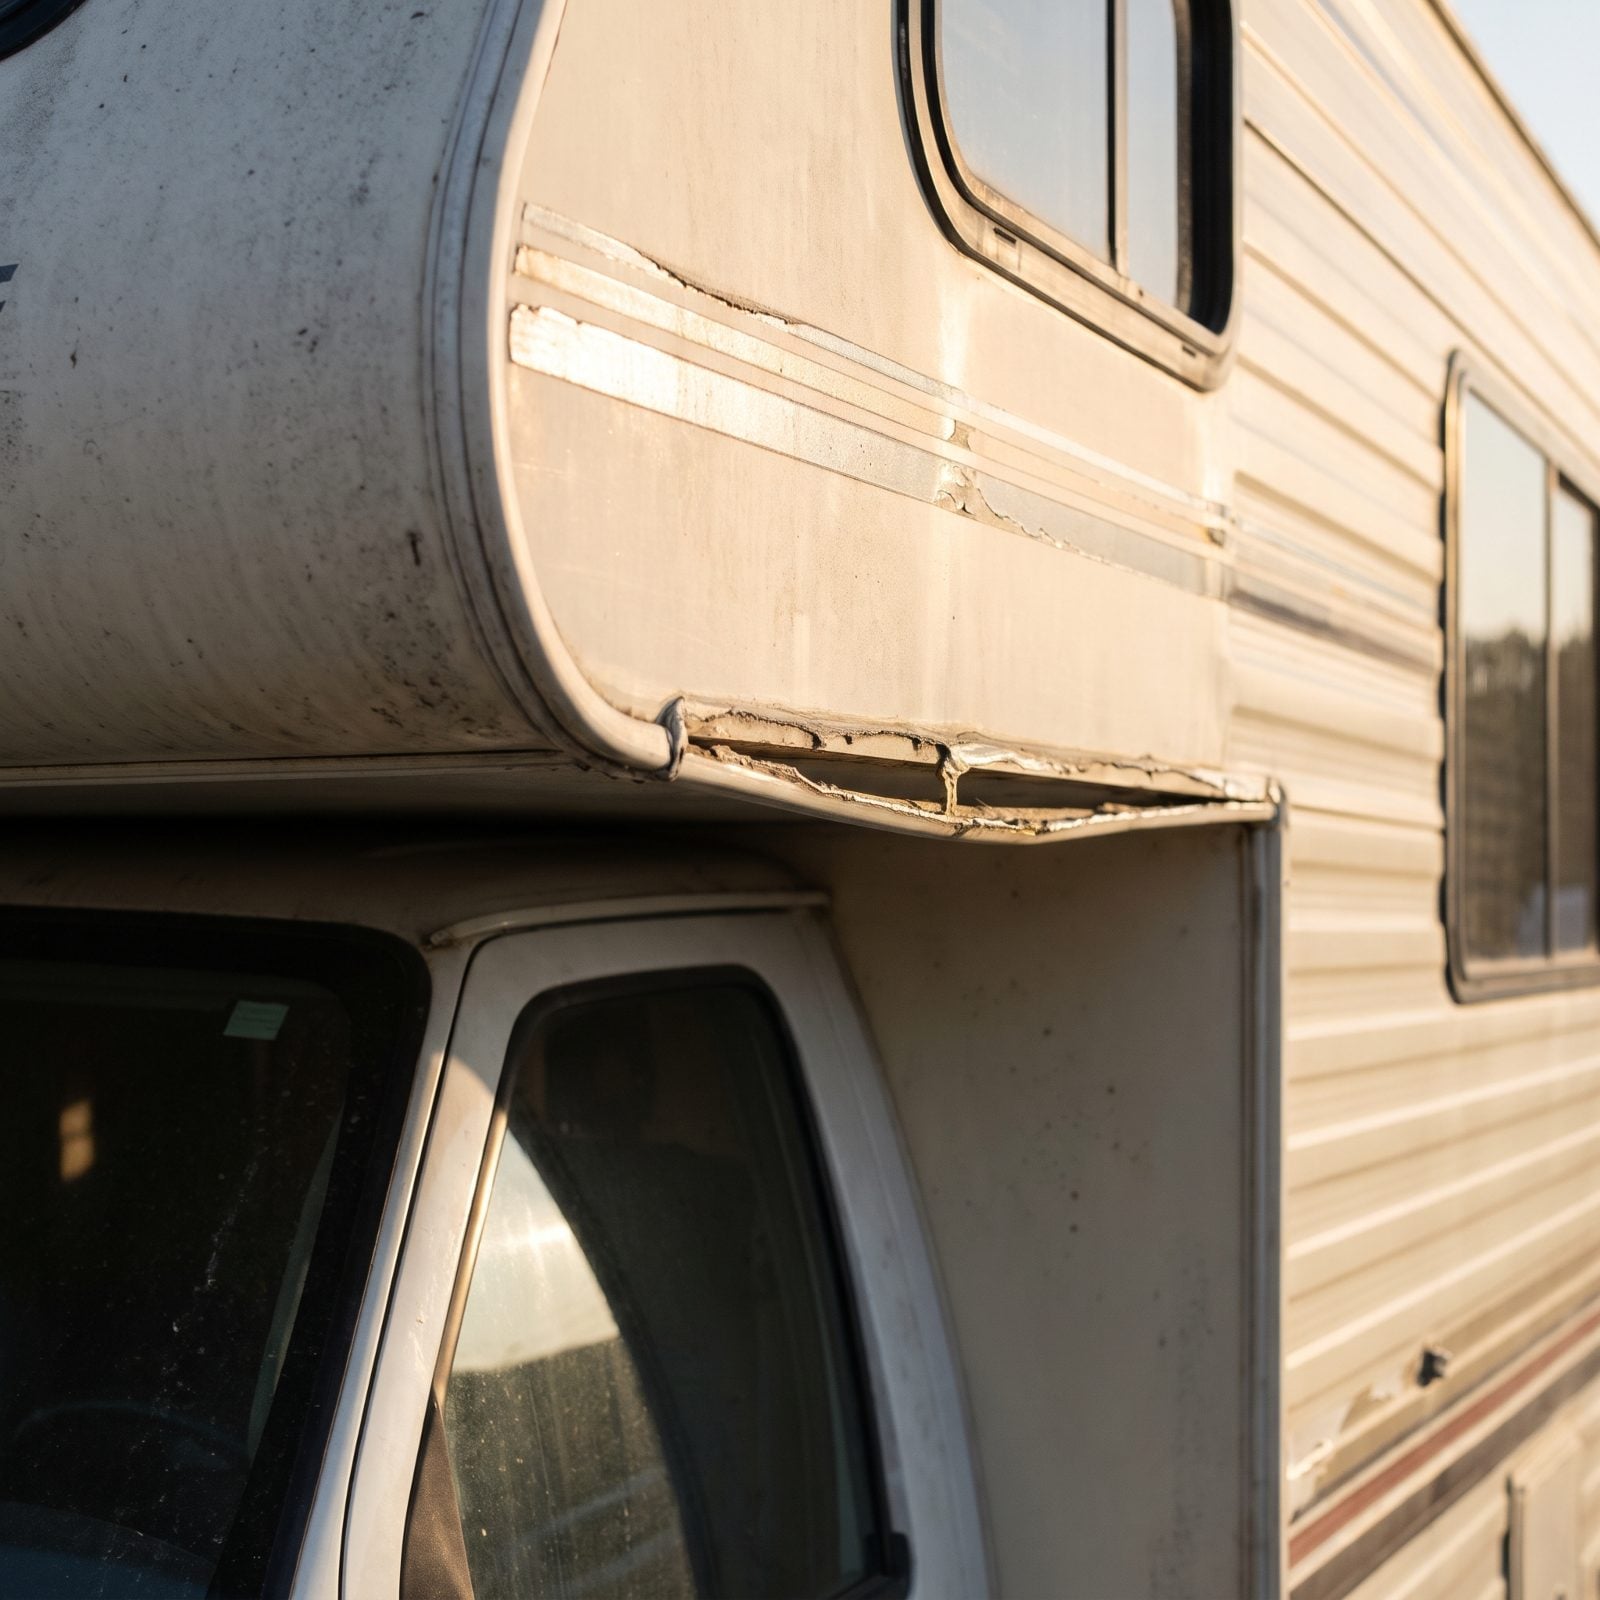
A Class C is two things bolted together: a cab-over cap made of fiberglass, and a box behind it. The seam where they meet is a classic trouble spot, and it sits right over your head when you sleep.
Movement, UV, and age open that joint. Cracked sealant or a visible gap there lets water into the cab-over bunk, where it rots quietly behind the mattress. Inspectors shine a light into the seam and look for staining below it. Dealers love the cab-over bunk in the sales pitch. Fewer mention how often it’s the wettest spot on the whole rig.
11. Bent Awning Arms or Loose Wall Mounts
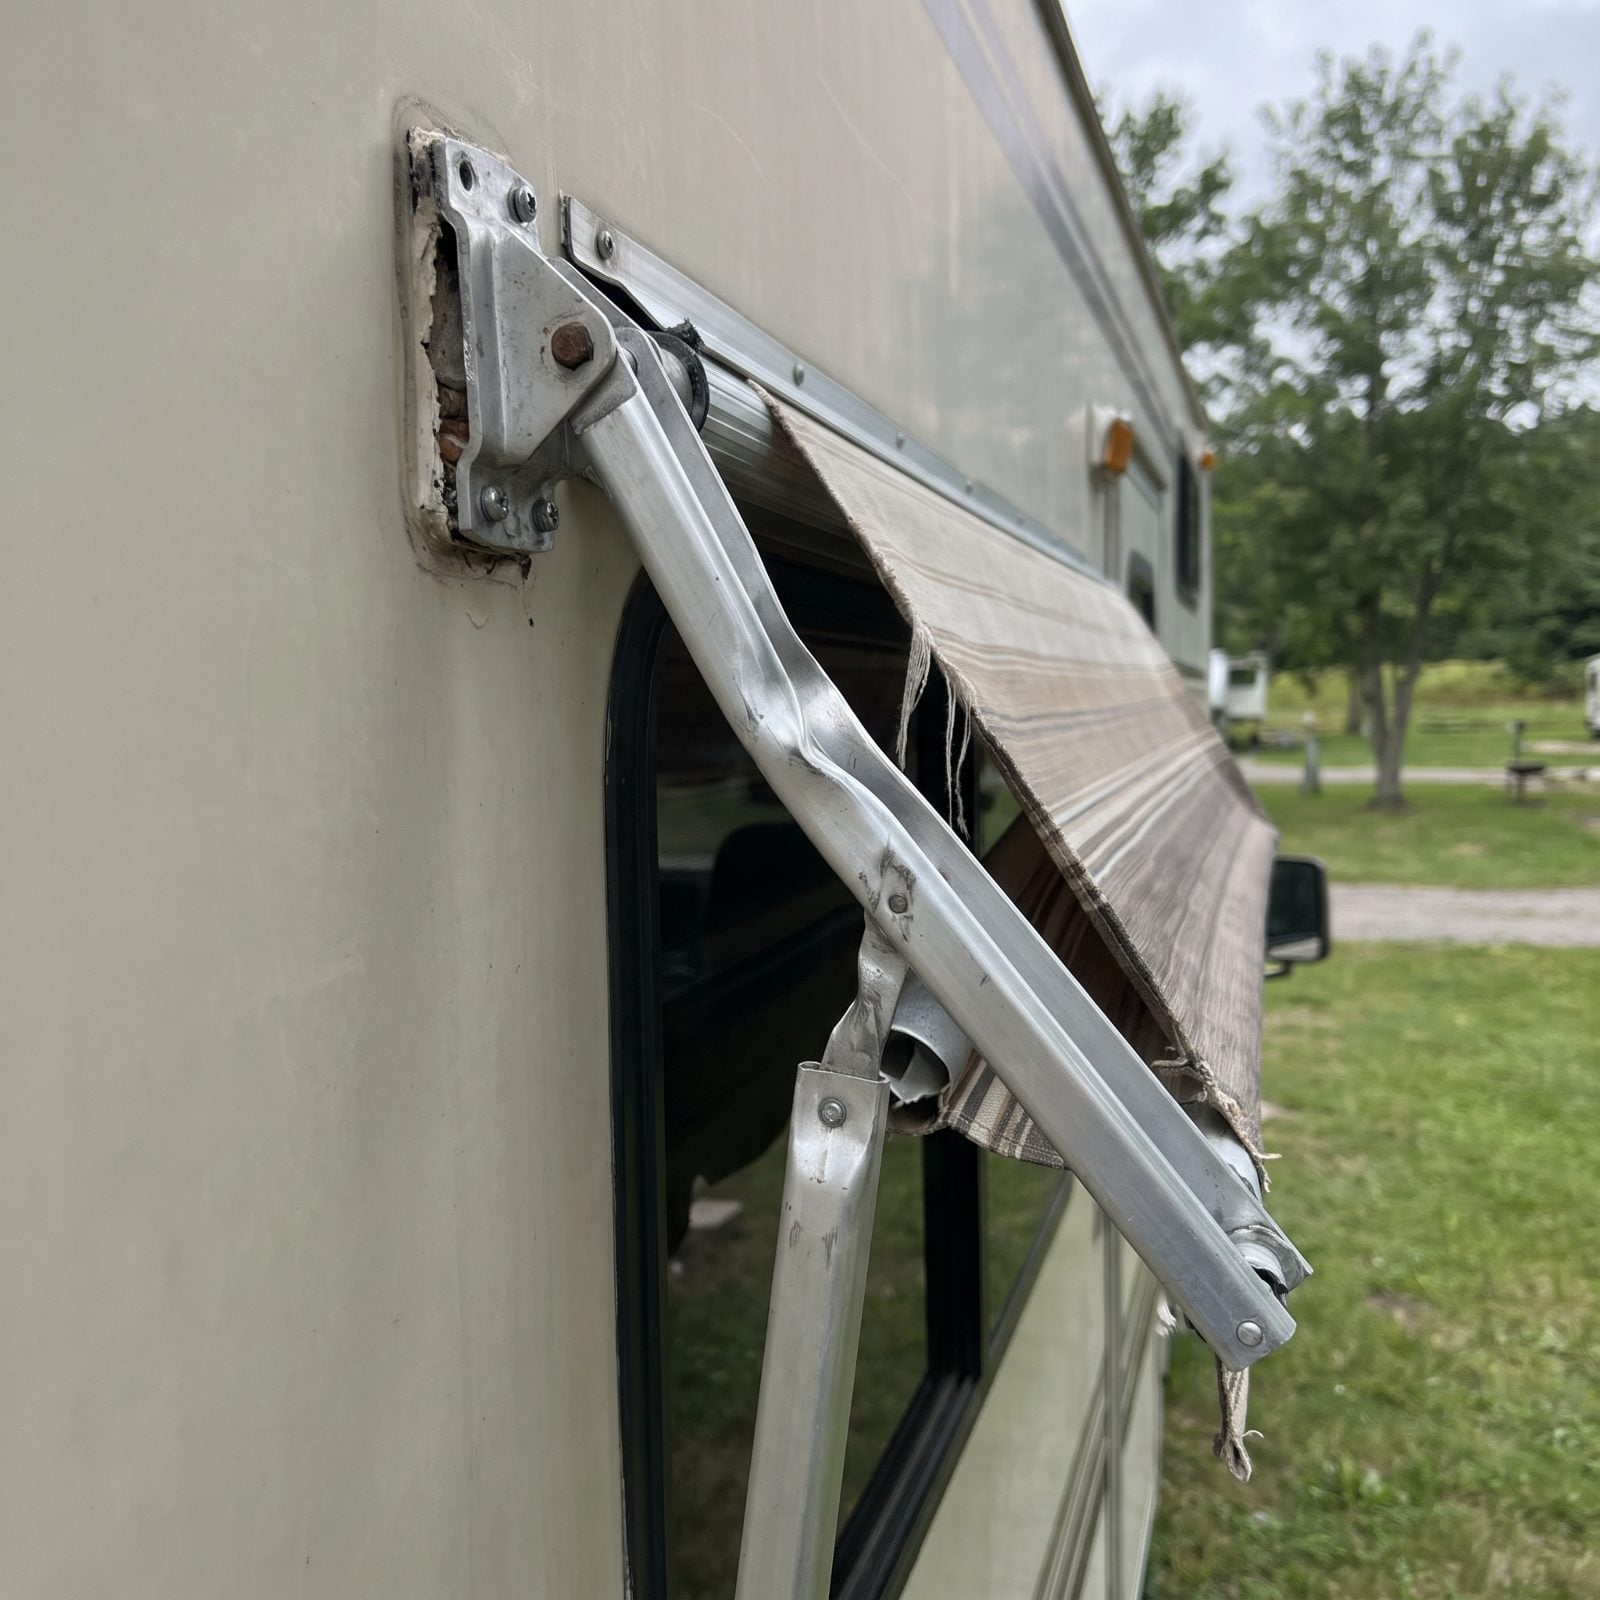
An awning seems like the least serious thing on the rig until you understand what a bent arm is telling you. Wind got it, or someone drove off with it half out. Either way, the hardware took a shock load.
The real concern isn’t the arm — it’s the mount. When a bracket loosens or pulls away from the wall, the screws tear at the panel and open a path for water right where you’d never think to look. Inspectors check whether the mounts sit flush and whether cracks radiate from the fasteners. A wobbly awning is cheap. The wet wall behind a failed mount is not.
10. Slide-Out Seals That Are Torn or Folded Under
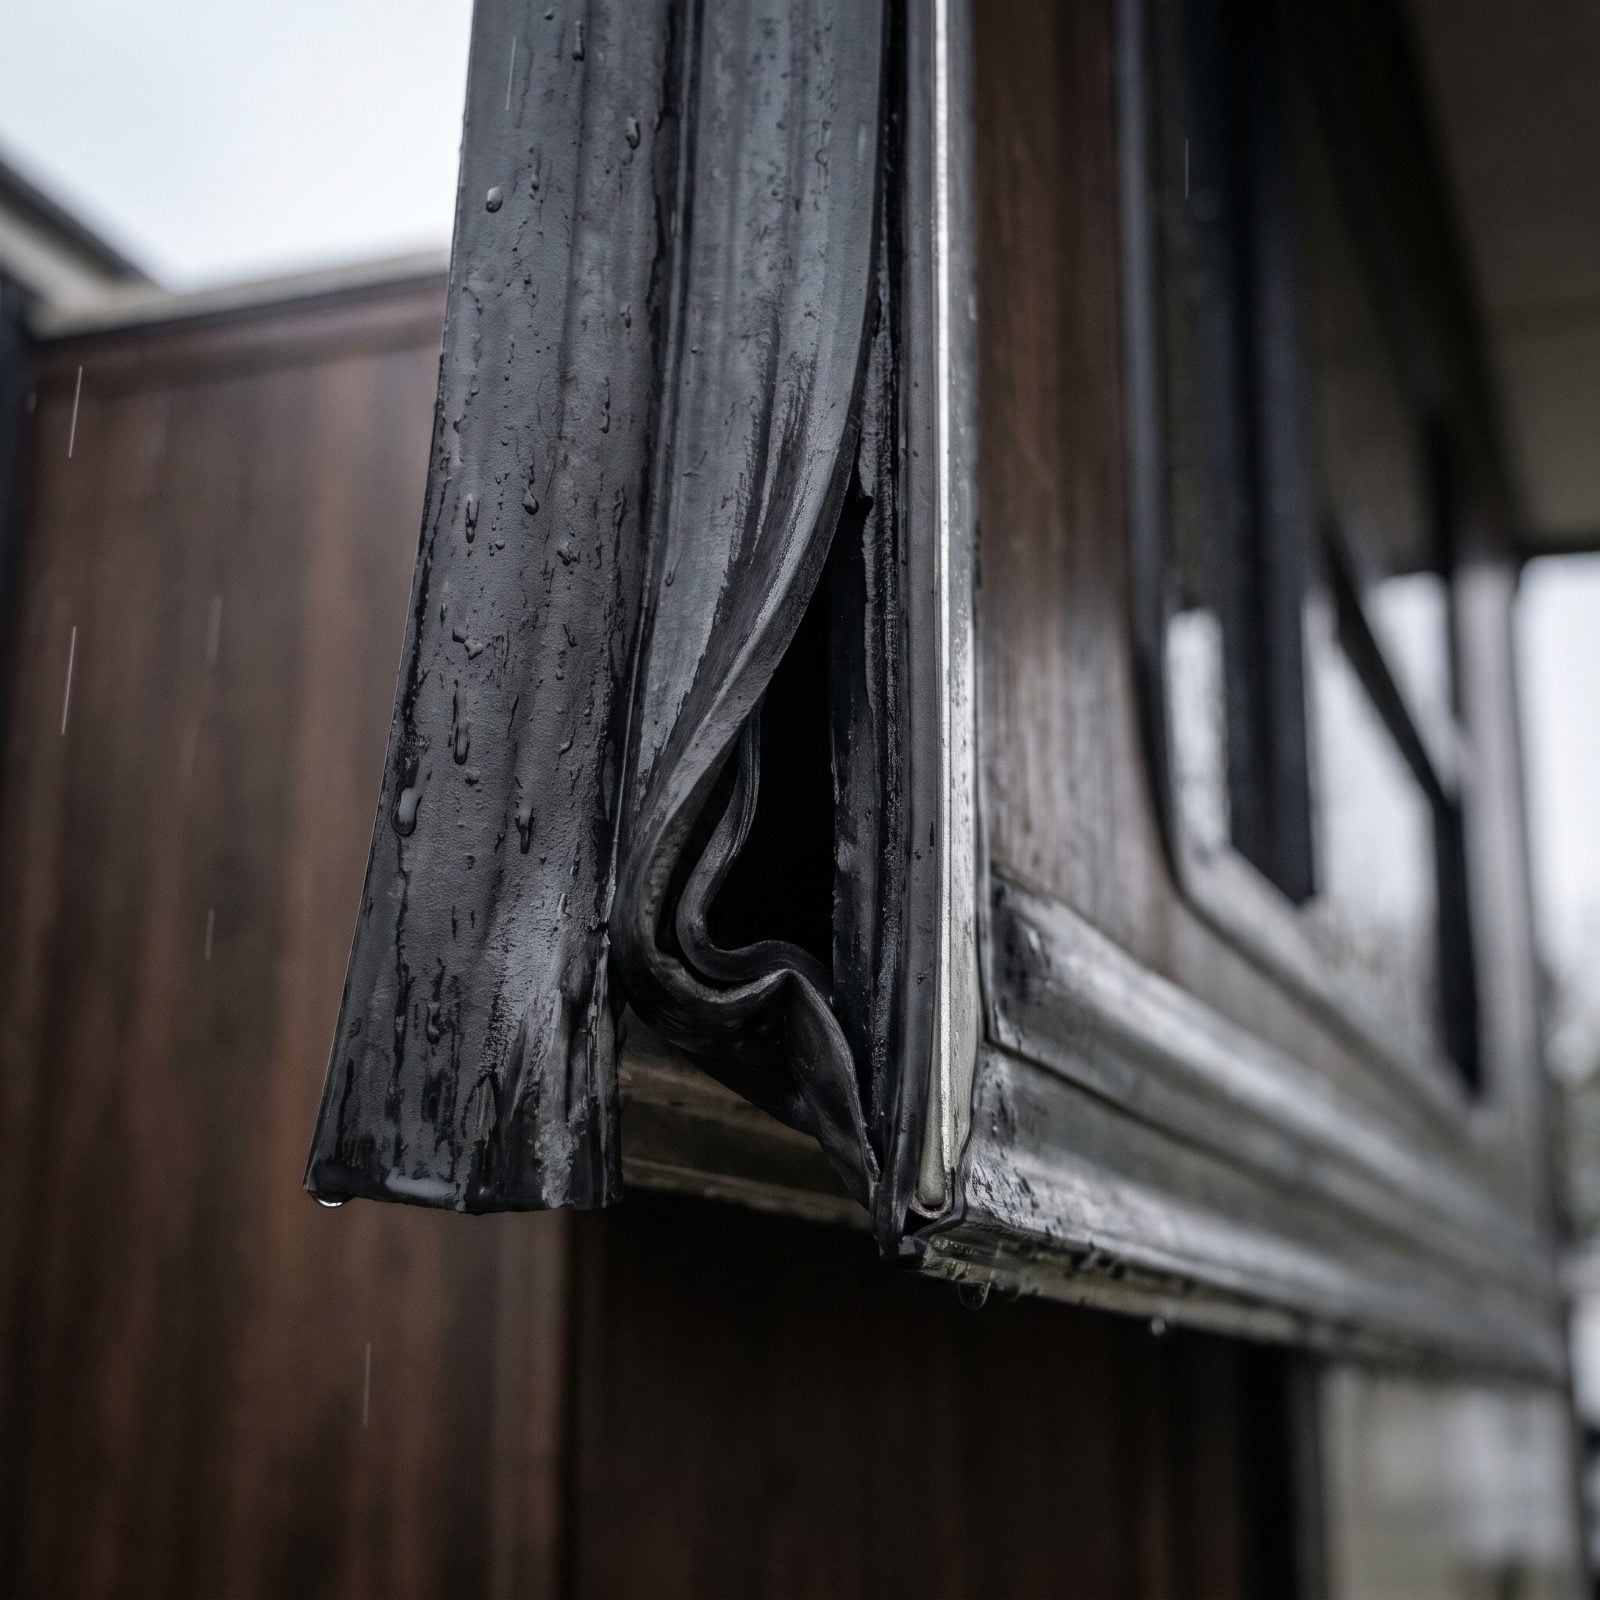
The seal is the whole defense. When a slide-out wiper tears or folds under itself, nothing stands between the rain and your subfloor, and inspectors look here first because it’s cheap to spot and brutal to fix once water gets in.
Folded seals happen when the room retracts crooked and pinches the rubber. You might not notice for a season. Then one day the carpet near the slide smells like a wet dog and the plywood underneath has gone soft and dark.
Pointing to a coach in for a full reseal, one longtime motorhome RV technician explains “When wiper seals start deteriorating, they’ll get cracked, the corners come unglued, the lips no longer stay tight against the slide’s roof and walls, or the rubber start tearing”
9. Entry Steps That Sag, Bind or Show Heavy Rust
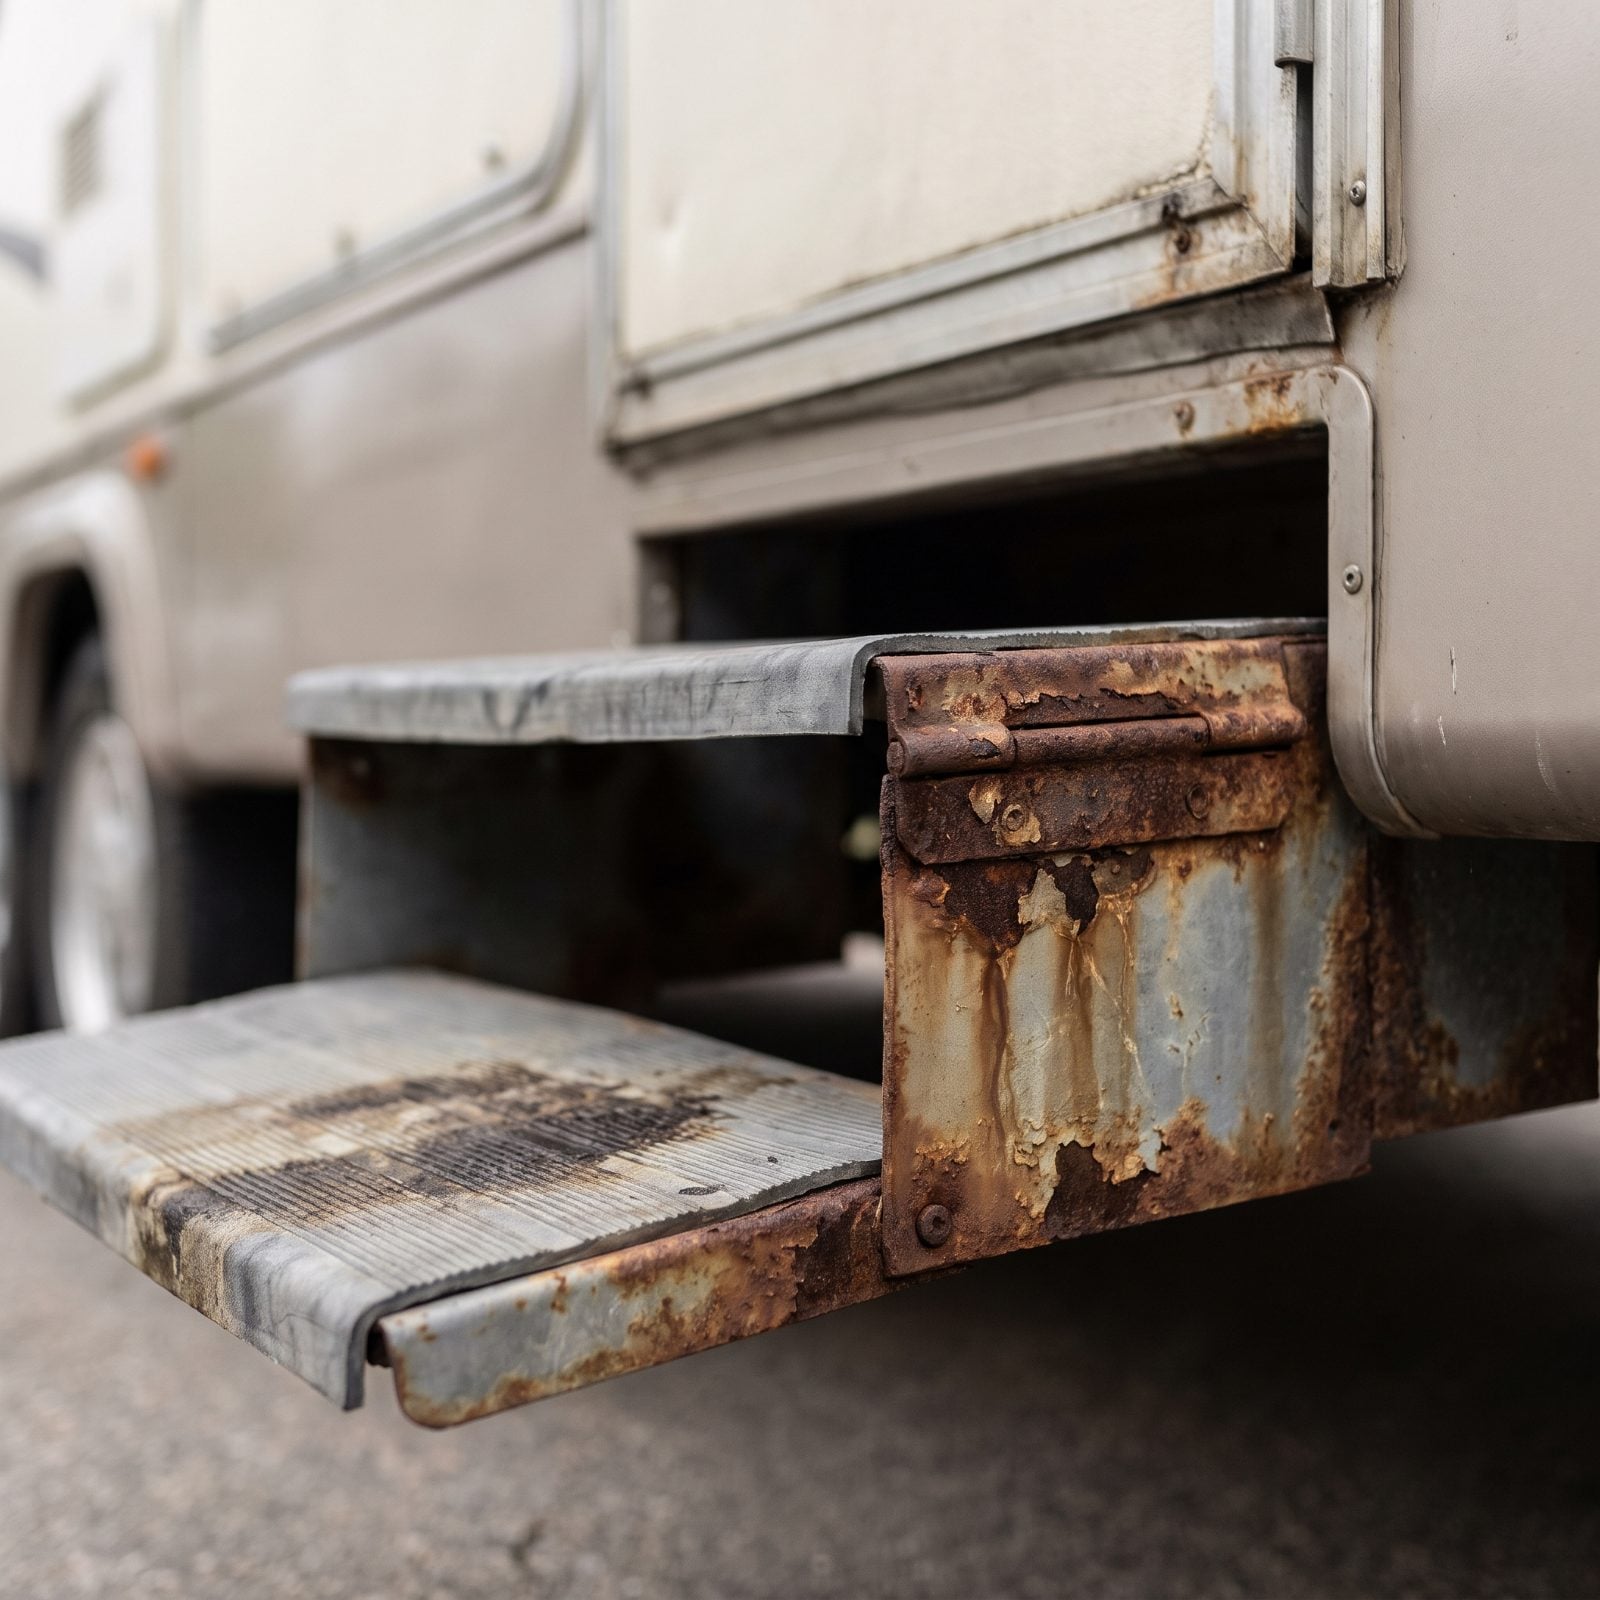
Rust on the step hinges tells you two things at once. The step is on its way out, and water has been pooling where it shouldn’t, which means somebody let this corner go for a long stretch.
A sagging or binding step is more than an annoyance. It’s the one load-bearing thing every single person uses, every single time, often in the dark with their hands full. Seize up the motor or the scissor mechanism and you’re looking at a part that costs real money and a rig you can’t comfortably climb into until it’s fixed.
8. Black Soot Around the Furnace Exhaust
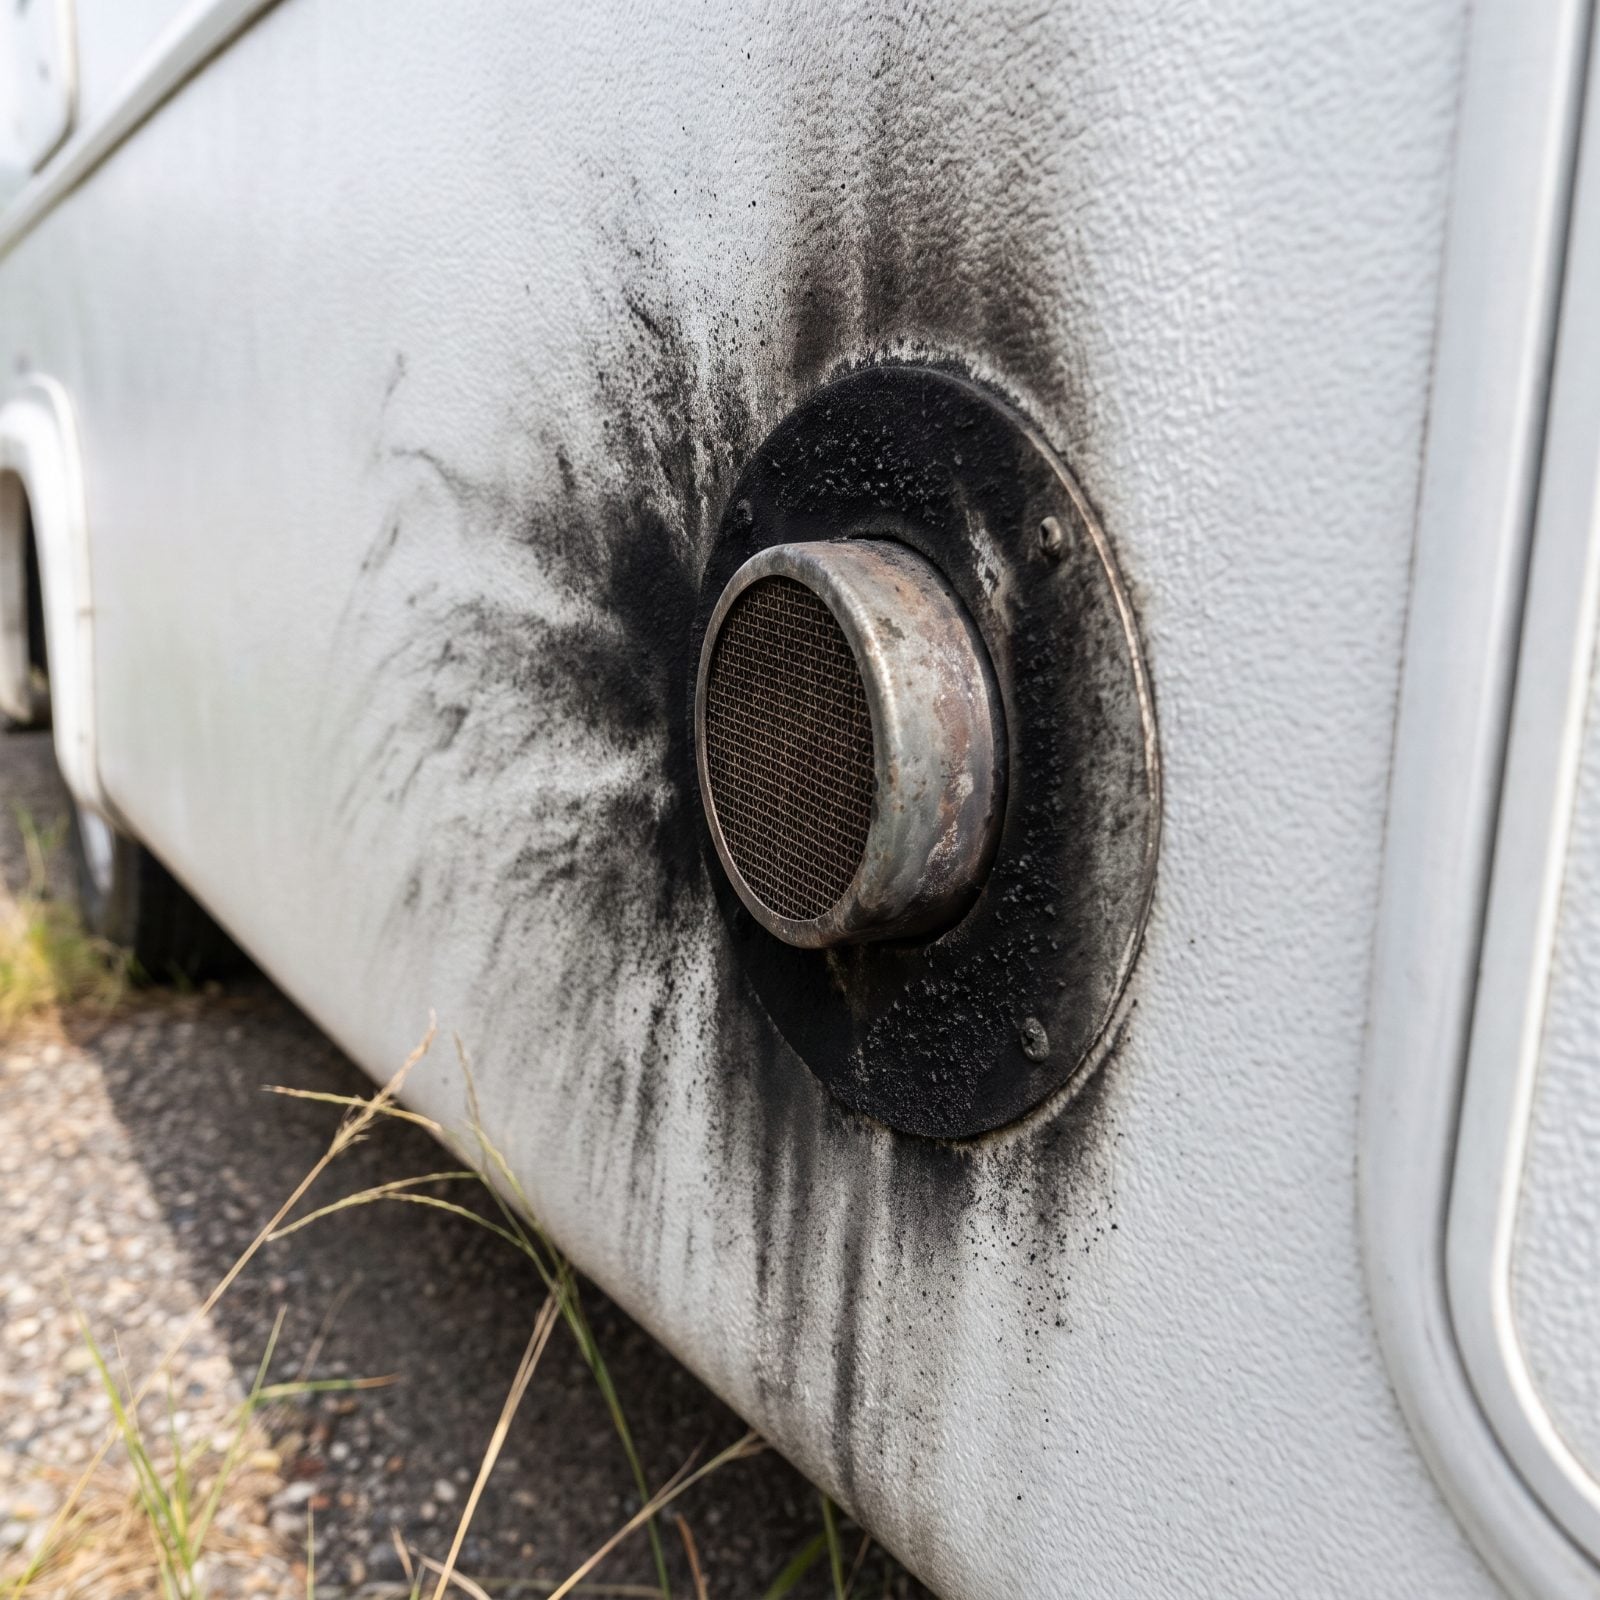
Soot means incomplete combustion, and incomplete combustion is the one thing nobody should shrug off. A clean furnace burns clean. A black starburst splattered out to the side of the exhaust vent? That’s the burner running rich, the exhaust path partly blocked, or something off with the air mix.
I don’t love anything that leaves a carbon signature on the side of a camper you plan to sleep in. Soot on the outside raises a fair question about what’s happening inside. Get a professional look before the next cold night. No exceptions on this one.
7. Corrosion or Mineral Deposits at the Water Heater
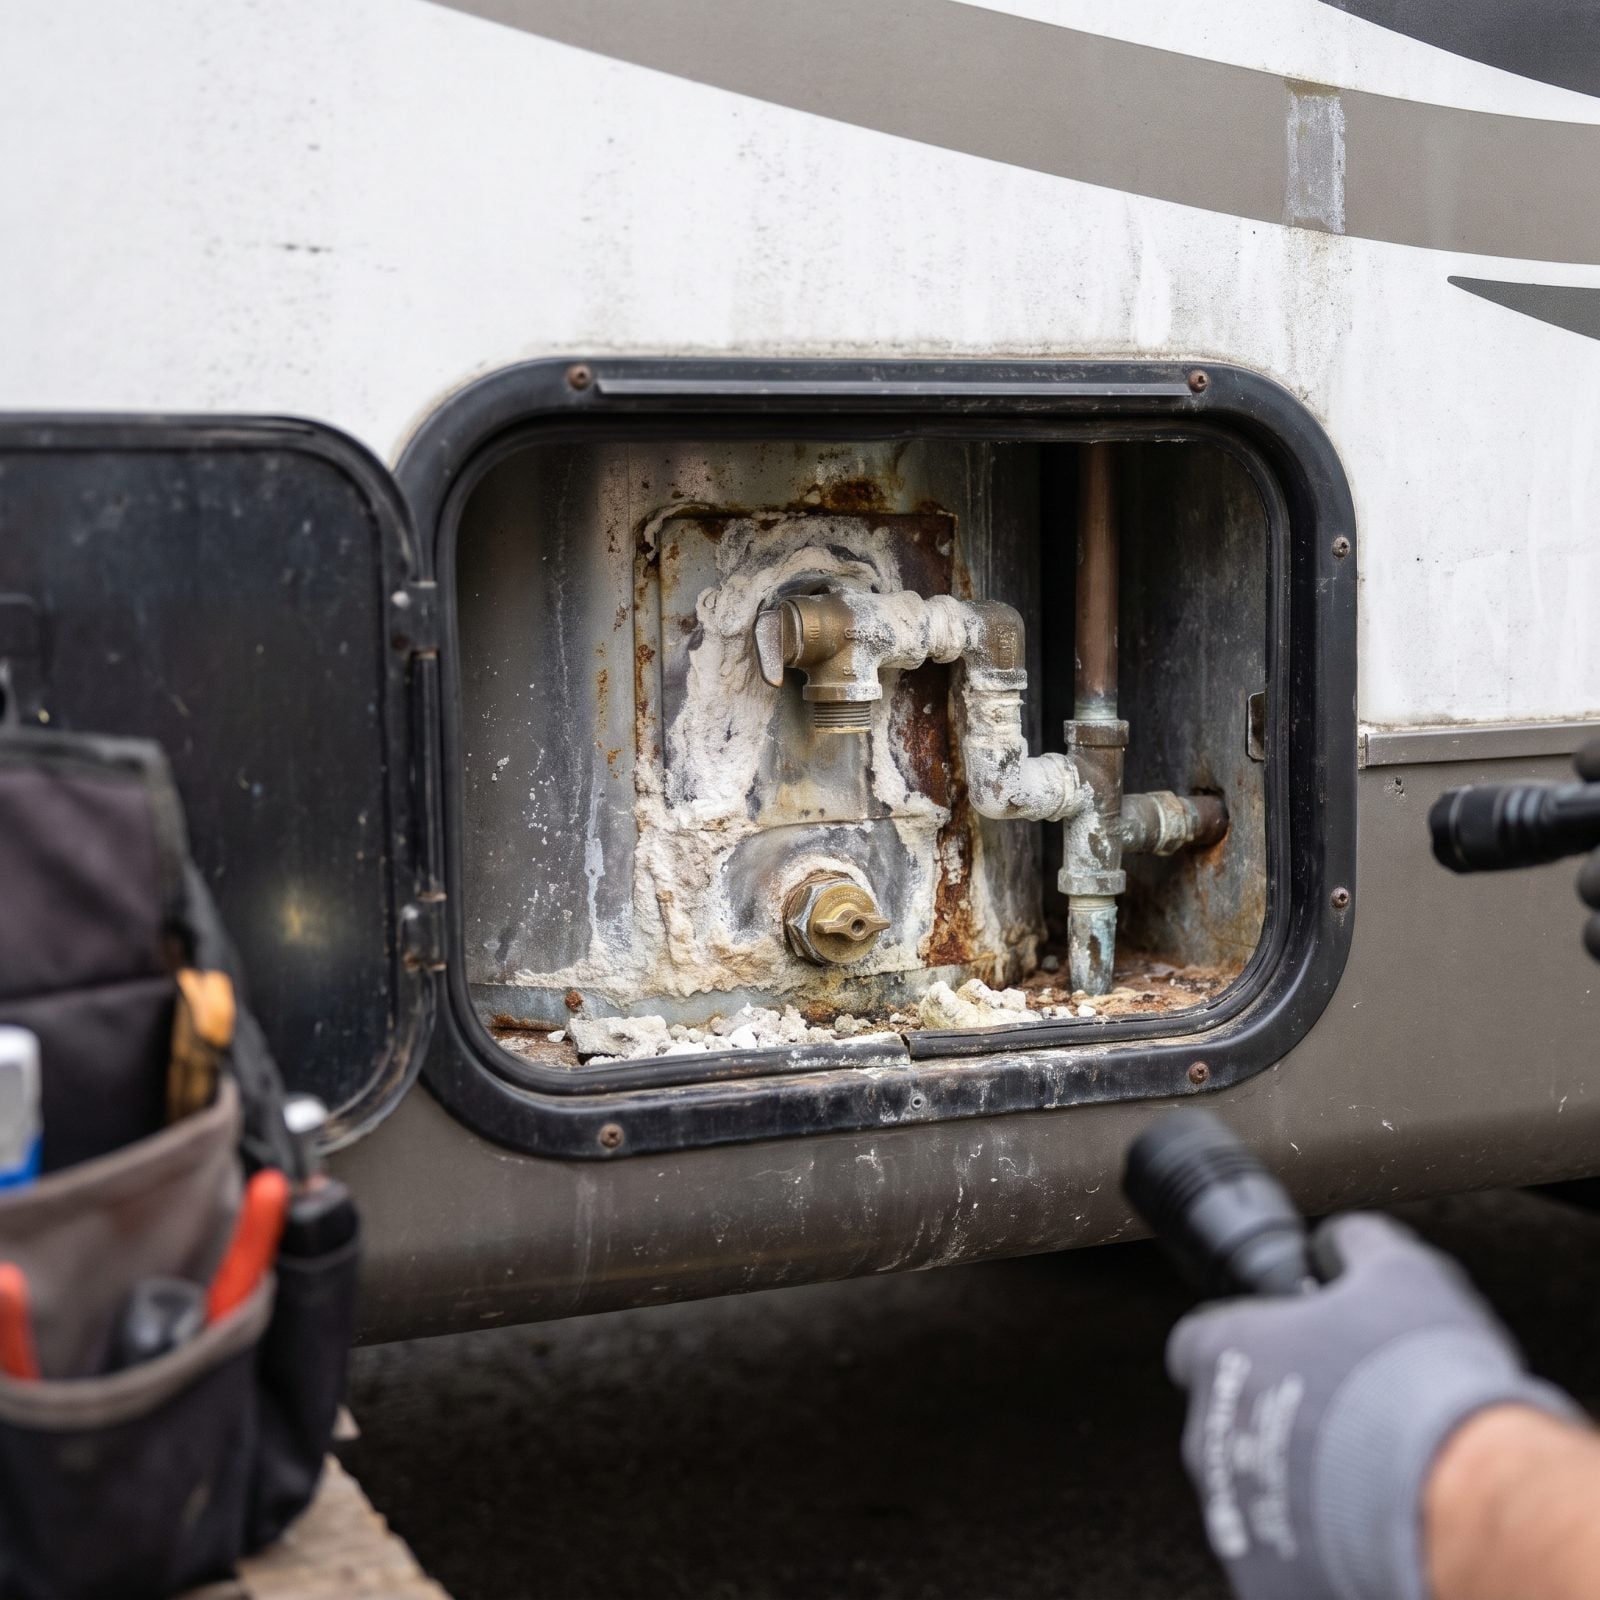
Open the access door and the drain plug tells the story. White chalky crust is hard water doing its slow work, and blue-green fuzz on brass is corrosion quietly eating the fittings.
Here’s what people miss. Mineral scale isn’t just ugly, it insulates the tank and makes the heater work harder for less hot water. A weeping relief valve crusted with deposits? That usually means it’s been leaking long enough to matter.
6. Leaking Waste Valves or a Stained Sewer Outlet
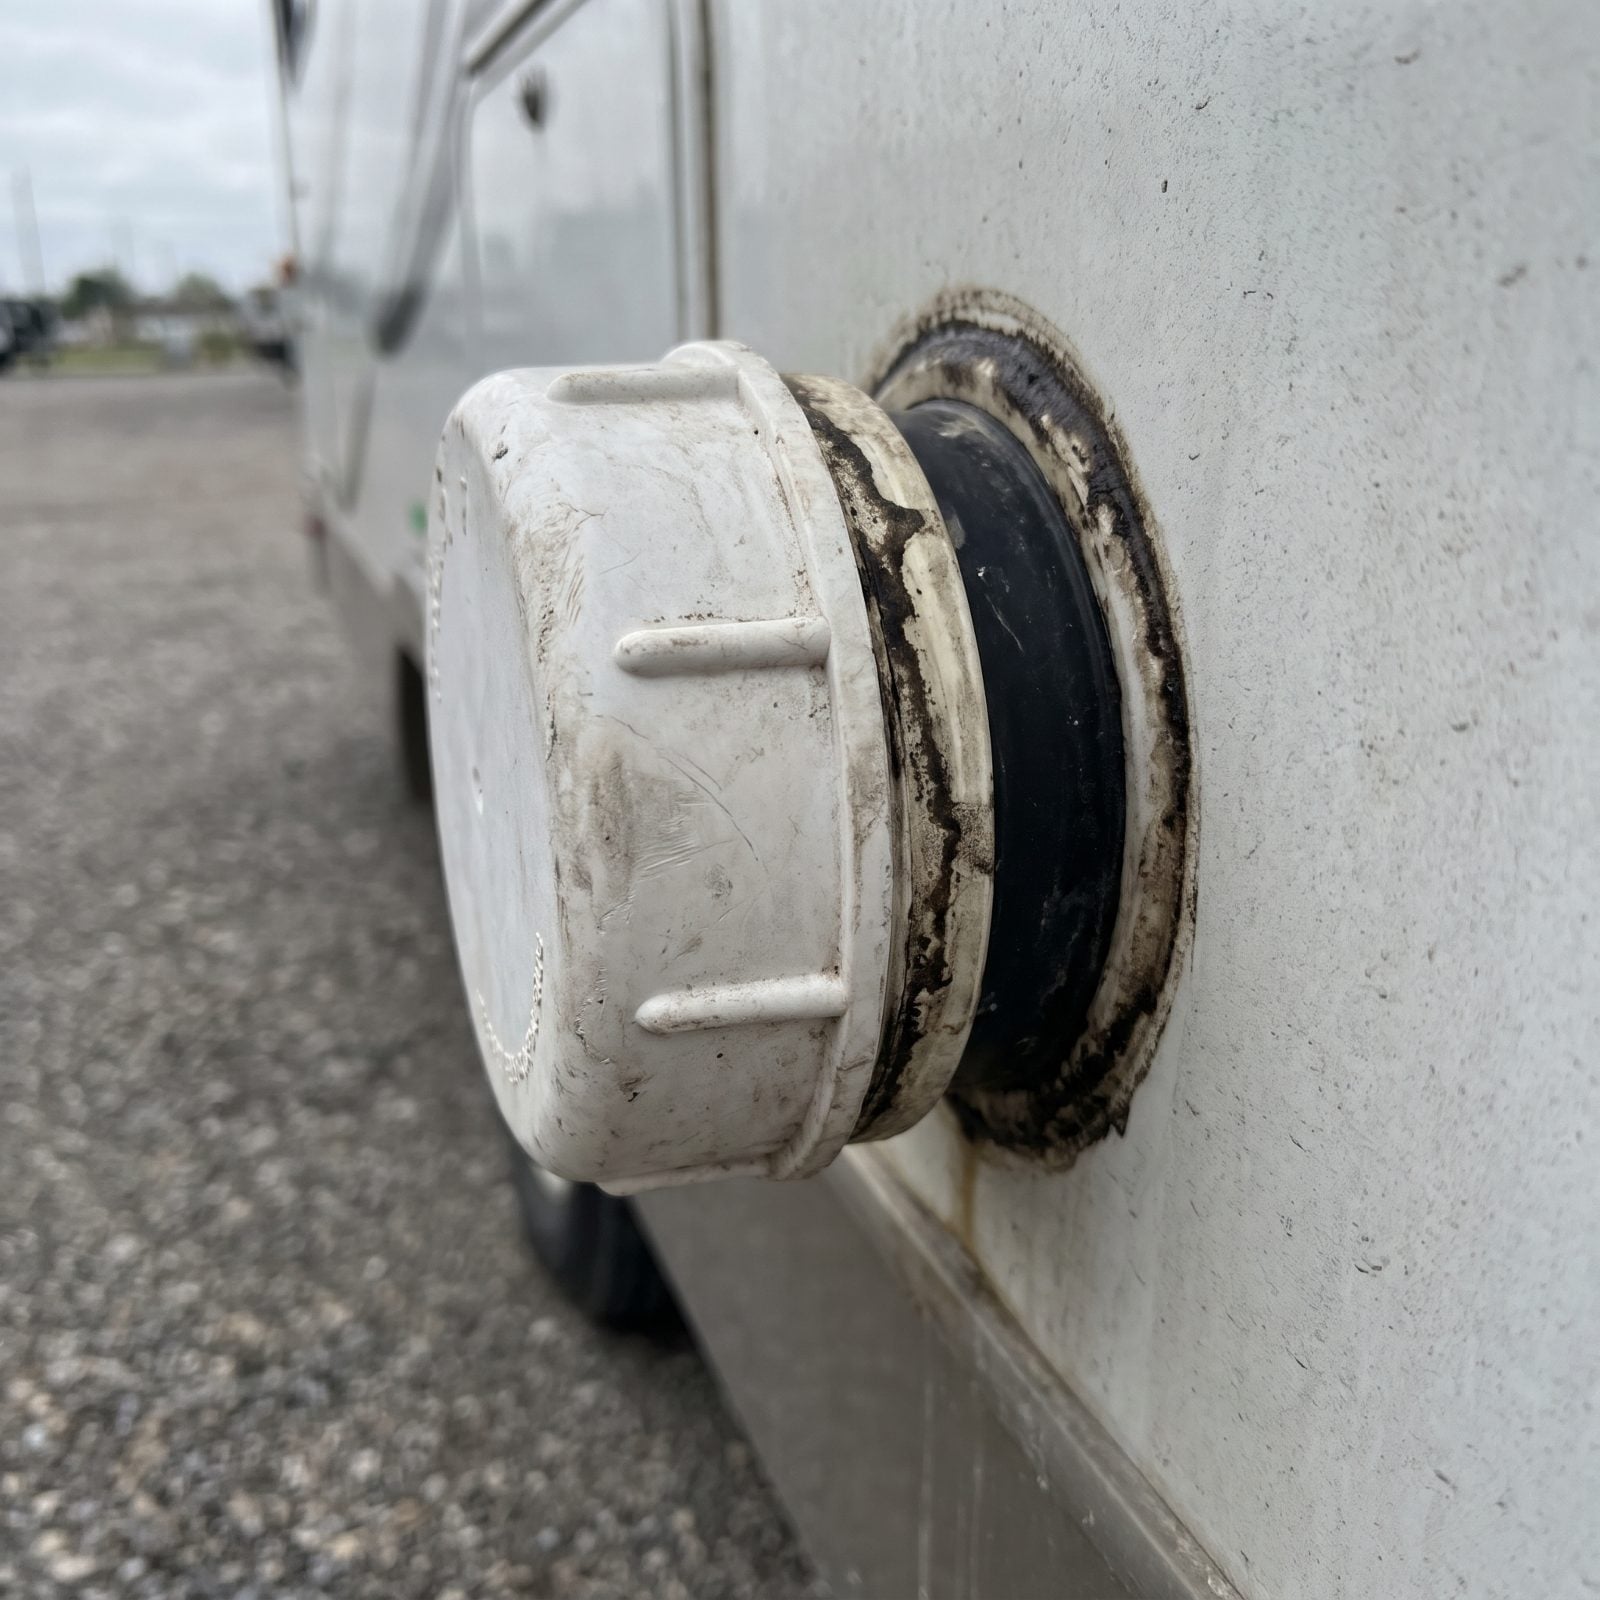
Staining around the sewer outlet is the clue nobody wants to look at, which is exactly why inspectors do. A valve that seeps leaves a telltale ring and a slow drip trail down the pipe.
A leaking gate valve means waste can escape while you’re driving or while the rig sits in storage. The seals themselves are cheap. The cleanup, the smell, and the horror show at a packed dump station are not.
5. A Cracked or Sun-Brittle Air-Conditioner Shroud
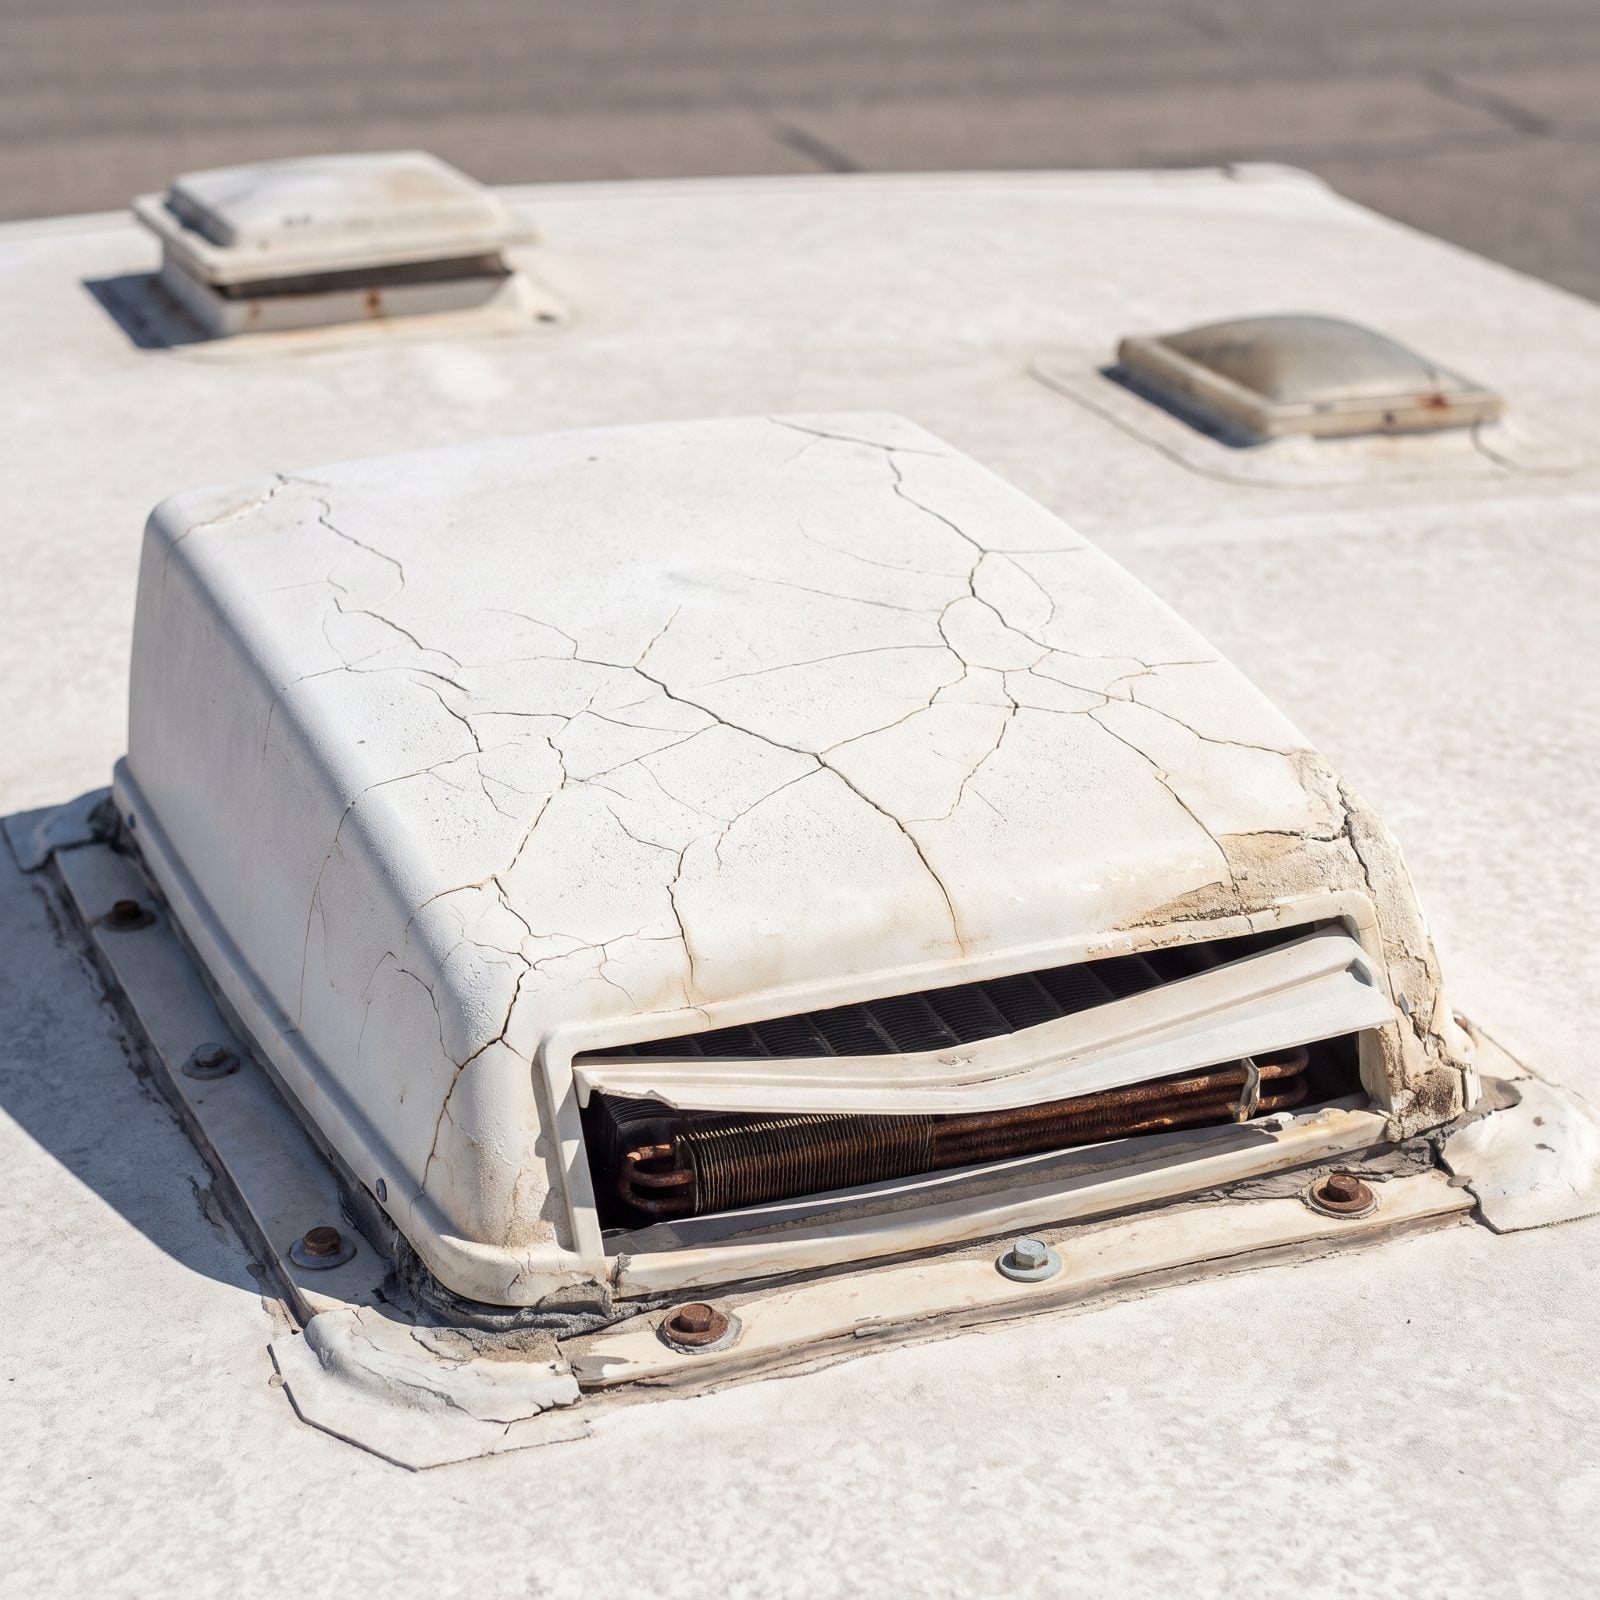
That shroud looks like a cosmetic part. It isn’t. Once UV turns it chalky and brittle it cracks, and a cracked shroud lets rain and debris straight into the coils and the electrical.
The giveaway is how it crumbles. Sun-baked material flakes and crumbles along thick, layered crack edges instead of holding together, and a broken corner usually means the whole cover is one highway gust from flying off down the interstate behind you.
4. Roof Membrane That Has Bubbled or Pulled Loose
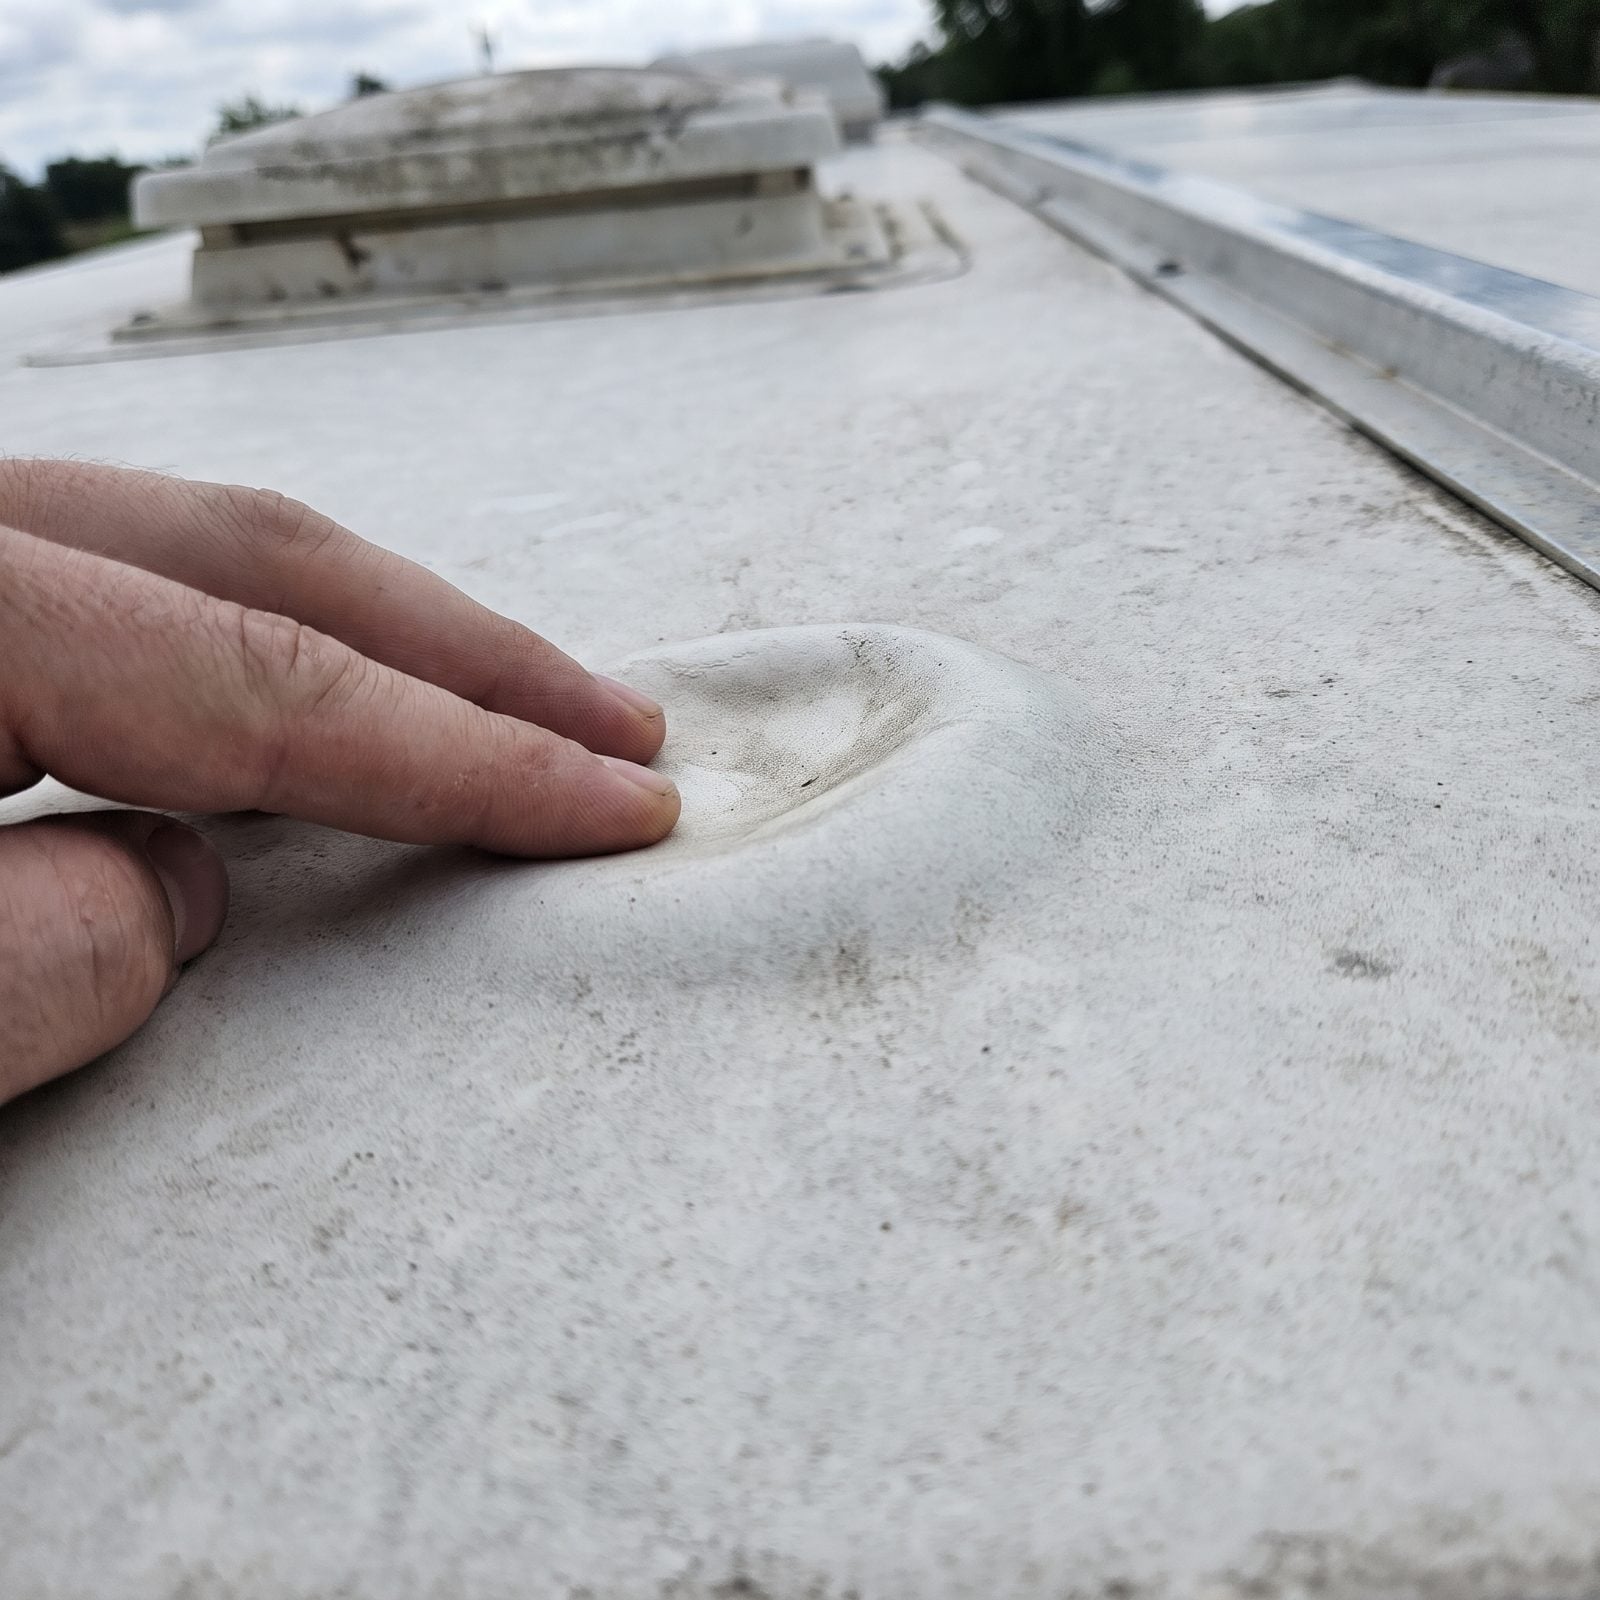
Press on a healthy roof and it feels solid, backed by decking. Press on a bubble and your hand sinks into air. That pocket means the membrane has let go of the plywood below, and water is almost always the culprit.
A pulled-loose edge is worse than it looks. Wind gets under the lifted flap at highway speed and peels it like a sticker. Reroofing a trailer is one of the most expensive jobs on this whole list, so a lifting membrane is a number you want to know before you buy or before storage, not after.
3. Failing Sealant Around Roof Vents and Skylights
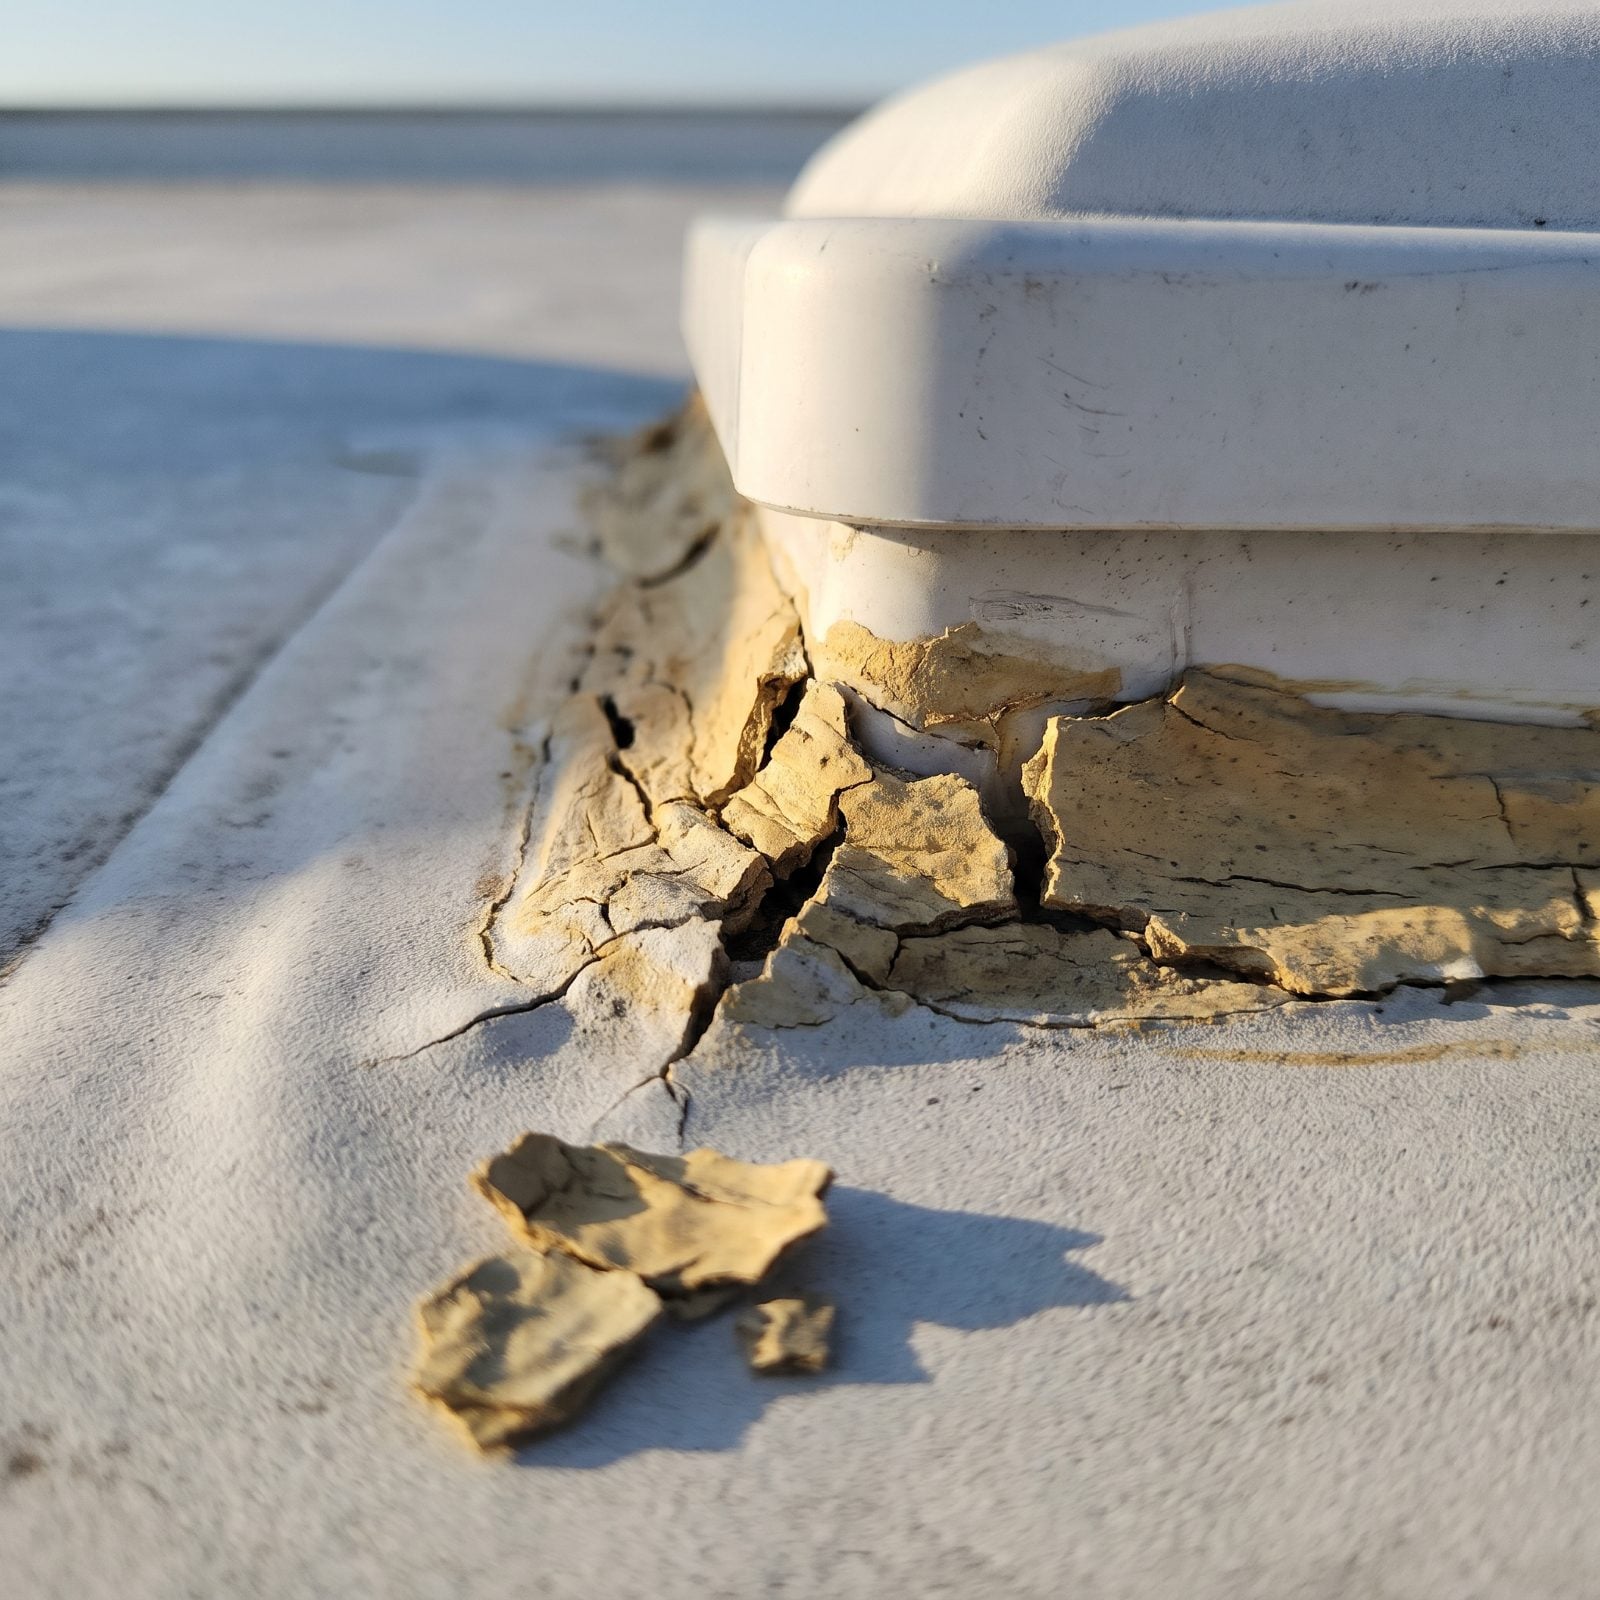
Every hole in the roof is sealed with a bead of lap caulk, and every bead has a shelf life. When it yellows, shrinks, and cracks away from the flange, water follows the easiest path down into the ceiling.
Inspectors check the corners of vents and the base of skylight domes because that’s where the bead quits first. A crazed, foggy skylight that’s gone brittle tends to split right when a hailstorm rolls in. Resealing is maintenance you can budget for. A soft ceiling and delaminated roof panels are not.
Explaining why failed lap sealant causes most roof leaks, a certified RV inspector says “Air conditioners, vent fans, skylights, antennas, refrigerator vents, and the front and rear cap transitions are all sealed with a bead of sealant that dries out, cracks, chalks, or pulls away from the edge over time.”
2. Unsealed Holes and DIY Wiring Through the Body
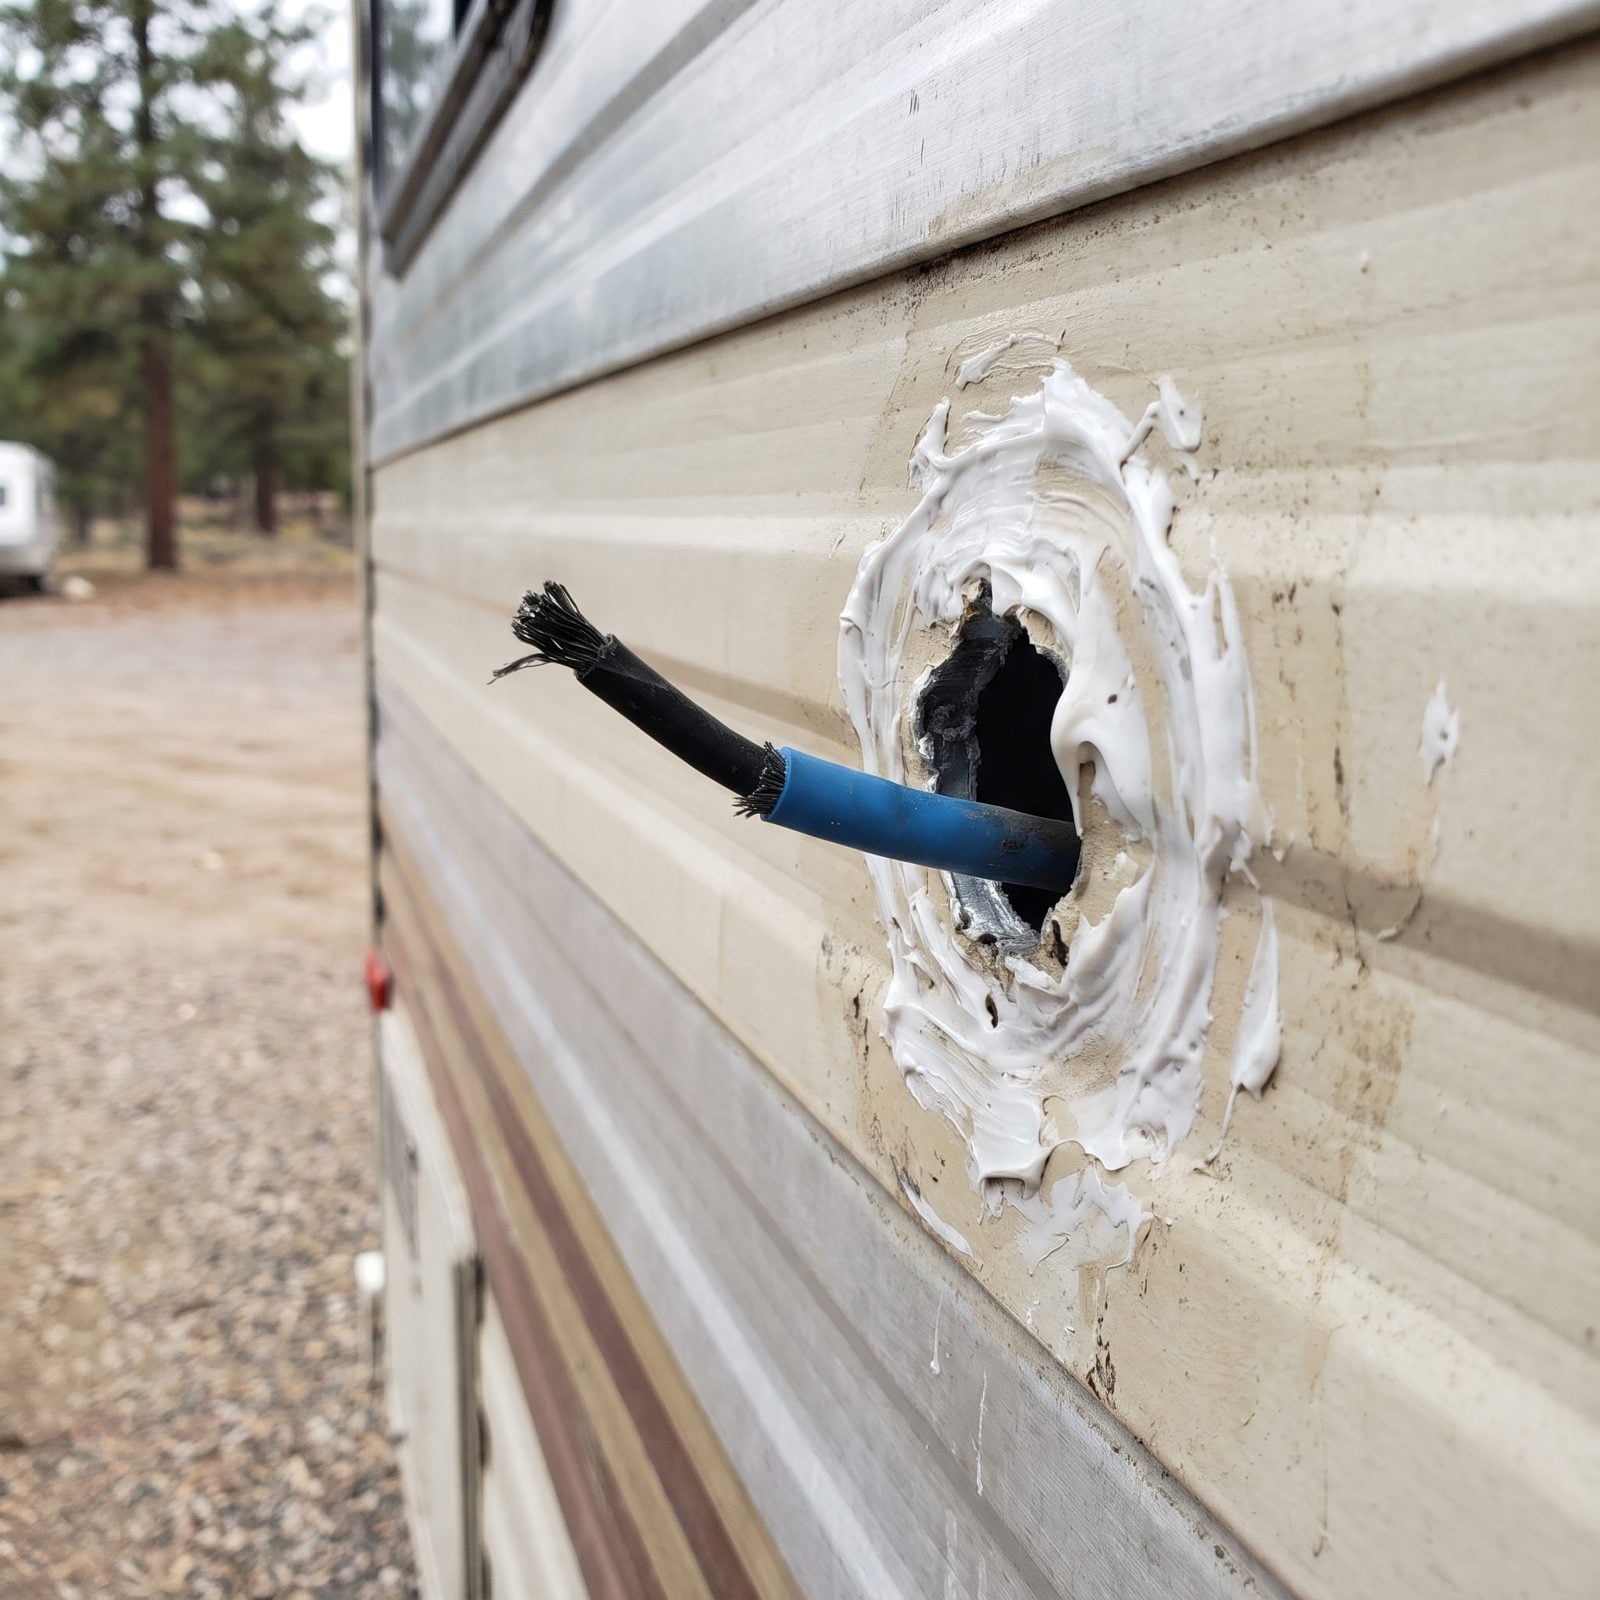
A drilled hole with a wire through it and a smear of caulk is a red flag you can read from ten feet away. It tells you a previous owner did their own electrical work, and the quality of that caulk job tells you how careful they were everywhere else.
Two problems live here. The hole leaks if it isn’t properly sealed, and the wiring behind it may be ungrounded, undersized, or spliced in a way that invites a fire. I’ve learned to read sloppy outside work as a trailer for whatever horror is hiding in the walls.
1. Evidence of Rodents Around Vents and Underbelly Openings
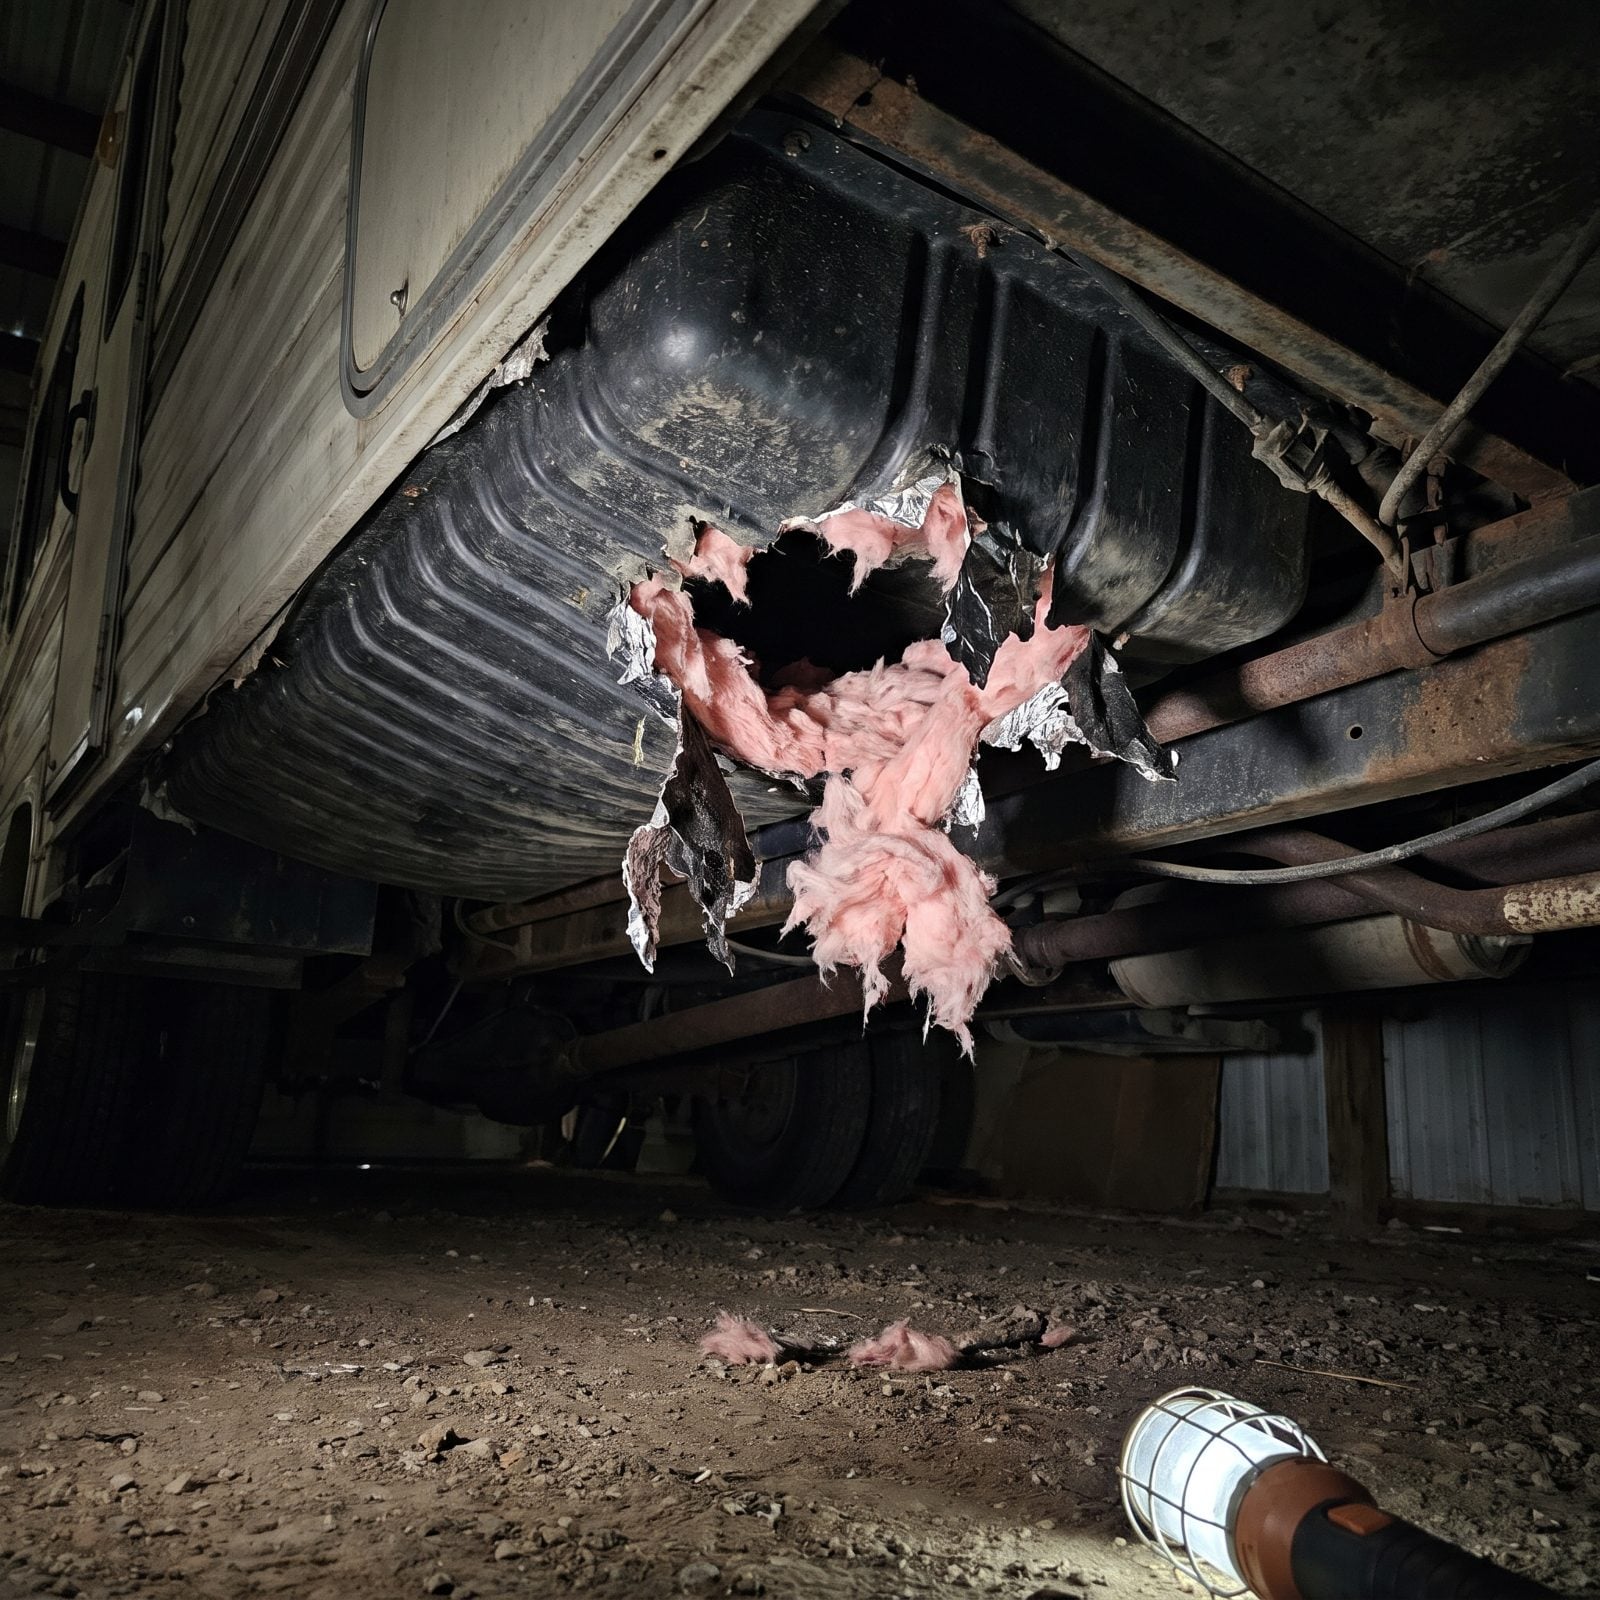
A chewed hole in the belly pan with pink insulation hanging out is the calling card of a tenant you never invited. Mice find the smallest gaps around vents, hoses, and wiring, and once inside they get comfortable fast.
Here’s why inspectors care so much. Rodents don’t just nest. They chew wiring insulation and propane lines, and a few droppings on the frame rail usually mean there’s a nest and a gnawed harness somewhere in the dark you can’t reach. Spot the evidence outside and you’ve got your cue to check every pass-through before it turns into an electrical fault or, worse, a gas leak.